
I was once exposed to a kitchen where food temperatures are being monitored to ensure that foods are properly cooked and has met the desired temperature before serving it to the customers. One way of doing this is by inserting a thermometer probe directly to the food for a given amount of time. Another is by soaking the thermometer probe in a pan of oil used for deep frying.
If you are implementing and maintaining Quality related to Temperature, whether in a Food Industr
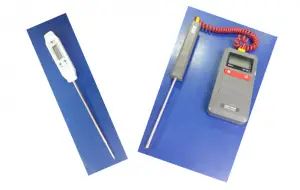
In a Food Thermometer (Lavatools Javelin), a probe is inserted on a meat to check the temperatures or a digital thermometer with a probe soak in a tank or liquid bath for a defined time in order to monitor temperature changes. Based on this temperature, one can determine the condition of their processes.
Why Calibrate a Digital Thermometer?
In order to have a reliable thermometer, a thermometer probe calibration is advised to determine and verify its accuracy and to know whether an adjustment, repair or replacement is needed. Usually, all electronic measuring devices suffer what we call a drift where accuracy is affected as time passes by and also its exposure to different environmental conditions. This drift can only be detected through calibration. One method of verification is presented below using a Metrology Well.
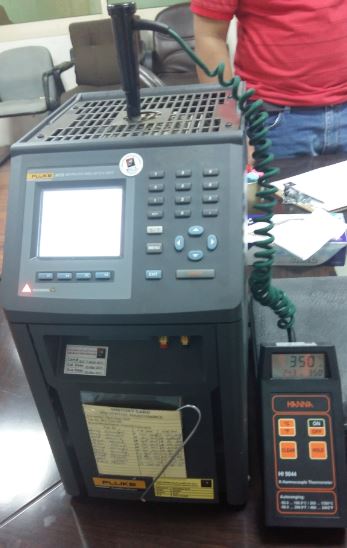
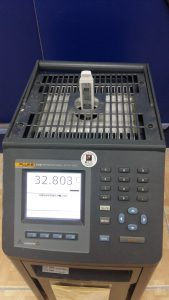
Metrology Well ( Field Metrology Dry-Well ) is designed to simulate the necessary temperature (an example is from -45 to 700) where a probe is inserted in the middle (the holes or metal insert). It is like probing a meat or soaking to a liquid bath but a standard source of heat is being created in which it is read by the thermometer display. The temperature generated from the Metrology Well is then compared to the reading of the digital thermometer display.
How to Calibrate a Digital Thermometer?
Here is a calibration procedure for a thermometer with probe long enough to be inserted on a metrology well or temperature bath (a dry bath). This procedure is also applicable for an analog thermometer with probe.
Objective:
To define verification procedure on digital thermometers with probe using a Metrology Well as the reference standard.
Calibration Method:
This is accomplished by comparing the temperatures generated from Fluke Metrology Well, which is the reference standard. The Probe is inserted on the Metrology Well where the Unit Under Calibration(UUC), the thermometer is being compared to.
Requirements:
- Warm-up time (UUC): At least 1 hour for proper stabilization
- Temperature: 23 +/- 5 deg C
- Humidity: 50 +/- 30%
- Perform 3 trials for each range or test points
- Measurement Data Sheet (MDS)
Reference Standard and Equipment:
- Fluke Field Metrology Dry-Well
- Extech RH520A Humidity and Temperature Chart Recorder with RS-232 Computer Interface
- Holder
- Cleaning materials
Calibration Procedure:
- Observe proper care and safety, Metrology Well generate a high temperature which can cause burn and damage.
- Check the thermometer for any visual defects that can affect its accuracy. Discontinue calibration if any defect is noted.
- Clean the thermometer with a soft cloth and check if digital thermometer has good batteries. Replace low powered batteries.
- Prepare the measurement data sheet (MDS) and record all necessary details or information ( Brand, Model, serial #, etc).
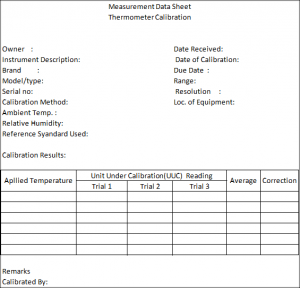
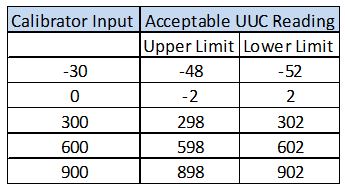
Sample Measurement Data Sheet to record measured values - Determine the range of the thermometer (an example is from -30 to 700 deg Celsius), choose at least 5 test point.
- Turn on the Well and set to the desired temperature, starting from low to high temperature, once the temperature of the Metrology well has stabilized, carefully insert the probe on the holes in the well. There are different sizes of holes so choose the one that fits properly to ensure maximum heat absorption and accuracy. Use the holder if necessary.
- Wait for the display to stabilize ( approximately 15 min) then get the reading. Record readings on the MDS.
- Continue steps 4 to 7 until all ranges are finished.
- Check readings if within the accuracy defined by the manufacturer, for example, accuracy = +/-2 of reading. See below table.
- If the readings are already within limits update the corresponding record, do labeling and sealing and issue to the owner, otherwise, do necessary repair or adjustment.
- End of Verification
Please click this link for a list of digital thermometers.
Check Fluke Metrology Well in AMAZON, click this link: Fluke Field Metrology Dry-Well
Thank you for visiting my site. please leave a comment and subscribe
Edwin
4 Responses
AbdulRahman VO. Sheriff
The post was very useful and wish to make use if your site as a reference to my research activities. Thank you.
edsponce
Dear AbdulRahman,
Thank you for reading my post. I am glad it was useful to you. Please feel free to use my site for your research and comment on any related concerns you have.
I appreciate it if you give credit to my site after your research.
Best regards,
Edwin
antonio semakalu
This is a nice page! very good information
I wish u can also add for us the uncertainty budget procedure for this calibration
edsponce
Hi Antonio,
I will update this post and consider your feedback. But for now, below are the contributors that you can include with your uncertainty budget when using a dry block:
1. repeatability
2. resolution of UUT
3. resolution of standard
4. uncertainty of standard
5. stability of standard
6. axial inhomogeneity
7. radial inhomogeneity
I hope this helps, thanks for visiting my site.
Edwin