Have you encountered the following scenario?
You are interpreting a calibration certificate but you noticed that the correction factor you need is not exactly displayed or provided in the report, what can you do?
The measurement data of your instrument based on the calibration results have errors. There are chances that specific measuring instruments cannot be adjusted. It is either not included in the design or simply not adjustable physically or automatically. Again, what can you do?
The question above can be answered by using a technique wherein we can adjust a measured value by simply determining what we call a “correction factor”.
One of the important skills for a calibration technician to have is to learn how to use the correction factor in a calibration certificate.
This method is important when reviewing or interpreting a calibration certificate. A simple technique that we must learn to improve our measurement results and in effect improve our process.
In this post, I will share with you the following:
- What is a Correction Factor in Calibration?
- Important Use of a Correction Factor in Measurements
- 4 ways to Apply Correction Factors In a Calibration Certificate
- Applying the “Correction” value directly
- Using the Nearest Reported Correction Value in the Certificate
- Averaging Between 2 Correction Factors
- Linear Interpolation to Determine Any Value Between 2 points
- Example of How to Apply the Correction Factor
First of all, let us define the meaning of a Correction Factor.
What is a Correction Factor in Calibration?
Definition of a Correction Based on VIM 2.53,
Correction – compensation for an estimated systematic effect
Correction Factor (CF) is a value that we either add or subtract to compensate for the error from a systematic effect. This correction factor is based on “Correction” from a calibration result calculated using the equation:

.
From the statement that “ No measurement is perfect“, the correction factor is also just an estimate even though we see it as an exact value of the compensated error (systematic error).
There are other ways to compensate for an error but this is the simplest when it comes to the reported results in a calibration certificate.
Correction Factor is sometimes known as “corrective factor” and “calibration correction“
Why do we need to calculate the correction factor?
“You cannot perform adjustment if you do not know the corrections you need to apply”
One very important reason we perform calibration is to determine the error and at the same time, the corrections to correct the error afterward.
Errors can only be detected by performing calibrations. But once an error is detected, we should do something about it. It is either we adjust (using the provided zero and span error adjustment) or perform a correction factor if we cannot adjust it.
If there is a ‘correction factor and you do not know how to apply it, then you did not fully use the actual application of calibration, therefore calibration results become useless in our process application.
If you want the best results from a calibration result, then you need to learn the technique of determining the proper correction factor.
This is one reason we need to review the calibration or measurement results from a calibration certificate– to determine if we need a correction before we can use the value from the calibration result.
Another reason why we need to calculate or use a correction factor is to ensure that we meet the specified requirements of our calibrated reference standards or reference materials. We need to ensure that we use an updated correction factor every time a recalibration or new calibration takes place. This is a requirement under clause 6.4.11 of ISO 17025:2017 which states that “When calibration and reference material data include reference values or correction factors, the laboratory shall ensure the reference values and correction factors are updated and implemented, as appropriate, to meet specified requirements.”
Important Use of a Correction Factor in Measurements
Correction Factors compensate for the error that we encounter during calibration. The following are some of the important reasons why we need to use the Correction Factor, these are:
- To make a measurement closer to the true value.
- To adjust a measurement value that cannot be adjusted physically or by any software
- To return equipment performance to a tolerable result or to a more accurate condition closer to the standard value
- To reduce the effect of a systematic error.
What are these Systematic Errors that we need to correct?
Systematic errors are the errors that are known or unknown to us, known errors can be corrected or compensated. It is a consistent deviation in measurement. These systematic errors are from:
- Measurement procedure -Positioning or setup and execution of methods during calibration
- Effect of environmental conditions– Instruments operating in harsh or variable environments may experience systematic errors due to external factors such as electromagnetic interference, humidity, or pressure.
- Personal error due to habits or improper training of the observer
- Errors directly from instruments or the ‘Bias’– uncorrected errors from calibration standards can introduce systematic errors. Regular verification and recalibration of standards can help address this issue.
- Instrument error from improper calibration
- Zero Error – occurs when the instrument’s reading is not zero when the input or measurement signal is zero.
In every correction that we perform, remember that this is not also perfect, measurement uncertainty still exists, therefore, measurement uncertainty should still be considered.
4 Ways to Apply Correction Factors (CF) In a Calibration Certificate
Below are the techniques used on how to calculate correction factors in a calibration result that you can use.
- Direct application using the Correction value
- Using the Nearest Reported Correction Value in the Certificate
- Averaging Between 2 Correction Factors
- Using Linear Interpolation to Determine Any Value Between 2 Points
There are other methods and correction factor formulas out there but these 4 are the simplest and the only method I use as per my experience.
1. Direct Application using the “Correction” Value
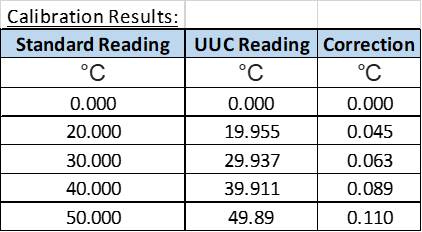
The Correction Factor formula for calibration is:
Correction = (True Value) – (Measured Value)
Correction = Correction Factor (CF)
CF = – Error
Example above @20 °C range:
Correction = 20.000 – 19.955 = 0.045 °C
CF = 0.045 °C
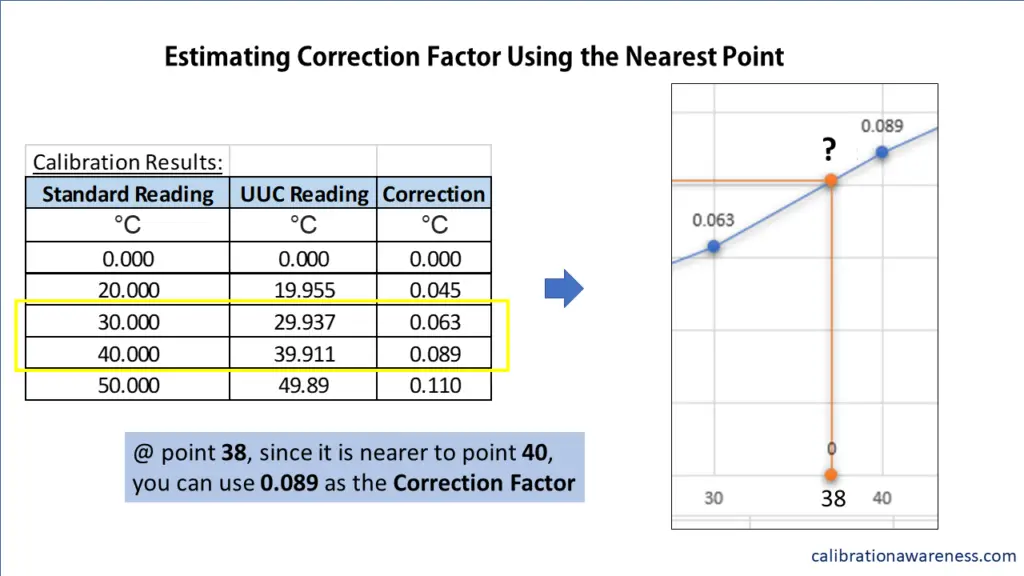
2. Using the Nearest Reported Correction Value in the Certificate
This is the technique that I can say is based on common sense to determine the correction factor.
You can apply this technique if a small difference does not have a significant impact on the results, or it is negligible because of a wide tolerance limit or the effect of resolution (low-resolution instrument), then this is a quick way to determine and estimate the correction factor.
If the measured value you need is not in the middle but very close to either the upper or lower range, just choose the one where it is closer.
See the below example.
How to Determine the correction factor if the exact value you need is not given? Or, how to adjust the correction factor to have the exact value you need?
To answer these, let us discuss the next 2 techniques, read more below…
3. Averaging Between 2 Correction Factors
If you only need to calculate the value of a correction factor between 2 successive points, you can use the Averaging Method. Just add the 2 successive points then divide it by 2. See the below example using the same data points above:
For example, we need the CF of the value equal to 25
The values that we need are the Correction Factor between 20 and 30 which are equal to
0.045 and 0.063.
Now we can calculate the CF for Standard Reading at 25

CF = [(0.045)+(0.063)]/2
CF= 0.0108/2
CF = 0.054
4. Using Linear Interpolation to Determine Any Value Between 2 Points
If 2 points are given (which are the Max and Min points) with Correction value in an increasing (or decreasing) manner, we can calculate any value in between using Linear Interpolation.
Linear Interpolation is best used when we want to determine the value that lies anywhere in a given range bounded by Max and Min points.
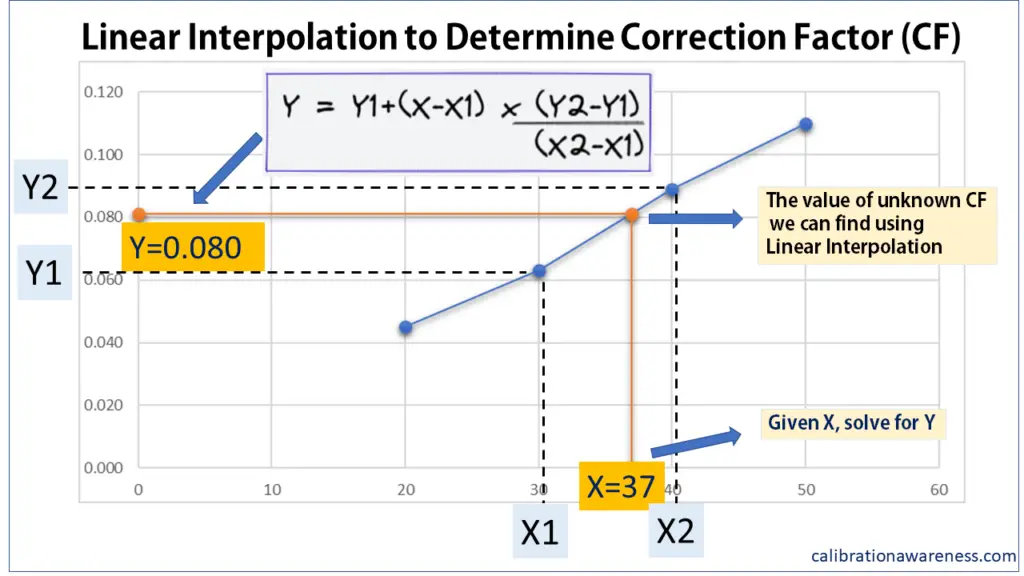
The equation for a linear Interpolation is:
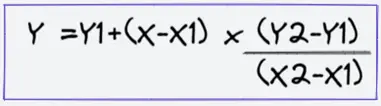
Where:
X1 and X2 are the given Standard Readings
Y1 and Y2 are the equivalent Correction Factors (or correction value)
X =The required standard value where Correction Factor is needed
Y = the calculated Correction Factor based on X
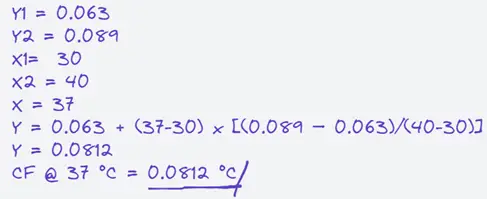
For example, determine the Correction factor @ point 37 in the table below (You can refer to the graph above):
Solution:
Example of How to Apply the Correction Factor
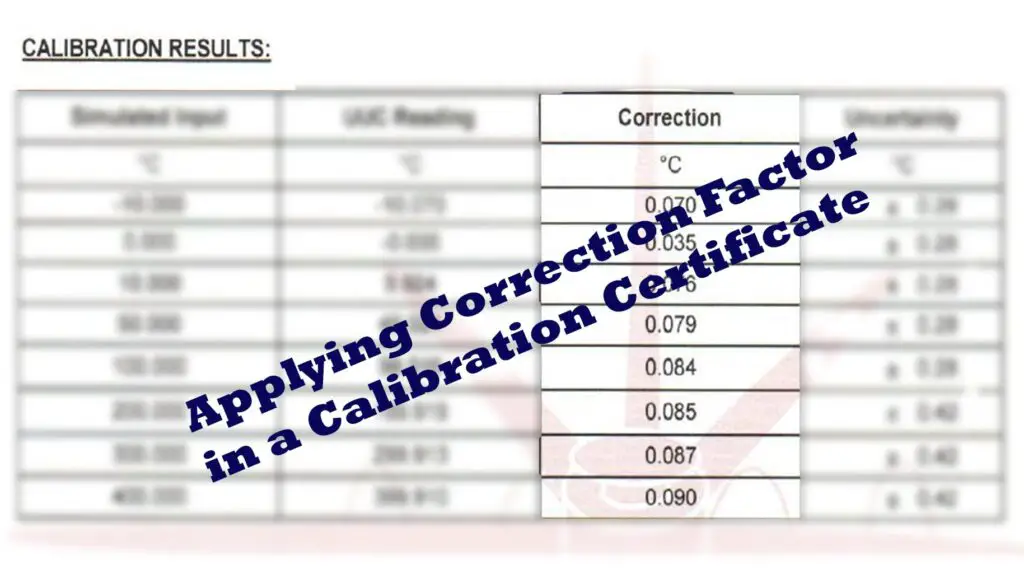
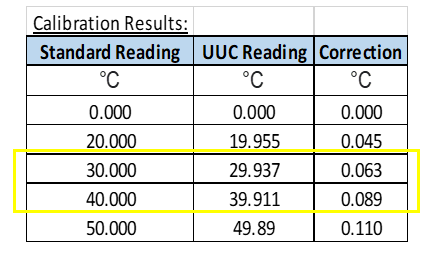
Given below calibration results of a balance: (example only)

During the review of the calibration results, you notice that the balance is not adjusted but a “correction” was provided. See table above.
When you see a result like this, before you use the actual value of the balance, use the correction value, which is now the “correction factor” that will compensate for the error.

The “Final UUC Reading” will become now your final value to be applied during your measurement process.
In this way ERROR is now compensated (ERROR =0), our actual value will now equal to the Standard value, therefore, accuracy was increased.
Remember that the Correction factor is the result during calibration which is used to offset the error and therefore should be subtracted (or added) on the final value of the balance (UUC) results. A correction factor is applied to all instruments that cannot be adjusted, that is why we calculate the correction factor manually.
Conclusion
One of the most important skills when interpreting and using a calibration result is the capability to understand and calculate Correction Factors. One good reason is for us to appreciate more the importance of a calibration result by achieving the most accurate measurements.
Correction Factor helps us achieve more accurate measurement results by simply compensating for the error.
Correction factor is also known as calibration correction and/or corrective factors. The value of correction factors comes from the calculated “correction” which is the opposite of “error”.
In this post, I have shared the following:
- What is a Correction Factor in Calibration?
- Important Use of a Correction Factor in Measurements
- 4 ways to Apply Correction Factors In a Calibration Certificate
- Applying directly the “correction” value
- Using the Nearest Reported Correction Value in the Certificate
- Averaging Between 2 Correction Factors
- Linear Interpolation to Determine Any Value Between 2 points
- Example of How to Apply the Correction Factor
Sometimes, we do not need to use a Correction Factor as long as the errors are very small or negligible and the tolerance limit is very wide, but as a good practice to follow and provide more accurate results, it is better to always implement its use.
Thank you for reading my post. If you like what you read, please share, subscribe and Buy Me A Coffee
Edwin
20 Responses
Jack
Hi Edwin,
This article is great as some other of your articles which I saw/red before.
Thank you that you share this with others
edsponce
Hi Jack,
You are welcome. Appreciate the comment.
Thank you also for reading my posts.
Best regards,
Edwin
Kayanga Muhammed
Hello
Thanks for sharing. It’s really educative.
edsponce
HI Kayanga,
You are welcome, thanks for reading.
Best regards,
Edwin
Upinder
Hi Edwin
This is really a very good and informative article
Thank you so much
edsponce
Hi Upinder,
You’re welcome. I am glad you liked it.
Thanks for reading.
Edwin
Ferenc
Hi Edwin,
Thanks for the new information that we can use well in our calibration lab.
Ferenc
Hungary
edsponce
Hi Ferenc,
It is good to know. You are welcome.
Thanks for reading
Edwin
M. Saleh
Hi Edwin,
This article is very very helpful & useful, thank you Edwin.
edsponce
Dear M. Saleh,
You are welcome, I am glad you liked it.
Best regards,
Edwin
Bito Thomas
Hello Edwin
This is beautiful article about understanding correction factors.
However I have few doubts, i hope you would clear it for me.
Our caliper checker was calibrated at 20.000 mm and the calibration certificate shows the UUC reading as 20.0006 mm
STD – 20.000 mm
UUC reading – 20.0006 mm
Error – 0.0006 mm
Correction – (-)0.0006 mm
Now when we use this caliper checker as a master to calibrate a vernier caliper and issue a calibration certificate, what value should we put as a standad value?
Would it be 20.0006?
Or would it be 20.000 + (-)0.0006 mm = 19.9994 mm (this is the value after correction)
If we put 20.0006, then we are negating the error of our caliper checker at point 20 mm, so would it not be correct to put 20.0006 mm as standard value ? Because if we put 19.9994 mm we are creating more error in the caliper checker.
Or is this not how correction factor be applied when we use our master to calibrate a vernier caliper?
I am kind of confused.
Kindly help
Thomas
edsponce
Hi Bito,
Based on the calibration certificate of your caliper checker, you have a reading of 20.0006 at 20mm nominal range. Therefore, this is now the standard value or reference value you will use when issuing a calibration report.
But if you need to use the exact 20.0000 value, you can use the -0.0006 as the correction factor, considering that you will also use it on the UUC side. See below examples:
Example 1: use STD value as it is
STD reading = 20.0006
UUC reading (Vernier) = 20.001
Error = UUC-STD = 0.0004
Example 2: use the correction factor of -0.0006 from the calibration certificate of the STD . but make sure to use it also on the UUC result.
STD reading = 20.0006 – 0.0006 = 20.0000
UUC Reading = 20.001 -0.0006 = 20.0004, approximately equal to 20.000 based on UUC resolution
Error =UUC-STD= 0.0004
When issuing example 2 results in a calibration certificate, no need to display the use of the correction factor. But make sure the calculation is present in the worksheet.
I hope this helps.
Thanks for visiting my site
Edwin
Jaffer
Dear Edwin,
Why should we apply this correction value in UUC also? So the error will remain same.
The correction factor is related to standard equipment. So, we may minus or plus that value in standard reading to know the actual standard reading. But why at UUC?
edsponce
Hi Jaffer,
We apply correction factor in the UUC in order to attain more accurate results since we already know the error by comparing it to the Standard Value-our reference. In the calibration certificate, you will see the UUC reading and Standard Reading, their difference is the error, in order for the UUC to be accurate, it should be closer or the same with the Standard Value.
In case the results are not acceptable, we perform adjustment so that we can offset the error and make the UUC reading more accurate (accurate means it is almost the same or closer to the value of the Standard). We can make the UUC results more accurate by removing the error through adjustment. But not all UUC can be adjusted, in this case we manually calculate the correction factor and use it to offset the error.
I hope this makes sense.
Thanks for reading my post.
Best regards,
Edwin
therese
hi sir, is there a difference if I use the UUC reading for interpolation instead of standard reading. Thank you and hoping for your immediate response
edsponce
Hi Therese,
Yes, there is a difference and it depends on how exact is the input value for the UUC. But if your tolerance limit is large, the difference may be negligible.
thanks for visiting my site.
Edwin
HALA
HOW TO KNOW THE TOLERANCE LIMIT SO ACCORDINGLY I WILL DECIDE I WILL DO A CORRECTION FACTOR FOR EACH READING OR NOT
edsponce
Hi Hala,
You need to check the manufacturer specs or manual of your instrument for the tolerance limit. usually it is presented as accuracy.
I hope this helps.
Edwin
JMar
Hi
what if correction is in multiple position like oven, can we average the corrections?
edsponce
Hi JMar,
Yes you can.
Thanks for visiting my site.
Edwin