
Have you ever wondered why we need to use a calibrated thermometer to monitor food temperatures regularly or at a set time?
During my shift in one of the restaurants I worked at, we monitored the temperature of the chilled foods daily every 4 hours, consistently recording their temperature in a specific form. With this, we also ensured that the thermometer we used was calibrated.
I have the privilege to attend training about food safety management and am excited to share with you what I have learned and experienced.
Food safety Management has a lot of processes to cover. But in this article, I will focus only on the part where measurement is applied and includes the calibration of measuring instruments specifically Food Thermometers.
Furthermore, I will share with you the following:
1. What is food safety?
a. Food safety temperature danger zone/food safety danger zone
2. The Food Thermometers for Food Safety Monitoring
a. Analog Food thermometer
b. Digital Food Thermometers
c. Non-contact food thermometer also known as Infrared Thermometer or IR thermometer
d. How to use food thermometers
3. Why do we need calibration in the food Industry?
4. Calibration and Verification of Food Thermometers for Food Safety
a. What does ‘calibrated’ mean
b. Three ways to perform food thermometer calibration
1. calibration using an Ice Bath
2. calibration using a calibrated thermometer
3. calibration using metrology well
c. How to perform verification of food thermometer
.
What is Food Safety?
As per ISO 22000:2018, the Food Safety Management System, food safety is defined as the assurance that food will not cause an adverse health effect for the consumer when it is prepared and consumed by its intended use.
To ensure that food is safe when it is prepared or consumed to have a system that we need to follow. This system is the HACCP (Hazzard Analysis and Critical Control Point), it is a system and a tool used to identify significant hazards within the flow of operations to manage food safety.
In summary: below are the 7 HACCP principles:
- Conduct hazard analysis.
- Determine the critical control points.
- Establish the critical limits
- Establish monitoring procedures
- Identify corrective actions
- Verify that the system works
- Establish procedures for record-keeping and documentation
In this article, we will focus on the Temperature-related processes that contribute to food safety.
Now, the importance of calibration will fall under principles 2, 3, 4, and 7. This is where we will be using measuring and monitoring instruments including documentation.
Number 1 principle: Conduct hazard analysis. This principle explains how to determine food safety hazards that are likely to occur where potentially hazardous foods are processed.
Within the operation, we need to look at how food is being processed.
Number 2 principle: Determine the Critical Control Points (CCP). This is where we apply control to prevent, eliminate, or reduce food safety hazards to an acceptable level.
An example is:
- chilling foods to prevent bacteria growth.
- Cooking foods until they reach a safe internal temperature
Number 3 Principle: Establish the Critical Limits. Once we know the CCP, based on this, we then establish the limits or range of values where it is safe to hold the Food.
Example is:
- chilling foods to a temperature of 4 °C and below or a range of 33 to 37 °F
- Cooking Foods until it reaches a safe internal temperature of above 75 °C.
Number 4 Principle: Establish monitoring procedure. This is used in order to adjust the process when needed and maintain control. We monitor to ensure that the Critical Limits are followed and maintained.
As an example: Foods must not be exposed to a temperature of 5 °C to 60 °C within 4 hours. Therefore, it is important to maintain the foods that are in the chiller below 4 deg C, or an acceptable range of 33 to 37 °F.
As part of the monitoring procedure, the frequency for checking temperatures is every 4 hours. Since it is a monitoring process, these are documented or recorded in a form.
Number 7 principle: Establish procedures for record-keeping and documentation
All the performed activities must be documented and records must be maintained. Records are created during temperature monitoring including the verifications performed.
And as part of our recording and documentation is the calibration record.
To learn more about documentation and other calibration requirements, visit my other post in this link>> ISO 9001 calibration requirements.
Food Safety Temperature Danger Zone
One main reason why we monitor temperature for food safety is to avoid getting into the danger zone or at least limit exposure to the danger zone.
Food held between 4 to 65 °C is considered a food safety danger zone, where the rapid growth of pathogens is between 20 and 50 °C
Foods can be exposed to a food safety danger zone when it is ‘time-temperature’ abused. This time-temperature abuse happens when:
- internal temperature is not achieved
- not properly cooled or reheated
- held at the wrong temperature
When this happens, we need to throw out or discard foods that are exposed to the temperature danger zone within 4 hours.
The following are some food safety guidelines:
- during the cooking process, the internal temperature of food should be 75 °C
- pathogens grow fastest between 50 and 20 °C
- cool food from 60 to 20 °C within 2 hours
- cook food to a minimum internal temperature
- when thawing food using running water, the water temperature should be 21 °C or lower
- thaw for 4 hours or less and not above 4 °C for 4 hrs or more
Food Thermometers for Food Safety Monitoring.
To monitor and measure temperature parameters, we need an instrument to perform these measurements. This Instrument is what we call a thermometer. There are different kinds of thermometer that is specific for every need.
In these posts, we will be focusing on thermometers for food. Thermometers have an analog and digital display.
There are 3 types of food thermometers that we can use depending on our purpose, these are:
- Analog food thermometers
- Digital food thermometers
- A non-Contact food thermometer is also known as an Infrared Thermometer or IR thermometer
Analog Food Thermometer
Analog food thermometers are mechanical type thermometers consisting of a dial that points to a printed temperature range as the display. The dial is connected to a bimetallic strip, the sensing part, that bends to an amount depending on the temperature it is exposed to.
Below are some examples of food thermometers with analog displays (dial-type food thermometers):
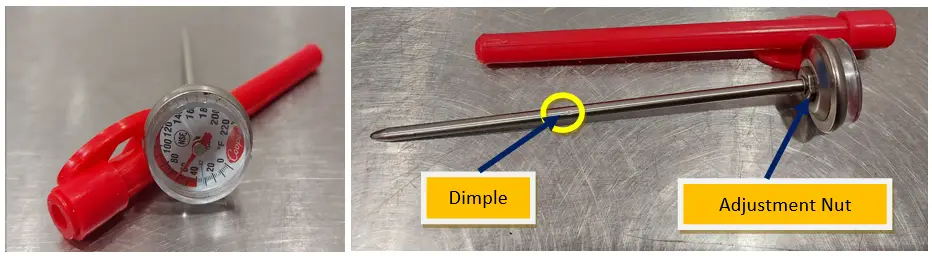
- Bimetallic stemmed thermometer
- Refrigerator or freezer thermometer
The stem thermometer is usually used for thick foods. How to use the bimetallic stem thermometer? When using the stem, there is a small dimple, an indicator which means we need to insert it up to that point. Usually, 2 inches deep.
The refrigerator or freezer thermometer, as the name implies, it is a thermometer that is placed inside a cooler or chiller. It is hung inside the entrance of a cooler or chiller.
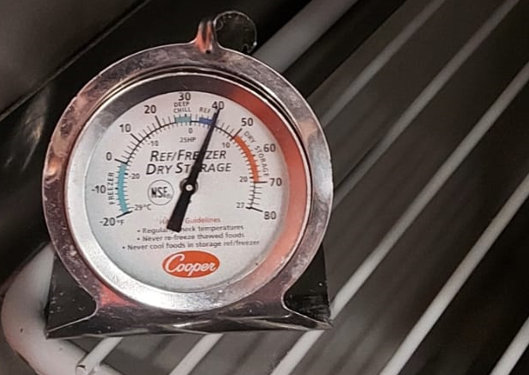
Analog display has a slower response therefore fluctuations are not a problem. Since it is not battery-powered, it can display the temperature inside the chiller/freezer continuously.
For both stem and refrigerator thermometers, to achieve more accurate results, you need more time to stabilize before taking a reading.
Digital Food thermometer
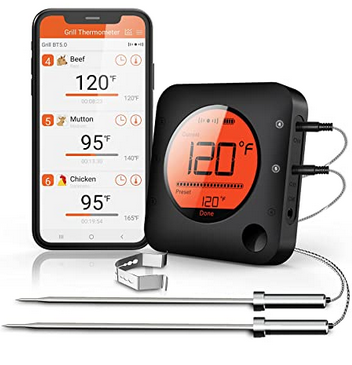
Digital food thermometers are thermometers that are electronically powered, usually by a battery. It can display a higher resolution or number of decimal points. It can be a stemmed type where the display and sensor are in one casing or a probe type where the display and probe are extended by a cable and can be detached. In a more advanced digital thermometer, it is Bluetooth capable which is wireless.
Higher accuracy and sensitivity are two of the advantages of digital thermometers. Higher sensitivity means it can easily detect and display the temperature reading almost instantly.
The sensors commonly used for digital food thermometers are the thermocouple wires. It consists of 2 dissimilar wires that are welded together and, when exposed to a different temperature generate an emf or voltage that has an equivalent temperature reading.
Below are some examples of digital thermometers.
- A stemmed digital thermometer
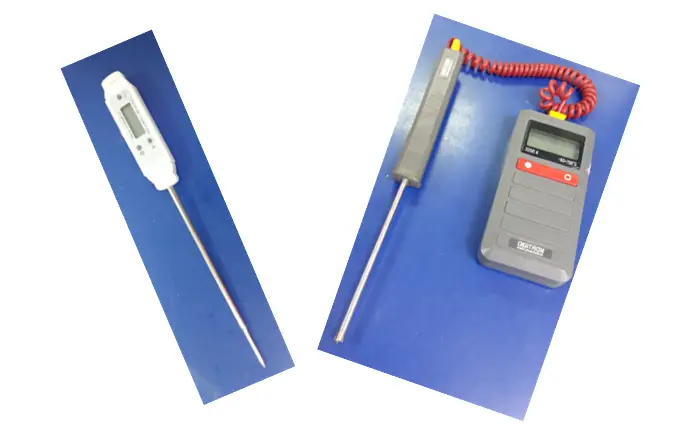
- Digital thermometer with probe
- Digital thermometer with a wireless probe

Courtesy of Amazon
The disadvantage of using a digital thermometer is when the battery is low, there is a chance that readings will not be accurate anymore. Therefore, we should always check the battery status before using it.
Note: I get commissions for purchases made through links in this post.
Non-Contact Food Thermometer – Infrared Thermometer
An IR thermometer measures the temperature of a body or food without touching it, this means that you can obtain a temperature reading even at a greater distance.
Applicable to those hard-to-reach areas or foods that are large and located in harsh environments. It measures the amount of Infrared energy (emissivity) emitted by the food in concern.
To properly measure the temperature of the food, we need to determine its “emissivity”. The emissivity setting used is usually 0.95.

Be sure to follow the spot-to-distance ratio of the IR thermometer. This means that the smaller the surface size, the lesser (closer) the distance to position the IR thermometer.
Read more in this link about IR thermometer >> IR thermometer calibration
How to Use Food Thermometers
There are many types of food thermometers available but the way we use it are almost the same. Here are the general guidelines when using food thermometers:
- For more accurate results, insert probes on the thickest part, usually the center.
- Fully immerse the sensing part. The immersion depth is very important to observe to avoid the effect of ambient temperature.
- Stem or probes must not touch any packaging.
- For best results, repeat measurements in different spots. At least 3 spot is good then take the average.
- Take the readings for at least 15 seconds or more.
- The bimetallic thermometer takes more time to stabilize, therefore allow at least 30 seconds before taking the reading. You can also check manufacturer recommendations for this.
The Importance of Calibrating Your Food Thermometer in the Food Processing Industry
We use tools and instruments like the food thermometer in order to verify and monitor the temperature parameters. One main reason why we need calibration is to ensure these instruments have accurate measurement results to support the implementation of food safety management fully.
Instruments are used in 2 important processes:
- Determining critical control points
- Establishing temperature applicable critical limits
These processes cannot be implemented without the use of accurate measuring and monitoring instruments. To ensure that these measuring and monitoring instruments are displaying the required accuracy, they should be calibrated and controlled.
As per ISO 2200:2018, below are the requirements for the Control of monitoring and measuring Instruments:
The monitoring and measuring equipment used shall be:
- calibrated or verified at specified intervals prior to use;
- adjusted or re-adjusted as necessary;
- identified to enable the calibration status to be determined;
- safeguarded from adjustments that would invalidate the measurement results;
- protected from damage and deterioration.
To know more about each requirement, visit my other post in this link >> ISO 9001 calibration requirements.
Accuracy can only be attained through calibration. Monitoring and measurement results that is not accurate will provide questionable results thus making it unreliable.
Questionable results may cause harm to the user, cost reworks, or even accidents, and most of all, food safety management will not be effectively implemented.
We have read about the importance of calibration in the food industry, but what really is calibration?
Calibration and Verification of Food Thermometers for Food Safety
Calibration is simply the comparison of the measurement results of your UUC (Unit Under Calibration) to the output display of a more accurate instrument, known as the reference standard.
During the comparison of results between standard and UUC, we can calculate the error and measurement uncertainty. Through these results, we can determine how accurate your UUC is, we can also perform necessary adjustments in order to make a more accurate result.
Accuracy is the closeness of the measurement results to the reference value. Accuracy can be quantified by the calculated ‘error’. The smaller the error, the more accurate the measuring instrument.
Since we have performed calibration and necessary adjustments if applicable, we are now certain that our instruments are performing the way it should be. Therefore, providing confidence every time we use it.
One example of a measuring instrument for calibration in the food industry is the food thermometer. The food thermometers are soaked in a temperature bath with a known temperature, say an ice bath with a temperature of 0.0 °C, the reference value.
Since we know the temperature of the standard (0. 0 °C), we expect that the thermometer will display 0 deg C as well. This is now the comparison in the calibration process. Whenever the reading of the thermometer is more or less, an error can be calculated.
One of the main goals during calibration is to determine the ‘error’. Once we know the error, we can use it as the ‘correction factor’ to ‘correct’ the UUC reading.
The formula to calculate ‘error’ is UUC- STD, where the opposite of error (STD-UUC) is the ‘correction’.
You can read more about calibration in this link with more examples and explanations >> calibration awareness
What Does ‘Calibrated’ Mean?
One main requirement of Food Safety Management is to have a calibrated instrument in use, in this case, a thermometer.
If an auditor is asking if the thermometer is calibrated, you cannot just show a document that only tells it is “calibrated”.
When we are performing calibration, it is not a complete calibration if there is no calibration record or report showing the results of calibration.
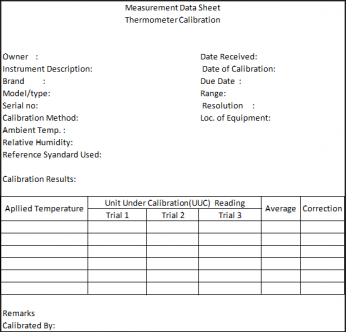
A calibrated thermometer means that it has a supporting record, a calibration report, that contains the following details as a minimum:
- The date of calibration.
- Due date
- The person who performs the calibration
- Unique identification of the thermometer- with labels or special marks (serial #)
- The calibration results, you can see here the value of the standard reading, the thermometer reading, and the error encountered.
- The reference standard used to calibrate the thermometer, for example, is the ice bath or ice point.
- The verification result, Does the thermometer have passed or failed results based on the calculated error?
- Signature
:
For a simple in-house calibration, the above is enough to show traceability and proof that the thermometer is calibrated, but for a more formal calibration, the record is usually the calibration certificate that follows a standard format. You can read more in my other post at this link >> calibration certificate
There are also requirements in calibration that we need to meet in order to support the in-house calibration of our food thermometers, these are:
- calibration procedure in place
- calibration standard used
- calibration report
- environmental conditions
- personnel competency
For an additional and more detailed explanation of the requirements, check out this link >> elements in implementing in-house calibration
How Thermometers are Calibrated–Three Ways to Perform Food Thermometer Calibration
There are 3 ways how thermometers are calibrated which can be implemented through in-house or internal calibration programs. These are:
- Calibration using the Ice bath
- With a properly prepared ice bath or ice point, you can have ZERO (0 °C) reference value for your food thermometers. See the preparation below.
- Comparison using a calibrated thermometer
- If you have a calibrated food thermometer, you can use this as the reference standard. All you need to do is to compare the readings. Just soak both the calibrated thermometer and the thermometer for calibration in the same bath or liquid then compare the readings.
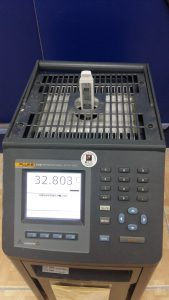
- Calibration using metrology well
- Metrology well is a programable temperature simulation instrument capable of generating any temperature that is highly accurate. It has a hole or a well in it designed to fit in the probes of the thermometers. Or a liquid bath where you can immerse the probes of thermometers.
How to Perform Calibration of Food Thermometer Using the Ice Bath
This is a simple calibration procedure designed to calibrate your food thermometer at the Zero °C range only. A comparison from a known Zero value-the ice bath.
What is an ICE Bath?
An ice bath or ice-point method is one of the oldest and simplest zero-point temperature source reference standards used in temperature calibration. It is a reference temperature where we compare the reading of the UUC to an actual 0 ℃ fixed-point range. As the name implies, it is a simple combination of ice (shave or cube) and water that generates approximately 0.01 ℃ (0°C /32°F) temperature.
A properly prepared ice bath will give an accuracy or uncertainty of 0.002 ℃ (as per ASTM E563-11). This means that the lowest error (uncertainty) you can get when measuring an ice bath is 0.002 ℃ which is already negligible when using a simple thermometer with a resolution of 0.1℃.
Therefore, if you are measuring an instrument using an ice bath, you should read zero (0) (32°F) exactly.
For immediate calibration and verification, the ice bath is the best and easiest way to use as a reference standard. You can even prepare it even in your office for a quick verification setup.
How to Prepare a Simple ICE BATH
Simple Steps On How To Create an Ice Bath.
Prepare enough water and ice cubes from purified water (preferably distilled water). We are only aiming a result of approximately 0.0 ℃, so for this verification, it is not a problem to use regular purified water.
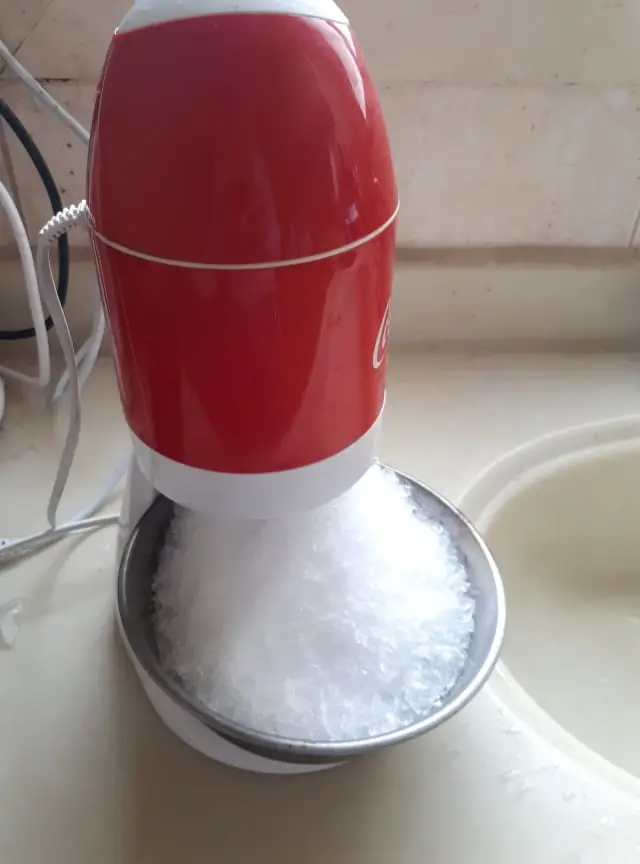
Step 1. Prepare the ice. If it is in big blocks, crush it into smaller sizes
Step 2. Prepare a container. A dewar flask is advisable but not required.
Step 3. Look for an ice shaver. Load the ice cubes into the ice shaver
Step 4. Shave enough amount that you can fill the container (dewar flask) with at least ¾ or 75 percent.
. .
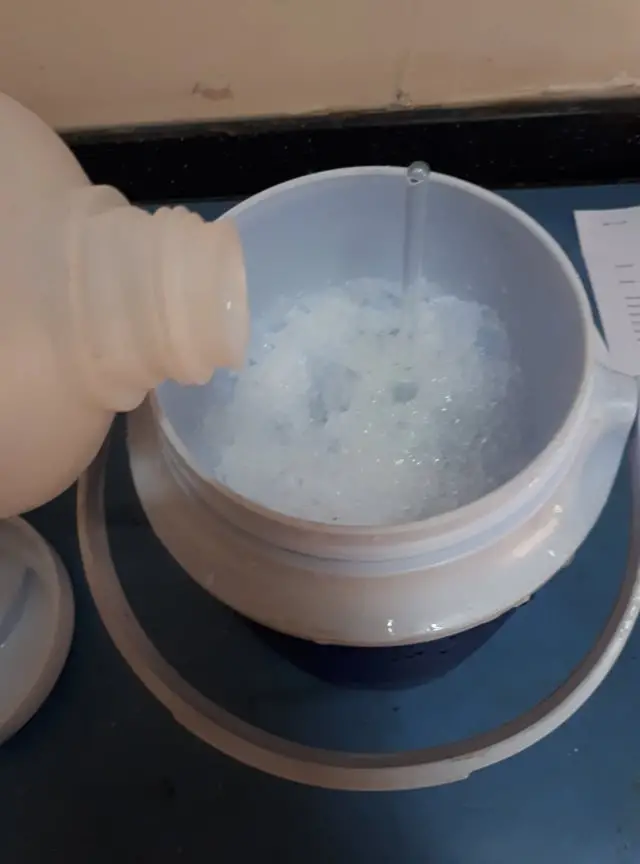
Step 5. Wash the shaved ice with purified water to remove any contaminants and impurities.
Step 6. After washing, drain the water in the ice properly.
Step 7. Pour again the purified water until about 90% of the ice is soaked. See to it that the shaved ice will NOT float.
Step 8 Occasionally stir the mixture to avoid any lumps or spaces forming. Drain any excess water.
Step 9 Wait for around 2 minutes, then your ICE BATH is ready.
.
Now, below are the steps to perform Food thermometer calibration using the Ice Bath:
- The prepared ice bath above can now be used directly.
- Clean the stem or probe of the thermometer.
- Insert the probe into the ice bath at least 2 to 3 inches deep, and avoid touching the bottom or corners of the container.
- Wait for about 30 seconds then record the reading on the datasheet.
- Repeat steps 3 and 4 three times
- Determine the average reading then calculate the error. Refer to the datasheet above.
- Verify the results then perform adjustment if necessary.
Calibration By Direct Comparison Using a Calibrated Thermometer
This one is the simplest if not the easiest to implement. But in this method, you need to have a calibrated thermometer as the reference standard, preferably a thermometer with higher accuracy than the one you are using for monitoring. Calibrated means it is sent to a 3rd party calibration lab with a valid calibration certificate.
Once you have a calibrated thermometer, you only need a liquid with any temperature that is close to your user range.
But make sure to control the use of the reference thermometer, controlled means:
- It should only be used as a reference standard, during calibration of other thermometers, not as a regular measuring instrument.
- Kept in a controlled environment – not exposed to harsh environment or mishandled
- and calibrated regularly – sent to a 3rd party calibration service provider for re-calibration at a given calibration interval
When performing calibration, soak both the Standard thermometer (STD) and the Unit Under Calibration (UUC) to bath then compare readings. The readings of the standard thermometer should be followed. Any error must be noted, then an adjustment follows if capable.
See below the calibration steps:
- Power on the units. Ensure batteries are full.
- Allow at least 30 minutes of stabilization time before making measurements.
- Prepare a liquid bath with a temperature closer to the user range.
- Insert the probe into the liquid bath at least 2 to 3 inches deep, and avoid touching the bottom or corners of the container.
- Wait for about 30 seconds then record the reading on the datasheet.
- Perform at least 3 trials then calculate the error/correction
- Verify the results then perform adjustments if necessary.
- Record the readings on the worksheet. (See the sample worksheet above)
Calibration By Direct Comparison Using a Metrology Well
If you are in a big manufacturing company with many food thermometers including other thermometers for monitoring, Metrology Well is a must-have.
Using metrology well will save you time, money, and energy in the long run. With this instrument, you can perform a full range calibration with your thermometers
Metrology well is an instrument that can generate or simulate the needed temperature. It has a well or hole in it to insert our thermometers. This is also portable and convenient to use.
When using this instrument, especially for digital food thermometer calibration, below is the calibration procedure:
- Observe proper care and safety, Metrology Well generates a high temperature which can cause burn and damage.
- Check the thermometer for any visual defects that can affect its accuracy. Discontinue calibration if any defect is noted.
- Clean the thermometer with a soft cloth and check if the digital thermometer has good batteries. Replace low-powered batteries.
- Prepare the measurement data sheet (MDS) and record all necessary details or information ( Brand, Model, serial #, etc). Sample Measurement Data Sheet to record measured values
- Determine the range of the thermometer (an example is from -30 to 700 ℃), choose at least 5 test points, and record it in the datasheet.
- Turn on the Well and set it to the desired temperature, starting from low to high temperature, once the temperature of the Metrology well has stabilized, carefully insert the probe in the well. There are different sizes of well (holes) so choose the one that fits properly to ensure maximum heat absorption and accuracy. Use the holder if necessary.
- Wait for the display to stabilize (approximately 15 min) then get the reading. Record readings on the MDS.
- Continue steps 4 to 7 until all ranges are finished.
- Check readings if within the accuracy defined by the manufacturer(verification stage), for example, accuracy = +/-2 of reading. (See below how to perform verification.)
- If the readings are already within limits update the corresponding record, do labeling and sealing, and issue to the owner, otherwise, do necessary repairs or adjustments.
What is the Most Accurate Method for Calibrating Thermometers?
If we are just performing the calibration on a zero-point range, the ice point or ice bath is the most accurate method. But if you are using a wider range of test points, then it is a different story.
All the methods above are accurate but it depends on your needs and budget. Therefore, you need to assess your needs or requirements first. Requirements such as:
- User range
- Accuracy required, your tolerance limit
- The number of thermometers needs to be calibrated at a given time
Accuracy in calibration depends on many factors:
- How the standard is prepared, is the water used in the ice bath distilled water or just normal filtered water?
- How the procedure is performed, did you follow the exact immersion depth? Did you wait for the stabilization time before taking the reading?
- The skill of the person performing the calibration, proper reading, and positioning of the thermometer (setup)
- Range of use, are the thermometers calibrated in the correct range based on specifications?
What Temperature Should a Bimetallic Stemmed or Digital Thermometer be Set during Calibration?
When performing calibration, it is important that we use the range of a reference standard that is exact or closer to our user range.
For example, if we are using the food thermometer from 0 to 6 ℃ range, then we should use an Ice bath or Ice point as our reference standard. An ice point has a 0 ℃ reference range which is exact or closer to our need.
It is not wise to calibrate your thermometers to a reference range that is far or not within your user range. The accuracy of reference standards and digital thermometers is different for a specific range.
For a digital thermometer that has a wide range, and you are using it for different ranges, an ice point is not enough as the reference standard, you need another reference test point. This is where the Metrology well is used. But if resources restrict you, then it is best to send it to a qualified calibration service provider for calibration.
How to Perform Verification of Food Thermometers
What is verification?
As per JCGM 200:2012,” verification is the provision of objective evidence that a given item fulfills specified requirements”
Our main goal in verification is to confirm if our measuring instrument’s measured value (UUC output) is within the specified acceptance criteria or tolerance limit which leads us to a ‘pass’ or ‘fail’ decision.
Also, one good reason to perform verification is to determine if the measuring instrument we use is still fit for its intended purpose. If the intended purpose is to monitor temperatures at a specific range, then we should verify that range if it is within the tolerable limit of the set temperature, not necessarily the whole range.
In order to perform verification, we need first the tolerance limit of our food thermometer. You can check this through its accuracy specifications.
Tolerance limit are sometimes known as MPE (Maximum Permissible Error), tolerance, and acceptance criteria.
Once we have this accuracy value, we can determine the limits to see if the thermometer has passed or failed the calibration results.
- Prepare your tolerance limit. If you already have a set tolerance, then skip steps 2 to 5
- Get the manufacturer’s manual for the food thermometer.
- Refer to the specifications and get to the ‘Accuracy’ part. See the sample accuracy specs below.
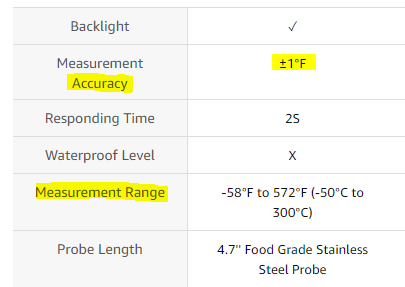
As per the above example, the accuracy at -58 to 572 degF= +/- 1 deg F Now, this is also your tolerance limit
For example @ 0 deg F, the tolerance interval is 0+/-1 = -1 to 1
- Now, when performing verification, your reading should stay within these limits in order to be acceptable. See the below as an example to explain more.

- If it is outside this range, you need to perform an adjustment or send the thermometer to a qualified calibration lab for adjustment and full calibration.
When to perform calibration or verification? Check out my other article in this link >> when to perform calibration or verification or both
Conclusion
Every Food Industry requires food safety management in some way in order for their products to be accepted and approved for use and consumption. And in order to manage and maintain food safety requires monitoring and measurement using a calibrated instrument.
I have presented here the 7 HACCP principles, a system use to manage food safety focusing mainly in temperature-related processes, and therefore where calibration is most important.
I also define food safety as per ISO 22000:2018 and the importance of calibration in implementing food safety management including the following topics:
1. What is food safety?
2. The Food Thermometers for Food Safety Monitoring
3. Why do we need calibration in the food Industry?
4. Calibration and Verification of Food Thermometers for Food Safety
5. Three ways to perform food thermometer calibration
6. How to perform Verification of Food thermometer
References:
ISO 22000:2018 Food Safety Management System
SafeServe Food Safety Training Course
Thank you for reading my post. If you like what you read, please share, subscribe, and Buy Me A Coffee
Edwin
2 Responses
J
Very good post Ed, thank you for sharing!
edsponce
Hi Ms. J,
You’re welcome. Appreciate again for the time to read my post.
Best regards,
Edwin