I have presented in the past article on how to calibrate a digital handheld tachometer using Fluke 754.. Click this link to visit.
Now in this article, I will share with you on how to verify the accuracy of a thermo anemometer using a Handheld Tachometer non-contact type.
I will present the setup and a simple calibration procedure for Extech CFM/CMM Thermo Anemometer with model AN100.
So What is a Thermo Anemometer?
Thermo anemometer is an instrument used to measure the speed or velocity of air from a known source. It could be from a simple fan to a bigger and wider hood (HVAC).
In my past job, the technicians used it in a clean room area where wind velocity has an effect on the environment of that certain place. Also used to measure wind velocity in wire bonding machines and ionizers.
With today’s technology, temperature measurement is also integrated as an additional capability, thus temperature and wind velocity can be measured simultaneously
Regardless where it is being used, we need an accurate reading in order to achieve the desired result for better maintenance and monitoring. And we can achieve this through calibration.
There is no adjustment involve in this procedure, we will verify only how accurate the thermo anemometer in displaying the measured wind velocity and temperature.
Adjustment can be done by using the correction factor that is computed based on the data that we gather.
How to use a correction factor? Visit this link learn about correction factor in a calibration certificate.
How to Use a Thermo Anemometer?
It is simple to use, power up the thermo anemometer and select the desired unit of measurement ( m/s or ft/sec) then place (or face) the sensor ( Vane) where there is a stream of air.
Ensure that the air enters the vane. Check the display and wait for a stable reading.
Needed equipment for verification
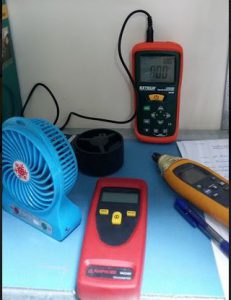
Below are the equipments we need in order to verify the accuracy of Extech Thermo Anemometer.
1. Amprobe Digital Handheld Tachometer

2. Fluke 971 temperature measurement ( or any thermometer)
3. Electric fan (for wind source)
Extech Thermo Anemometer Verification Procedure
Our reference standard is a Digital Tachometer, non-contact type.
This verification procedure is not a direct comparison of the reading from the tachometer, we need a little computation in order to have the exact or acceptable value.
We will be using the RPM value that will be displayed from the tachometer and the radius of the vane (or sensor head) of the anemometer ( which is equal to 0.035 m), then convert it to linear velocity which is the display of the digital anemometer in m/s, ft/min or km/hr.
But do not worry because this is a direct substitution. We will be using a formula.
The RPM to Linear Velocity formula is ( for manual computation) :
v = r × RPM × 0.10472
Where:
v: Linear velocity, in m/s
r: Radius, in meter ( = 0.035 m)
RPM: Angular velocity, in RPM (Rounds per Minute)
The good news is, no need to compute, just input the value in this website and it will be computed automatically.
Visit this link.http://www.endmemo.com/physics/rpmlinear.php
Observe the following before calibration:
- Be sure to check first the functionality of the tachometer ( power on, good battery, good physical condition, clean…).
- Stabilize the instruments to a suitable environment condition ( monitor temperature and humidity) – check this link for more info regarding temperature and humidity.
- Warm up the reference standard by powering on for at least 30 mins. before using to ensure stable functionality ( good performance)
- Prepare your Measurement Data Sheet (MDS) to record necessary details of the Extech Thermo Anemometer AN100 ( brand, model, serial, etc)
Procedure
- Power on the Thermo Anemometer.
- Set the display to m/s unit (preferably for this procedure). The temperature will also be displayed at the upper right of the LCD.
- Power on the electric fan. (the speed of the fan can be adjusted to measure different points)
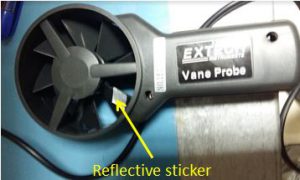
- Place a reflective sticker on the vane of the Thermo anemometer. This is used for the non-contact measurement of the Amprobe Digital Tachometer. Observe exact position in the figure.

The Vane ( sensor) of the Thermo Anemometer with a reflective sticker for a tachometer aiming point. - Set the tachometer to RPM read out.
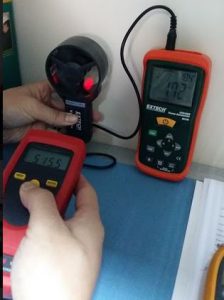
- Now to get readings, position the vane facing the electric fan while pointing the tachometer on the vane ( aiming the reflective sticker). See figure.

Positioning the Tachometer to get the RPM value of the Vane - Get the RPM value and record it.
- The Diameter of the sensor head ( Vane) is given by the manufacturer. Just divide the diameter into 2 then you will get the radius.
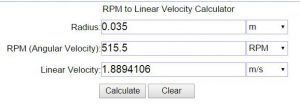
- Go to the endmemo website ( click here) and substitute the value to convert it to linear velocity (v) in m/s (or ft/sec).

Calculator for Linear Velocity Given the RPM value - Check if the desired result is acceptable. (the accuracy of Extech Thermo Anemometer is 3% of reading + 0.2 m/s)
- Repeat the readings at least 3 times then record.
- For temperature calibration, we will just compare the readout of the Fluke 971 with the display of the Thermo Anemometer. Please check this link for this detail.
- End of verification
Conclusion
In this post, I have shared to you on how to verify the accuracy of Extech Thermo Anemometer by using a Digital Tachometer.
We converted the RPM value from the tachometer with the radius of the anemometer vane to linear velocity by direct substitution using the automatic calculator from Endmemo website.
To view the Extech Thermo Anemometer AN100 in Amazon, click here Extech AN100 CFM/CMM Mini Thermo-Anemometer.
Thank you for visiting my site, please subscribe and comment.
Edwin

Leave a Reply