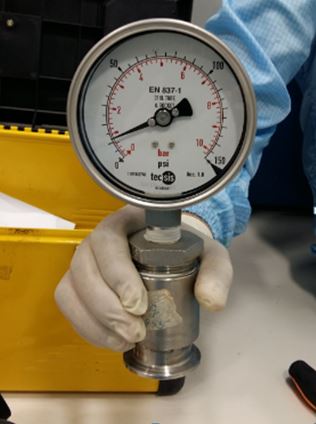
The analog pressure gauge is one of the simplest, mostly used instruments, and the easiest to calibrate in pressure calibration. It has a simple setup where you can easily execute the calibration. But analog pressure gauge is also one of the instruments where errors are mostly encountered.
Most errors are either “out of tolerance” or the needle is not in the “zero settings”. The following are the commonly encountered problems with the analog pressure gauge:
1. pressure gauge needle stuck;
2. pressure gauge not zeroing;
3. the pressure reading is very far or out of calibration;
4. the worst, the pressure gauge not working at all
When this happens, do not immediately throw or discard the gauges. Luckily, there are still ways to adjust or repair pressure gauges.
Pressure gauges have different applications and therefore have many construction designs.
I will present in this post the various setups for different models of gauges that need to be adjusted.
This article is part of our Pressure Calibration Hub
👉Pressure calibration
Below are some reasons why pressure gauges are getting out of whack (out of tolerance or not in the zero settings):
- Changes in the altitude and temperature (due to changes in environmental factors).
- Overstressed bourdon tube due to exposure to overpressure.
- Overused or overexposed to the pressure cycle
- Exposure to high temperatures and excessive vibrations
- Wear in the mechanical parts.
Things to Consider Before Performing Pressure Gauge Adjustment or Repair
Pressure gauge errors can be identified during the execution of calibrations, where we compare the readings of the pressure gauge against the reference standard or pressure calibrator.
Pressure gauge errors can be calculated using the formula:
ERROR = UUT Reading – Reference Standard Reading
If the identified error is not acceptable or too large based on verification, then an adjustment is necessary.
During the pressure gauge calibration process, we observed the below defects, chances are high that adjustment or repair is impossible.
- A reading near its full-scale value is shifted to more than 10% (a span shift)
- Pressure gauges that have a zero shifted to more than 25 % (a zero shift)
- Gauges with signs of leakage and corrosion of its body.
- Gauges with a needle showing an error due to excessive friction or wear on its movement (loose)
- With damaged sockets and threads.
When the above signs are observed, there is a high chance that replacement is the only option.
You can read more in this article from ASHCROFT
The Process of Pressure Gauge Repair
Pressure gauge repair becomes necessary when a gauge no longer responds to adjustment or exhibits physical damage. Repairing a pressure gauge involves a series of steps to restore its functionality and accuracy. To repair it, you would typically follow these steps:
- Isolate the Gauge: First, shut off the system and isolate the gauge from the pressure source. This prevents any further damage or injury during the repair process.
- Disassemble the Gauge: Carefully disassemble the gauge, removing the damaged parts. In the case of a cracked glass face, you would remove the glass and any broken components.
- Replace Damaged Parts: Obtain replacement parts, such as a new glass face, needle pointer, and gasket, if necessary. Ensure that the replacement parts are compatible with your gauge model.
- Reassemble and Test: Reassemble the gauge with the new parts and ensure proper sealing. Then, verify the gauge’s accuracy using the appropriate reference standard and make any necessary adjustments.
- Calibrate: Perform calibration on the gauge to ensure it provides accurate readings covering its full range.
By following these repair steps, you can extend the life of your pressure gauges and avoid the expense of replacing them. Regular maintenance and repair help keep your operations running smoothly while minimizing downtime and safety risks.
5 Techniques to Adjust or Repair a Pressure Gauge
- Opening a vent to release pressure build-up
- Opening the Glass (or plastic cover) then remove the needle.
- Rotating the screw located at the face of the scale.
- Adjusting the knob at the lower side of the pressure gauge
- Adjusting the screw located at the gauge needle pointer itself.
Be reminded that the above techniques are dependent on the construction or design of the pressure gauges.
1. Opening a vent to release pressure build-up
This is the simplest technique. Due to changes in temperature and altitude, pressure inside the pressure gauge will build up and affect the needle settings to zero. You can correct this by just opening the vent to release the pressure.
Do not forget to return or re-seal the vent. The oil may leak and may damage the gauge.
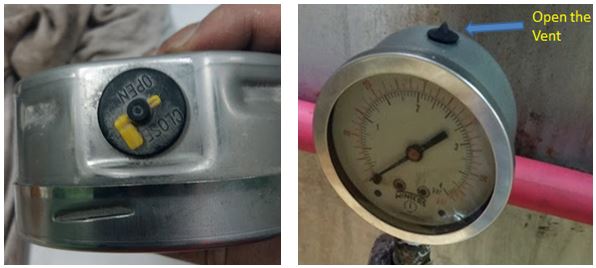
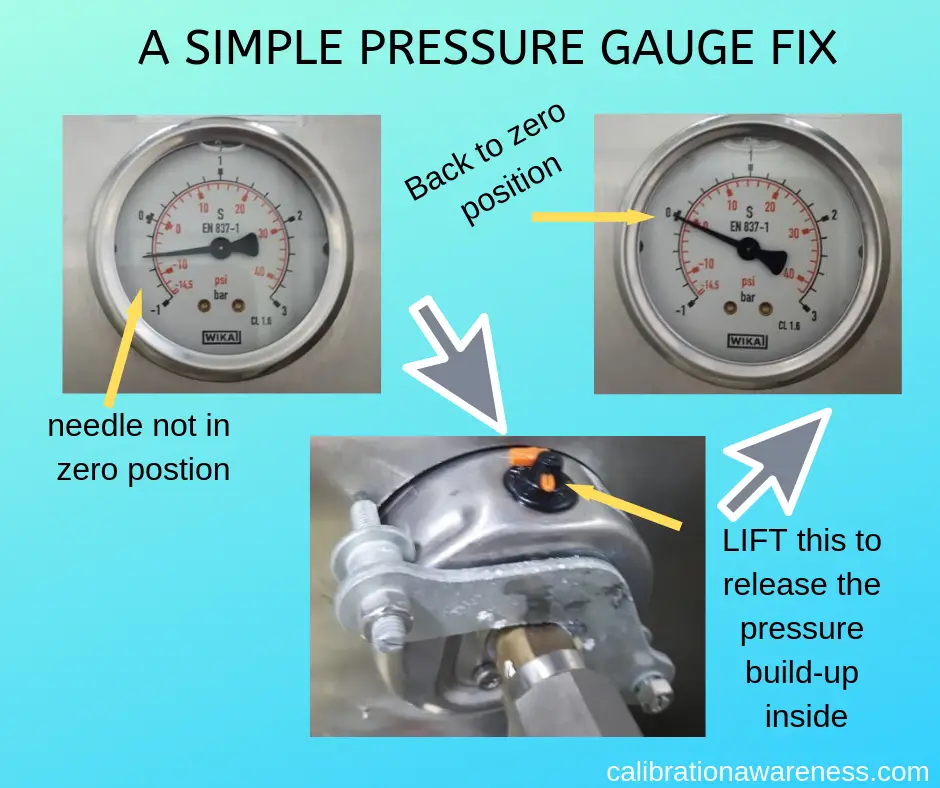
This is the simplest of all the adjustment techniques that is usually applicable to most oil-filled and permanently sealed types of analog pressure gauges. If this technique does not fix the problem, then a replacement is the only fix. Check out replacement gauge here >> Pressure Gauges
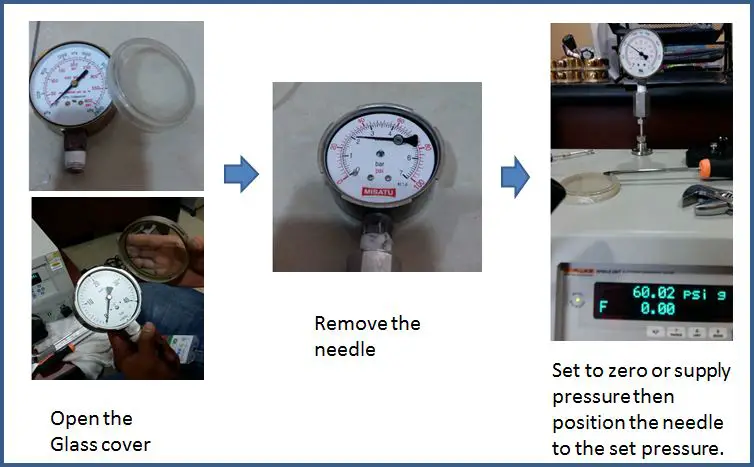
2. Opening the Pressure Gauge Protective Glass (or plastic cover) then remove the needle.
For non-oil-filled gauges, it is not permanently sealed (most oil-filled gauges are permanently sealed where adjustment or repair is not possible).
But in some cases, where it can be opened, remove first the oil inside before removing the glass cover. You need an extra oil replacement just in case.
If you are wondering what is the liquid filled inside the pressure gauge is, it is called glycerine or silicone oil. It is important to replace or refill the pressure gauge oil when removed or if the oil has been drained because of a leak.
What are the advantages of oil oil-filled pressure gauge? Below are some of the reasons why we need to maintain the oil-filled pressure gauge:
- Oil-filled pressure gauges are more protected from harsh environmental factors and moisture or water condensations. Some pressure gauge mechanical parts get stuck from dust and corrosion build-up resulting in wrong readings, or worse, damage.
- Glycerine Oil-filled pressure gauges are also protected from strong vibrations. Strong vibrations affect the mechanical components. Some needles are getting removed or broken because of these strong vibrations.
- Since the liquid-filled pressure gauge can resist strong vibration, the displayed readings of the needle are more stable, making it easy to read, thus, increasing the accuracy of the pressure gauge.
- Glycerine or silicone oil acts as a lubricant for the mechanical parts especially for the needle pointer making it move smoothly.
(see at the bottom of the page the tool to remove the cover and needle easily and safely).
In some cases where releasing the pressure build-up cannot solve the problem, we can perform the below adjustment by opening the pressure gauge through the removal of its protective cover and removing the needle pointer. With this method, we can correct the zero and span shift of the instrument when it occurs.
A. To correct the Zero Shifts:
Once the cover is removed, perform below steps:
1. Pull the needle using the needle puller (see below).
2. Once the needle is removed, position it on the zero scales then push to return.
3. Verify the reading by supplying pressure
How to perform pressure gauge verification? Read on …
B. To correct Span Shift:
Once the needle is removed, perform the following:
1. connect the pressure gauge to a known pressure source (the Electronic Deadweight Tester or Fluke 754 with a set of pressure modules)
2. Generate a pressure of about 50% of its Full scale. Once the pressure is set, return the needle to the same value as the supplied pressure. For example, generate a 100 psi pressure from the reference standard, then fix the needle on the 100 psi scale reading on the pressure gauge.
3. Perform verification to ensure that it is now within the accepted range.
Most of the time, Just performing either A or B solves the problem.
3. Adjusting the knob at the lower side of the pressure gauge
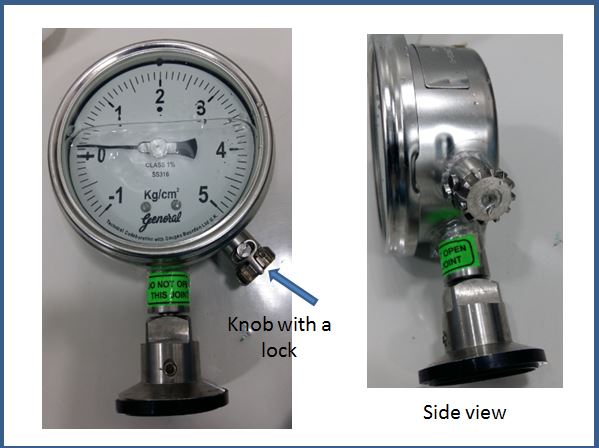
Some pressure gauges have an adjustable knob on the lower side of the body. This is a diaphragm-type pressure gauge that is usually used in water treatment piping.
Just remove the lock then the knob will freely turn to adjust the needle.
4. Adjusting the screw located inside the pressure gauge mechanism
Some pressure gauges have an adjustable screw inside the body, at the back of the needle, or within the dial face. This type of gauge is used in gas lines.
Access the screw inside the gauge by removing the cover. Turn the screw either clockwise or counterclockwise to return the needle to zero position.
Perform verification after zeroing.
.
5. Adjusting the screw located at the gauge needle pointer
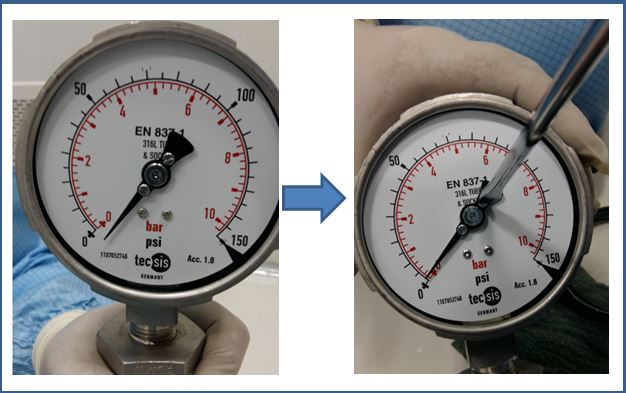
This applies to some pressure gauge that has an adjustable screw integrated on the needle itself. Once the cover is removed, use a screwdriver and carefully turn the screw to position the needle. See the figure above or watch the video below.
Based on the photo above, I have shown you the location of the screw and the position of the screwdriver, but during the rotation of the screw, you need to hold the needle to rotate the screw and perform the adjustment.
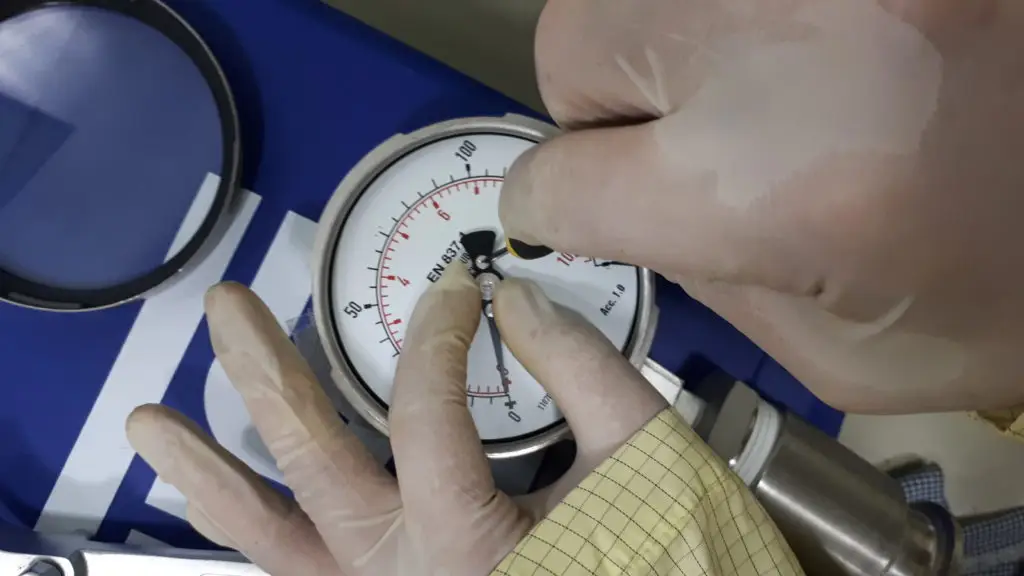
You need to be more careful in this type of adjustment. the needle is connected with the spring inside and it is very sensitive. A strong force while rotating the screw can damage the whole part or pressure gauge.
After performing the adjustments, do not forget to verify the pressure gauge.
Additional tips:
1. Adjusting the screw located at the Pressure Gauge Dial Face

This is the same as # 4 above but this one is the simplest and easiest to adjust, the adjustment screw is just beside the needle pointer on the dial face, designed by the manufacturer (Zahm and Nagel). It seems difficult at first but once the glass cover is removed, you simply rotate the screw clockwise or counter-clockwise to perform zeroing or any point adjustment.
..
2. Adjusting the Screw located at the Back of the Pressure Gauge

This is Aderson’s EL hygienic pressure gauge, used mostly for water systems in pharmaceuticals or food industries. One of the easiest ad simpliest type of gauge to adjust. You only need a Allen key to reach and rotate the screw at the back of its casing.
Key Takeaways
1. Zero Adjustment
Key Takeaways:
- Zero error is a common issue with analog pressure gauges.
- Adjustment is typically done by removing the front cover and turning the zero adjust screw.
- Always depressurize the gauge before performing any adjustments.
2. Pointer Removal and Repositioning
Key Takeaways:
- Misaligned pointers can mislead pressure readings.
- Use a pointer remover tool to safely lift and reposition the pointer.
- Ensure the gauge reads zero after pointer adjustment, especially with atmospheric pressure.
3. Span Adjustment
Key Takeaways:
- Span errors affect gauge readings across the scale.
- Adjust the span screw if the gauge shows consistent over- or under-reading.
- Calibration with a standard pressure source is essential to verify span correction.
4. Gear Movement Calibration
Key Takeaways:
- Internal gear misalignment causes pointer inaccuracies.
- Re-engage or align gears properly for accurate needle response.
- This step is more complex and may require manufacturer guidelines or expert assistance.
5. Leak Testing and Sealing
Key Takeaways:
- Leaks in bourdon tubes or connections lead to incorrect readings.
- Use leak detection fluid or bubble solution to locate leaks.
- Seal minor leaks or replace damaged components when necessary.
.
How to Verify the Accuracy of Pressure Gauge After Adjustment?
In every adjustment or calibration that we perform, we need to verify if the readings are within the pressure gauge’s acceptable range, tolerance, or acceptance criteria.
Before performing the adjustments, you must consider what tolerance you should follow.
The tolerance or acceptance criteria are based on:
1. manufacturer specification;
2. user or process tolerance.
3. International Standards or Regulatory requirements ( ex: ASTM or ISO Standards)
As an example, we will be using the manufacturer’s specs to verify the pressure gauge. Below are the steps:
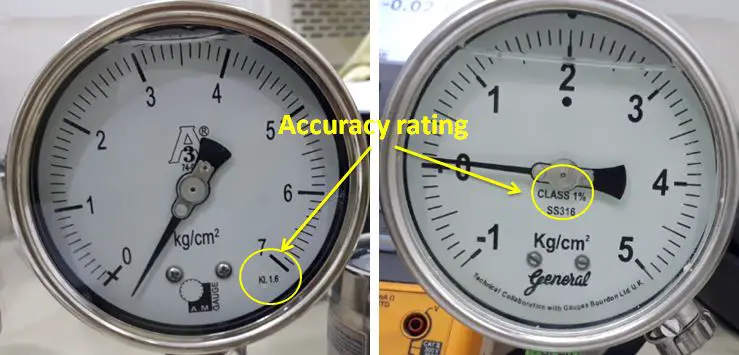
1. Determine the accuracy rating (accuracy class) of the pressure gauge. Most pressure gauges have the accuracy class printed on their dial face (see the below photo). This accuracy class has an equivalent MPE (Maximum Permissible Error) where we can calculate the limits of permissible error.
Learn more about the relationship and differences between accuracy, error, tolerance, and uncertainty in my other post on this link>> accuracy-error-tolerance-uncertainty
2. Convert the accuracy class to decimal by dividing it by 100 then multiplying it with the Span or FS reading. This rating is in percent of Full Scale or Span. Based on the photo above, the pressure gauge is labeled with KL 1.6 which means 1.6% of Full Scale and Class 1% equivalent to 1% of Span (see example below).
The difference Between Full Scale and Span in Pressure Gauge Display
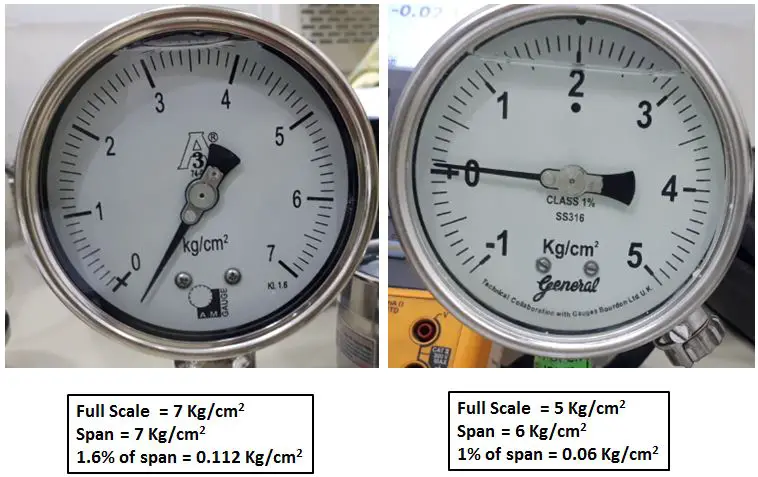
The difference between Span and Full-Scale reading
Full Scale (FS) reading is equivalent to the maximum displayed value of the pressure gauge. It is from ZERO to the maximum range.
Span is the difference between the lower range (not Zero-value) and the higher range. Span range applies to those pressure gauges with a negative value (see photo above-right side gauge).
Span = 5 – (-1) = 6
Span and Full-Scale reading are the same when the lower range is equal to ZERO.
To determine the tolerance limit, we will multiply the accuracy class rating with the span or FS reading. See the example below.
- The pressure gauge has an accuracy of 1.6% of Full-Scale (FS)
- Full-Scale reading is = 7 Bar
tolerance limit = (1.6/100) x 7 = 0.112 Bar
- Therefore, reading should be within +/- 0.112 Bar
3. Once the tolerance limits or the acceptance criteria are determined, generate the necessary pressure requirement and then compare readings. If the reading is outside of this range, then more adjustments are needed.
If you have performed one or all of the adjustments above and still the pressure gauge is out of tolerance, then it is already damaged and replacement or a deeper repair is the only option.
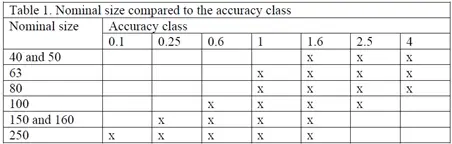
To determine the pressure gauge tolerances based on the dial face and accuracy class, you may refer to the table below based on BS EN 837-1.
Some Useful Tools During Adjustment
- Hand Jack Set Gauge Needle Puller. You can use this tool to remove the needle safely and effectively:
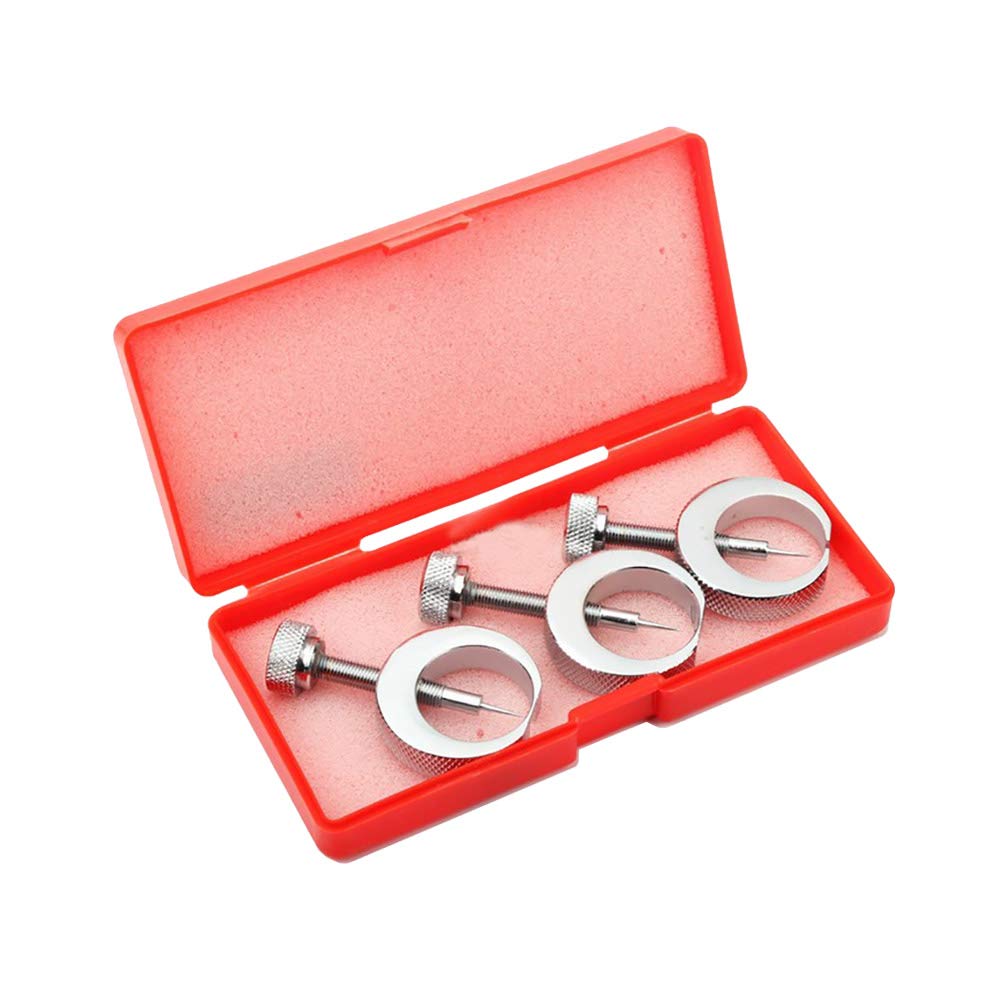
Click here to check at Amazon
In removing the needle, be careful not to pull the needle so hard to avoid damaging the pinion mechanism. Some needles are very tight and you can pull the pinion with it. To avoid this, you may use this tool.
2. Strap Wrench Set. Use this tool to remove the glass cover safely and easily.


Click here to check at Amazon: Craftsman 2 pc 16” Rubber Strap Wrench Set
Watch the video here on my Facebook Page: How to use the Strap Wrench
Note: I get commissions for purchases made through links in this post.
Remember that after the repair and/or adjustment, perform re-calibration using the methods of pressure gauge calibration discussed here.
Conclusion
In this article, I have shared the following:
1. 5 ways on how to adjust a pressure gauge,
2. The things to consider before making an adjustment or repair
3. how to identify the error in the pressure gauge and execute the adjustment.
4. How to verify a pressure gauge.
5. Some useful tools to use to perform adjustments
You can save and re-use a pressure gauge by performing regular calibration and adjustment, following or choosing the right setup suited for a specific pressure gauge as explained in this article.
If you have other methods to adjust or repair a pressure gauge, please do not hesitate to comment.

Do you need a complete pressure gauge calibration procedure? Check out this ready-made pressure gauge calibration procedure package, which consists of a procedure, measurement uncertainty calculator, a datasheet, and a calibration certificate in one package, visit this link >>buymeacoffee.com/edsponce/e/312258
To learn how to calibrate a pressure gauge, visit this post: How to Calibrate a Pressure Gauge (Complete Step-by-Step Guide)
Thank you for visiting my site.
Please comment and subscribe.
You can also connect with me on my Facebook page.
Best Regards,
Edwin

Your Information is secured and will not be shared to anyone else.
42 Responses
Deb Pearl
My husband has a pressure gauge on one of his machines that is broken and he would like to fix it. That is great that you can fix the needle by taking off the glass and then can adjust the needle by using the screw on the needle. I think that would help my husband a lot! Thanks for the information!
edsponce
Hi Deb,
I am glad that I have helped you. Do not forget to verify the pressure reading once the needle has been adjusted.
Thanks for taking time leaving a positive comment, I appreciate it.
Best regards,
Edwin
Frank Bonanno
The first one is to open the vent the one with the rubber pointy end.
You don’t mention to cut it off.
The reaso I ask I have a few at work the same type with a label next to it once installed to cut the point off.
Your feedback would be much appreciated.
Regards
Frank
edsponce
Hi Frank,
Thank you for your comment. Yes, this must be done before or during use and installation, you need to cut the pointy end as you described. This will ensure to release pressure built up inside the mechanism (parts). As time goes by, a pressure will build up inside the body of the gauges and in order to correct or prevent this, you need to cut (if it has a pointy end) or turn it to open position.
Hope this help, appreciate your comment.
Thanks and regards,
Edwin
Frank Bonanno
Forgot to mention the gauges at work are installed on pool pumps.
Regards
Frank Bonanno
RKB
HI!
After opening the vent with my oil filled pressure gauge to release the internal pressure to set the needle at zero, but the needle do not come.
Please suggest.
edsponce
Hi Rajib,
Thank you for reading my article.
Opening the vent of the pressure gauge will work if the error or out-of-zero displacement of the needle is very small.
If the pressure gauge was installed from a very high level then transferred to a low-level place, or low level to high-level place, have it stabilize first for 1 hour then try again to open the vent.
But if the error is large and the needle is still not returning to zero position, another option is to remove the oil, open the pressure gauge and remove the needle (try no.2 procedure in the post).
Hope this help.
Best regards,
Edwin
Anusit
Hi,
I have removed wesington cryogenic N2 Tank differential level gauge for the first time to send for calibration and tank completely empty after reinstall differential level gauge on the tank what is correct procedure to follow? The level gauge is reading ” Inch O2″
Best Regards,
Anusit,
edsponce
Hi Anusit,
Thank you for reading my post.
During reinstallation, just follow the opposite way on how you remove the differential gauge. if you have a three manifold set up, i have created a separate post and I hope this can answer your question. please visit this link. https://calibrationawareness.com/differential-pressure-level-gauge-calibration-setup-procedure
Thanks and regards,
Edwin
Atul
Thank you so much guys!
I solved one error in pressure gauge.
edsponce
You Are welcome. Happy to help.
Thank you for reading my post.
Best Regards,
Edwin
Bobby Slack
You mentioned over stressing of the Bourdon Tube. Is there a fix or adjustment for that?
edsponce
Hi Bobby,
The overstressed bourdon tube is one of the reasons why the needle is experiencing a shift in zero position or an error in a higher range or span. If the overstressed is minimal, it can still go back to zero by using the technique that I presented, but if the error is too much where it shifted to more than 25% of the range, it is already difficult, if not, impossible to repair.
I did not try it yet but if you open the gauge, you can see a screw in the tip of the Bourdon tube, there is a possibility that this can fix or adjust the error if you adjust the location of the screw with the connecting link. But this requires a trial and error until you reached the desired fix.
I will update this post if ever I encountered it.
Hope this helps.
Edwin
Joyce Valencia
This is such an informative article. Thanks!
edsponce
Hi Ms. Joyce,
You are welcome, thank you for visiting my site.
Best Regards,
Edwin
FREON GAUGE
A pressure gauge on the machine is broken and if you would like to fix it. That is great that you can fix the needle by taking off the glass and then can adjust the needle. I think that will work.
edsponce
Hi Freon,
You can try it out as long as the pressure gauge still can measure but out-of-tolerance. But if it is already broken, then a replacement is the best option.
Thanks for reading my post.
Regards,
Edwin
Dime Marine
I like the helpful info you supply for your articles. I have some doubts related to pressure gauge calibration, which are now solved by reading this blog. Thanks for sharing a smart thought.
edsponce
You are welcome. Happy to help. Thanks for visiting my site.
Edwin
Valmik Patel
Nice information. Your blog shares unique details. Well, thanks for sharing!!
edsponce
Hi Valmik,
You are welcome. I am glad you liked it.
Thanks for reading my posts.
Edwin
Yash
Hi,
I am trying to manufacture water pressure gauges – C shape bourdon tube gauge. I am facing a linearity issue and do not have an adjustable mechanism setup.
Can you guide me to fix that?
Thanks
edsponce
Hi Yash,
I am not sure if I can help you but if you can share more details, I can take a look. Here is my email in case you can share more details>> edwin@calibrationawareness.com
Thanks for visiting my site.
Edwin
Vinod Kumar
Dear Mr. Edwin, Very usable post you created. Thanks a lot! Request you to create a blog on Uncertainty budget for Pressure Gauges which calibration is taken place by Pneumatic Pressure Pump with Digital Pressure Gauge (for Pneumatic Gauges) and Hydraulic Pressure Comparator with digital pressure gauge as reference and water as medium (for Hydraulic Pressure Gauges). Uncertainty for both types gauges as per DKD-R-6-1.
edsponce
Hi Vinod,
You are welcome.
I will find time to consider your request.
Have a great day!
Edwin
kalai
It was nice article thanks for shared it.
edsponce
You’re welcome, thanks for reading my post.
Best regards,
Edwin
Alda
Dear mr. Edvin
In comparong a gauge with reffrence Is it better to adjust the ref gauge pointer in front of a fixed number or the gage (uut) pointer in front of fixed value and then compare other with it?
Alda
Dear mr. Edvin
In conparing a gauge with a reference gauge; Is it better to adjust the pointer of reference gauge in frint if the ficed value or adjuat the pointer of gauge under test in front of a fixed numberand then compare with other gauge?
edsponce
Hi Alda,
Either way is ok, but it is better to adjust it on a fixed value usually in the 50% range. Re zero then check it again.
Thanks for reading,
Edwin
shiva
hello there
thanks for the information ,i have a problem thought you can help
where i work we are montaging a pressure guage and it shows the pressure perfectly. but when the pressure is off it doesn’t completely back to the zero
we work on the “u type” part and it comes back to zero but then it doesn’t show the higher pressures correctly
do you have any clues what i might do to fix it?
i would be sooo happy if you could email me
thanks for reading
Shiva
edsponce
Hi Shiva,
You are welcome.
Have you tried isolating the pressure gauge by removing it from its place and then performing a calibration or verification?
When you have performed the techniques that I have presented and still have no luck, then you can try to just adjust the pressure gauge to the usable range even if it is not exactly reaching zero. As long as the pressure gauge is reading accurately on the user range then it is ok. But be sure to document this properly on the calibration report.
I hope this helps,
Edwin
mohit soneji
Thank you so much edsponce this solution Im stuck with my broken pressure gauge, i search in youtube but didn’t found any helpful tips so i come to your blog it’s very helpful.
edsponce
Hi Mohit,
You are welcome. I am glad that my article has been helpful to you.
Best regards,
Edsponce
Hridoy
Dear Sir, Some of my hydraulic pressure guages contain air bubbles inside it. How can I remove all these air bubbles from inside it ?
Thanks for your support.
edsponce
Hi Hridoy,
Air bubbles may form if the oil inside is either contaminated or not at the proper level in which you need to replace a clean oil to a proper level.
I hope this helps.
Edwin
Charly
Thanks for sharing these valuable techniques for pressure gauge adjustment and repair. This article provides a comprehensive guide for anyone dealing with pressure gauge issues. It’s great to have these steps outlined clearly to help ensure accurate measurements and extend the life of these essential instruments.
edsponce
Hi Charly,
You’re welcome. Thanks as well for visiting my site.
Best regards,
Edwin
George
I have a 0-30 PSI gauge that behaves like this: When the gauge is rotated CCW 90 degrees from vertical, the needle pointer reads HIGHER by the width of the pointer, when the gauge is rotated CW 90 degrees from vertical, the needle pointer reads LOWER by the width of the pointer. Is this normal behavior for a good gauge, or does it need to be repaired?
edsponce
Hi George,
It is not normal but it happens sometimes to others as well. That is the reason why gauges should be calibrated in the position on how it is being used. If you are using that in a CW or CCW position, have it calibrated and adjusted in that position and see if the results are still accurate or within the acceptable limits.
I hope this helps,
Edwin
SS Ball Valve
Your insightful article on pressure gauge repair is a lifesaver! The diverse methods provided, from calibration to part replacement, showcase a thorough approach to addressing issues. It’s a valuable resource for technicians and DIY enthusiasts alike. Your guidance ensures accurate pressure readings, making it an indispensable read for anyone dealing with gauge maintenance. Great job!!
edsponce
Hi,
Thank you. I am glad you liked it.
Best regards,
Edwin