There are different methods and reference standard used to calibrate a pressure gauge. Most are portable, small, and a good use for on-site calibration. In my other post, I introduce the calibration of pressure gauges using Fluke 754 with a set of pressure modules.
In this post, I will present to you the Electronic Deadweight Tester (E-DWT), a basic background/features, benefits of use and a calibration procedure for calibrating an analog or digital pressure gauge.
What is a Deadweight Tester?
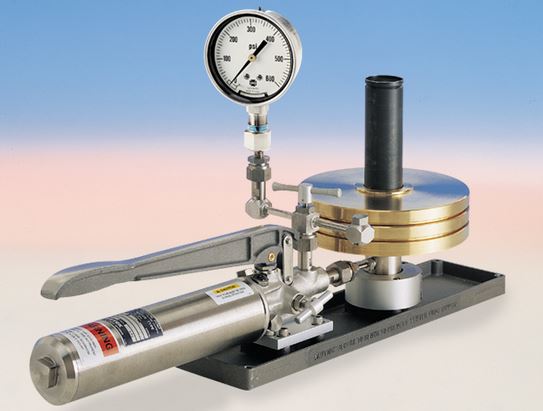
Deadweight Tester or hydraulic deadweight tester is a bench use reference standard for calibrating pressure gauges. Deadweight Tester utilizes a set of weights in a mechanical and piston driven assembly in order to achieve a pressure reading.
Its pressure source is created by a hydraulic pump. The fluid used can be oil or water. The principle is e
xplained by the formula, Pressure = Force /Area (P=F/A) (see wiki). In this advancement of technology, we can now use the advance version which is the Electronic Deadweight Tester (E-DWT).
Benefits of Electronic Deadweight Tester

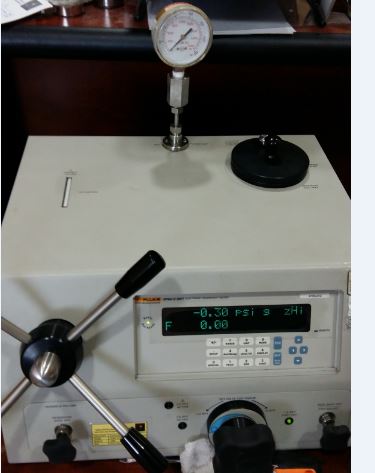
I will introduce the Electronic Deadweight Tester (E-DWT) from Fluke. This is now electronic meaning almost everything is digital and automatic. There are no set of weights being used. It is now more handy and convenient to use even for on-site calibration. No more manual computations and conversions, just a direct readout on its display are some of its benefits. Moreover, because of its high stability and accuracy (0.02% of reading ), it can calibrate a wide range of pressure transducers, sensors, transmitters, and gauges.
This Digital Deadweight Tester has a pressure source that is operated only by a variable volume control included in one package. Just connect the pressure gauge with the required or appropriate fittings then you are good to go.
Below are some of its features:
- High and low-pressure calibration in one
- Digital display and pressure units are changeable
- Lightweight and convenient to use.
- Minimal physical effort in generating a pressure using its low torque variable volume
- High accuracy and resolution of its display.
- It can detect when too much pressure is present for a specific range of use
- Adjust pressure readings with ease
- Programmable and can be connected to a computer device.
Calibration of Pressure Gauge Using Electronic Deadweight Tester (E-DWT)
Objective:
To define calibration procedures for Analog/Digital Pressure Gauges using EDWT
Calibration Method:
The pressure generated in EDWT is directly compared to the display of the Unit Under Calibration (UUC) which is the pressure gauge. This procedure is also applicable to all pressure transmitters, transducers and digital pressure gauges as long as the required fittings are available.
Requirements:
- Warm-up time ( Unit Under Calibration): At least 1 hour for proper stabilization
- Temperature: 23 +/- 5 deg C
- Humidity: 50 +/- 30%
- Perform 3 trials for each points or range
- Position – Calibration should be in a vertical plane
- Measurement Data Sheet (MDS)
- see this link about for more details about Measurement Data Sheet
Reference Standard and Equipment:
- Electronic Deadweight Tester (E-DWT)
- Thermo-hygrometer – to monitor temperature and humidity
Other Materials needed
- Teflon Tape
- Set of Fittings
- Set of wrenches
- Cleaning materials
- Fluid ( oil or water)
Pressure Gauge Calibration Procedure:
- Inspect the UUC visually for any signs of damage ( pointer, threads, etc), readability of display and cleanliness. Check batteries for digital pressure gauges and do an initial power on test. Record observations on your MDS .
- Set-up the EDWT, set the required range and ensure that the EDWT has a fluid on its reservoir. This will be used to generate the pressure.
- Connect the pressure gauge on the pressure port of the EDWT,
- Purge the EDWT by pushing the plunger to remove any air inside the valve,
- Press zero, and perform priming of the fluid until a iniitlal reading of pressure is generated.
- Immediately close all open valves then continue to set the required pressure using the variable control volume in increasing manner.
- Record five test points that is uniformly distributed on the range of the pressure gauge. You can follow the major scales or but preferably 0%, 25%, 50% 75% and 100% of the range.
- Take note to wait for the green light to appear( located on the left side of display) before getting the reading to ensure stability of pressure and display.
- Once the maximum range is reached, slowly turn the variable volume control on the opposite direction ( reverse) to get the readings in reverse or decreasing value, stopping on the same scale as before.
- Record all readings on your MDS.
- Do necessary adjustments if the unit can be adjusted or repaired.
- If the readings are already within the specified limits, finalized records, put labels and seal if necessary.
- End Of procedure.

Conclusion
I have presented here a background about Electronic Deadweight Tester and a basic calibration procedure using this standard. We can see that most pressure calibration procedure is the same, the only difference is the standards used to calibrate it. But in this procedure and standard used, this is the most convenient that I experience. Why? Because the pumping and lifting of heavy weights are already out of the way plus all the other features that I presented.
Thank you for visiting my site, please leave a comment and subscribe.
7 Responses
Jeremy Thompson
It’s interesting to learn about this deadweight tester that’s able to calibrate without any manual computations or conversions since it’s electric and almost everything is digital and automatic. That’s a wonderful to be had since it’s making things convenient for those who do the calibrations. I wonder if the companies that do calibration uses these as well. I better find out and see since they do manage a lot of gauges and all. Thanks for the informative article about pressure gauge calibration using deadweight tester!
edsponce
Hi Sir Jeremy,
You are welcome and thank you for reading my post. Yes, it is now very convenient and much faster using the Electronic Deadweight, you can generate pressure in just a turn of a wheel and directly reading its output on its digital display. If you perform calibration preferably in an internal lab bench-type calibrations and with a good budget then it is good investment. It can cater almost all pressure gauge except vacuum type. It is also a good master standards because of its high accuracy rate.
Best regards,
Edwin
valmik patel
Very informative on Pressure Gauge and the content is very engaging. And Pressure Gauge are widely used in industries.
valmik patel
One of the most engaging blogs I have come across. Very valuable and accurate information about Pressure Gauge here. Yes, they are in types and also with different properties.
edsponce
Hi Valmik,
Thank you.
Thanks also for reading my blog.
Best regards,
Edwin
HENRY
Good and useful information. i just wandering, if the gauge could not been calibrate due to its faulty parts, what should we do next? Since the lab already perform testing and find out the gauge is faulty, should the lab write a report and how is the format report will be?
edsponce
Hi Henry,
Yes, based on your test or calibration results, write a report about it. This is to document the issue found about the gauge and the actions that take place. We call this the “service report”.
A simple report (or letter) to notify the customer and what actions can be done with their instruments. The following content of the report are my recommendations: (you can add more if you want as needed)
1. Date of report
2. Name of customer
3. Informations about the instruments like brand, model, description and others
4. The description of the problem encountered.
5. The recommended action to close the problem (it is good to give options here like for example: for scrap, for repair, for return)
6. Signature of technician and supervisor
7. Signature of the customer
Have the form signed by the customer to acknowledge the report and return back to you for filing.
Make sure to have the form controlled as per Document Control procedure
Thanks for reading my posts,
Edwin