Based on my visits to most manufacturing industries, the temperature transmitter is one of the process instruments that can be normally seen. Each is using either a thermocouple sensor or a Resistance Temperature Detector (RTD) sensor, where the majority of the temperature transmitters are using an RTD (commonly a PT100) as the sensor.
So having the knowledge to understand and to learn how to calibrate it is an advantage for every technician.
Why Do We Need a Temperature Transmitter Calibration?
A temperature transmitter comprises a sensor and a transmitter in which both have an effect on the final output going to the display panel.
Calibration is a must because:
- over time, sensors are deteriorating through different exposures in environmental effects such as vibrations and extreme temperatures.
- The possible presence of drift due to the long period of continuous usage while exposed to different factors in the environment.
So it is a very wise decision to have it calibrated regularly.
In this post. I will share with you a calibration set-up of temperature transmitters in 5 different ways or set-ups. I hope this is a good guide for your in-house calibration.
Below are the calibration set-ups that I will present:
- Actual temperature simulation using metrology well
- Actual Temperature Read-out using a Process calibrator
- Direct temperature Simulation of Electrical Signal Using Fluke 754
- Resistance to temperature simulation using a resistance box
- The temperature to Current (4 to 20 mA) readout
- Calibration set-up for temperature transmitter with a thermocouple sensor
I will also share in this post the chart or table on how to convert the temperature to resistance manually, how to use a simple formula to convert temperature values to resistance, and lastly, how to convert temperature to current using also a simple formula.
As a calibration technician, it is very important if you can perform or understand all these basics in a temperature transmitter calibration. Once you have understood this, you can apply its principles to other transmitters.
I have presented a related topic about transmitter in my last post (see it here Pressure Transmitter).
Most of the principle of calibration is the same. The only differences are the standards to be used and the parameter or process signal which is the temperature.
1. Actual Temperature Simulation Using Metrology Well
This is the simplest and more conventional calibration set-up that involves a loop calibration. Just insert the temperature transmitter probe in the Metrology Well then compare the readings displayed in the PLC display panel.
But one disadvantage of this set-up is that it takes more time if more temperature range is to be checked for accuracy because we need to stabilize the temperature for every set point.
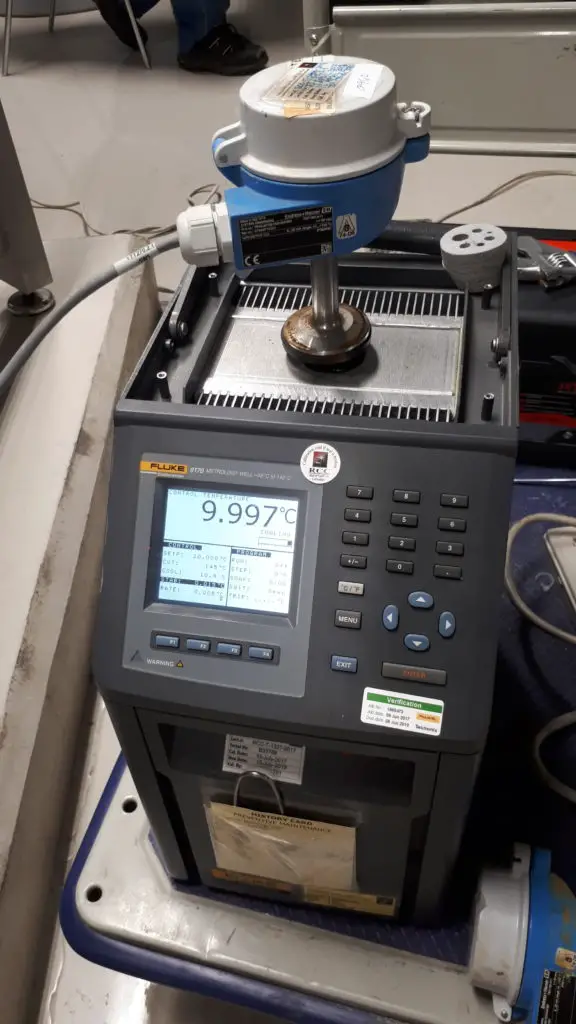
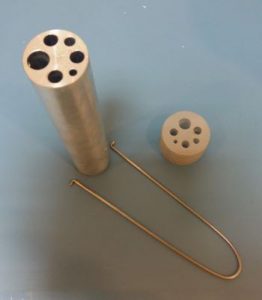
Inside the metrology well is a metal insert with different sizes of holes, ensure that you choose the most exact fit or size of the insert hole. A good fit and insertion depth of the probe inside the well will provide the most accurate results.
Once properly inserted, the metrology well can now simulate the required temperature to be displayed in the PLC display panel since this type of transmitter has no display.
For the calibration procedure in this setup, please visit this link..
To learn more about metrology well, check this post https://calibrationawareness.com/temperature-calibration-by-using-a-metrology-well
2. Actual Temperature Read-out Using a Process Calibrator
This set up utilizes 2 reference standards, the metrology well, and the Fluke 754 process calibrator. One is for heat generation and the other is for display. This is a set-up in any case that the transmitter is disconnected from the loop or if you want to perform a bench calibration.
In this setup, the RTD sensor is removed from the transmitter (Endress+Hauser TMT180) and directly attached to Fluke 754 input probes in a 3-wire connection. It can measure the signal from the RTD sensor and directly display it as temperature.
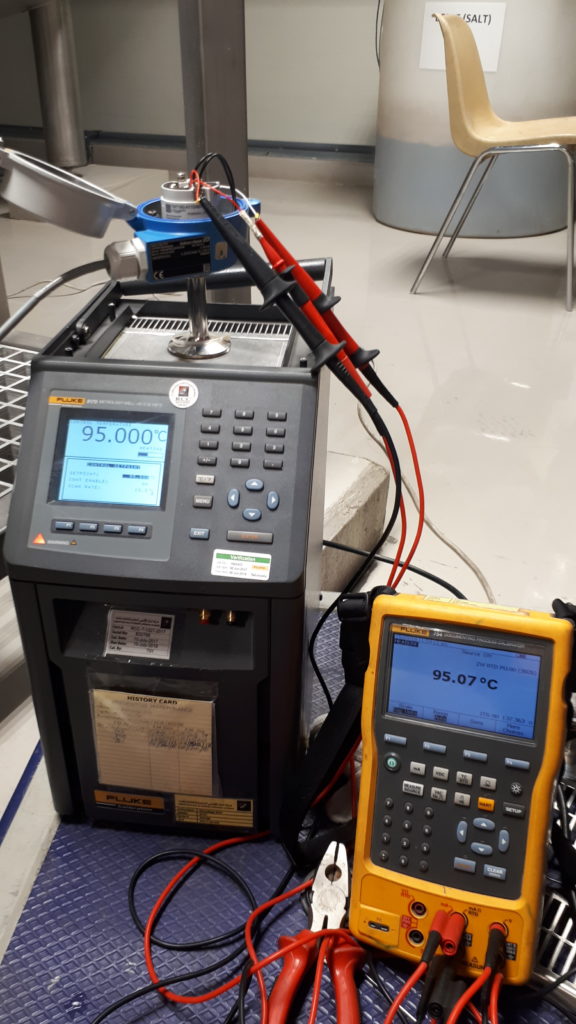
Refer in the photo below. If for any reason that you only need a two wire connection, you can short terminal 5 and 6 and connect it as a two-wire connection.
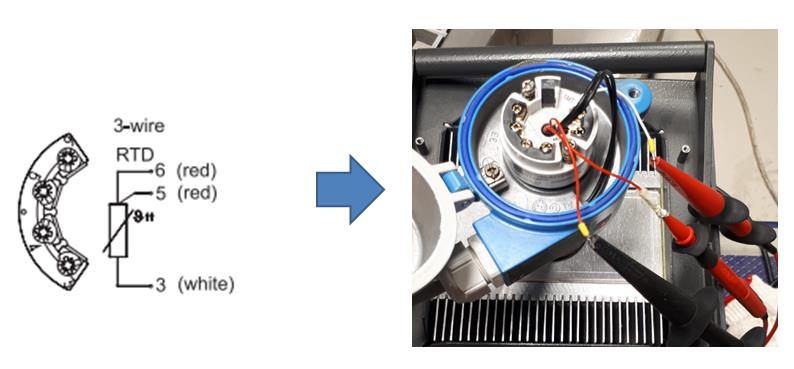
In this setup, the Fluke 754 becomes now the display of the temperature transmitter. And now, we can proceed with the calibration.
The Fluke Metrology Well will generate the required temperature. We will compare the reading of the displayed temperature from the Metrology Well to the displayed temperature of Fluke 754.
If you do not have metrology well, you can use this setup by just considering a 1 point verification of the temperature sensor which is the present user range only. Your only reference standard will be the Fluke 754.
3. Direct temperature Simulation of Electrical Signal Using A Process Calibrator
Just like the thermocouple sensor, you can also simulate an electrical signal to a transmitter with an RTD sensor. A process calibrator like Fluke 754 has an RTD calibrator that can simulate both temperature and resistance signals that can be directly fed into the transmitter input terminals. This type of setup is also suitable for transmitter loop checking.
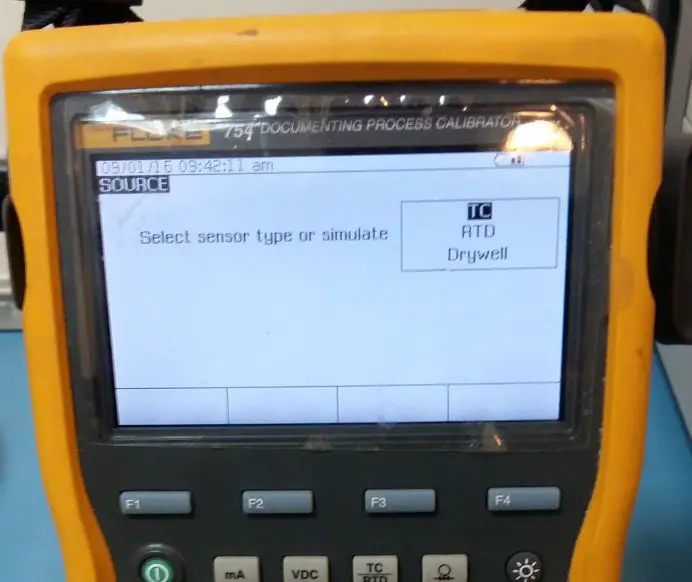
This type of calibration setup and a procedure is one of the easiest. The Fluke 754 has the capability to simulate a direct temperature signal that is being displayed in the PLC display. No need for conversions.
Based on the photo below, we will remove the wires or connection of the temperature transmitter that is going to the PLC and replace it with the wires or probes of the Fluke 754 process calibrator. Note that this is a 3-wire connection set-up.
This is the Endress+Hauser TMT180 type temperature transmitter (see the terminal 6, 5 and 3 in the above setup). This is where we will connect the probes from the Fluke 754.
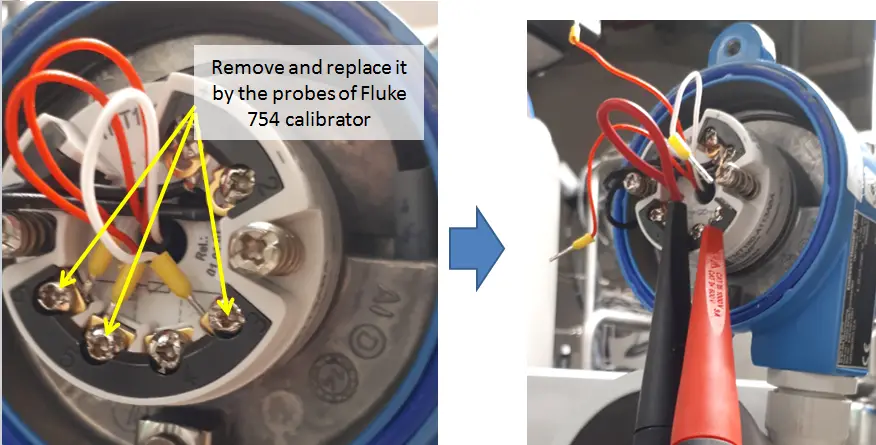
Resistance simulation using an analog signal will be discussed in the next set up below. Keep on reading.
4. Direct Resistance to Temperature Simulation Using a Resistance Box
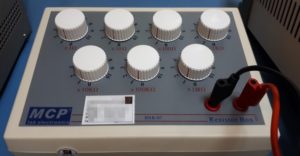
This procedure I can say is the oldest and maybe the cheapest set up because we are using an analog signal. This analog signal is a resistance coming from a set of resistances which is known as the resistance box.
Resistance Temperature Detectors (RTD) as the name implies is dependent on the change in resistance.
The principle is that an RTD is a sensor that produces a resistance output once there is a temperature change. And this resistance value has a corresponding temperature output.
By using a resistance box, we can simulate different values of resistance needed in the process. This is also one way of performing a loop check.
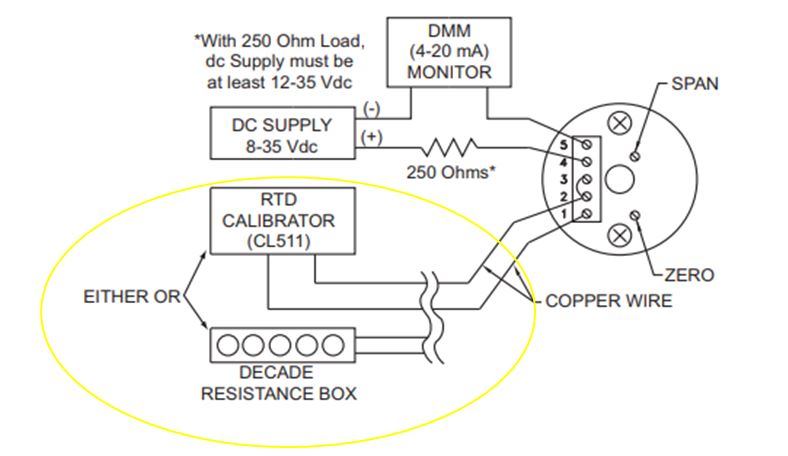
I copied this photo in this link for more info. https://www.omega.com/manuals/manualpdf/M4124.pdf
Since you know that the RTD sensor is a PT100 (you can check it on its specs just in case), you can determine the exact resistance to a temperature conversion.
A table is available as a reference for easy conversion. See below.
The RTD sensor connection will be removed from its place or connection in the transmitter, the same with the set up above, and we will replace it with the probe coming from the resistance box terminal.
Then we will just produce the necessary resistance value by rotating the knob and setting it to a known resistance value with the corresponding temperature.
For example:
– in a ZERO degree Celsius output, we will simulate a resistance of 100 ohms.
– for a 100 degree Celsius output, we will simulate a resistance of 138.5 ohms
For other setpoints, check the conversion table below.
Resistance to Temperature Conversion Table for RTD PT100 @385
There are readily available conversion tables for converting Resistance to Temperature, Below is a sample table.
Make sure that the temperature coefficient or also known as alpha is equal to 0.00385.
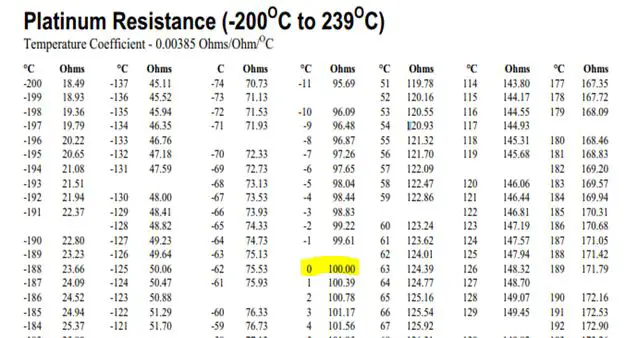
Based on the table, you can see that for PT100:
0 ºC = 100 ohm
100 ºC = 138.51 ohm
You can check here the full conversion table https://www.omega.com/techref/pdf/z252-254.pdf
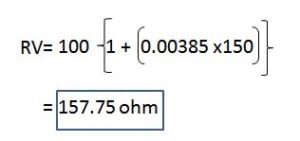
Conversion Formula from Temperature to Resistance for RTD PT100 @385
Using the below formula, you can convert any temperature value to a resistance value that you can use to simulate the RTD Temperature Transmitter with the below conditions:
- an RTD sensor PT100
- a Temperature Coefficient of Resistance (TCR) or alpha of 0.00385
- a reference temperature of 0 ºC

Where:
RV = Unknown resistance value needed
T = Known Temperature
α = 0.00385
Example:
let us compute for the resistance value (RV) with a given temperature = 150 ºC
5. Actual Temperature to 4 to 20 mA Readout
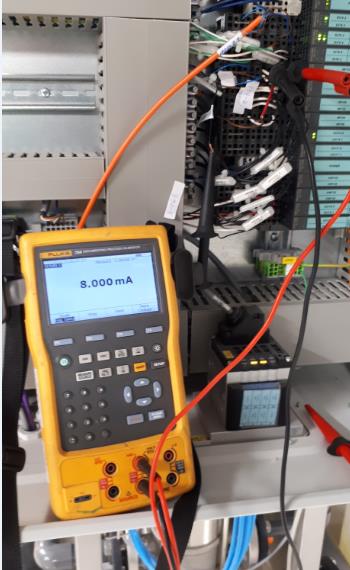
In order for the temperature output taken from the sensor to be transmitted in the PLC panel display, it needs to convert the temperature output into a current signal which is the 4 to 20 mA.
Since the transmitter is converting the temperature value to a current value that will be transmitted to the display panel, we can directly obtain this current output and perform a temperature to current conversion to verify its accuracy.
This is performed by connecting the current meter in series to the supply line. Or in most compatible transmitters, you can use the HART function of Fluke 754 to measure directly in the transmitter supply terminal.
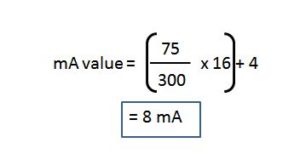
Conversion from Temperature to Current Formula:

For example:
Range is : 0 to 300 ºC
Max Range: 300 ºC
Displayed or measured value: 75 ºC
Temperature Transmitter with a Thermocouple Sensor Calibration Setup
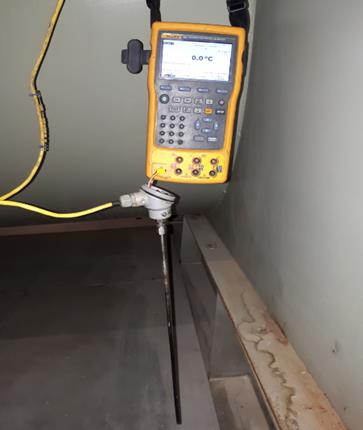
Just like an RTD sensor, thermocouples are also used as a sensor for temperature transmitter. It is used normally where temperatures in the process are ranging more than 1000 deg C.
When calibrating a transmitter with a thermocouple sensor, all of the setups above can be used except set-up number 4 which is about the resistance box.
The difference will only in the simulation part of the Process calibrator because thermocouples are using a voltage signal compare to RTD which is a resistance.
To learn more about thermocouple calibration related setup, check this link>>3-setups-for-thermocouple-wire-calibration
Conclusion
A temperature transmitter is one of the most seen instruments in every industry for monitoring temperature-controlled processes. Having knowledge of what standards to be used and how to use them may help you save up costs for buying standards. You may already have the standards to be used that you can start immediately to calibrate your transmitter.
In this post, I have presented 5 different setups or ways to calibrate your temperature transmitters. You do not need to perform them all. You may perform two at a time but not necessarily all of them. Other setups can be used for verification only. I also included how to compute or convert a resistance value to temperature using a table or chart and a formula.
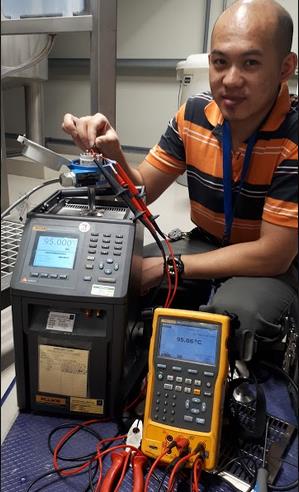
The setup that I am always using is setup no 1 and 2. All of the setups provide an effective way to check for accuracy but these 2 setups ( 1 and 2) provide a more visual accuracy check because the sensor and the loop are being checked with actual heat-generating standards.
I hope that each setup will be useful to you. Do you have any other set up to add? Please comment below and tell me what you think..
Thanks
Edwin
P.S.
Do not forget to share and subscribe
17 Responses
fred
right on point. Extremely useful
edsponce
Hi Fred,
Thank you for reading my post. Appreciate your comment
Best regards,
Edwin
Vin
Hi Sir Edwin,
I just wanna clarify things.
With regards in connecting Temperature Transmitter to PLC
My distance from Temp. Transmitter to PLC is 176 meters and I planned to use 22 AWG.
Can you help me with regards to this problem.
Thank you
edsponce
Hi Vin,
Thank you for reading my post.
I am not an expert regarding the installation and the size of a cable wire to be used, but since you are using a 4-20mA signal, I believe it is possible because the current signal is not affected (or has a negligible effect) by the size or length of a cable. This is one of the reasons why the 4-20 mA signal is very useful.
I have read a good topic regarding your problem and I interpreted it for you. Check this link..forum
This is how it is presented based on my understanding.
This is what you need to consider:
>> The load resistance of the transmitter = X; example: 500 to 1000 ohm
>> The load resistance of the PLC = Y; example: 250 ohm
>> The calculated resistance of the cable (22 AWG = 19 ohm/1000 feet) = Z; actual calculation where you have 176 meter=577 feet: 577 ft X (19/1000 ft) = 10.963 ohm
In order to determine if the size and length of the cable is acceptable, the total resistance should not exceed the resistance of the transmitter.
Y+Z < X;
10.963 +250 = 260.963 approx 261;
Therefore: 261 < 500;
Since 261 is less than 500, then it is acceptable.
I hope this helps.
Edwin
Edward
Hi Edwin!
Thanks for such an informative post! I bought something from the site http://www.famaga.com and I needed to deal with some information. You helped me a lot!
edsponce
Hi Edward,
You are welcome.
Thanks and regards,
Edwin
indigoer074
Hey Edwin. I long have you been waiting for the delivery? I order a PLC Controller from famaga.com a month ago and still haven’t receive it.
edsponce
Hi Indigoer074,
Sorry for that experience.
I just want to inform you that I am not related in any way to Famaga.com. Try to contact their support.
Best Regards,
Edwin
John
Hello Edward,
thank you very much for your information regarding calibration
I have a technical question regarding accuracy.
I want to evaluate the overall accuracy my temperature reading system, I’m not sure if I have to take into account the error introduced by the cable (harness) that I’m using to connect thermocouples (in my case “T” type) to the reading instrument
Theese are my data:
TCa T type thermocouple accuracy (in my range) = +/- 0,5°C
CBacc to take into account cable accuracy? data sheet ± 0.5 or ± 0.4% (0.004*t)
TCa Thermocouple contribution = 1°C
jacc intrument Reference juction contribution (+/- 0.5°C) = 1°C
Reading (at ambient temperature 23 °C ± 2°C) = 20,0 °C
INSTacc Instrument Accuracy (0.1% of reading +/- 0.2) = 0,42
Linear sum (Tca+jacc+INSTacc) = (1+1+0,42)= 2,42 (no cable contribute)
RSS sum = SQRT(1+1+0,1764)=1,475 (no cable contribute)
Is the above calculation correct or do I have to add myexternal 30m cabling error?
Thank you
John
edsponce
Hi John,
You are welcome.
I am not familiar with the full specs of your temperature instrument, but basing it with your data, you have a 0.5 °C specs of error introduced by the cable. This is a big contributor, if you cannot correct it, then you need to include in the calculation.
The usual method for calculation is the RSS Method and this is what I recommend. Add all the error contributor using RSS method to determine the final or overall accuracy.
I hope this helps,
Edwin
Manuel López
Could you help me with a query, I have a pt100 and according to the temperature controller it indicates 50.0 ° C and the value of the probe is 119.7 ohms. my query is if the thermocouple is bad or could it be the error range of my sensor? How to determine if a thermocouple is damaged?
M. Saleh
Thank you very much for these wonderful & useful details.
edsponce
You are welcome Sir.
Thanks again for reading my posts.
Edwin
J
Thank you for sharing this again. Very informative and helpfull as always. Keep up the good work =). God Bless.
edsponce
Hi Ms. J,
You are welcome. Thank you again for reading. I am glad it was helpful.
Have a nice day!
Edwin
JS
HI Ed,
Thankyou for sharing your knowledge. I had a question in regards to carrying out a calibration of a temperature tarnsmitter.
Is the indusrty standard to use a multimeter, or can i simply compare what i have on the PLC to my Reference sensor?
Many Thanks.
edsponce
Hi JS,
Yes, it is the industry standard to use a multimeter for a transmitter output. But you can also use other methods (like what you are asking) as long as the procedure is validated or approved to be used in your process.
The procedure used depends on the available standards you have, and the requirements of your process. But the best is to follow a standard procedure or the manufacturer’s recommendation.
I hope this helps,
Edwin