Calibration of thermometer is very common not just in very industries but even at home. Have you seen an oven with a temperature indicator that looks like a simple clock or a pressure gauge? Or simply watch a cooking scenario where a chef measures the temperature of a cooking oil with just a simple temperature indicator with one hand while stirring with his other hand? The thermometer they are using is a dial thermometer.
In this post, I will explain:
a. what is dial thermometer,
b. why do we need to calibrate a dial thermometer
c. how to calibrate a thermometer specifically a bimetallic dial thermometer,
d. And to show how it is being calibrated inside a laboratory using a metrology well.
What is a dial thermometer?
One of the most used temperature measuring instrument is the dial thermometer. It is an analog type of temperature sensor and indicator.
It is called a dial thermometer because of it has a scale with a dial pointer as an indicator.
One of the best advantage of this instrument is very simple to use and (the best of all) very cheap in price.
You can see this type of thermometers mostly in simple ovens, kitchen (used in taking temperatures of meats and cooking oils), installed in HVAC hoods or pipelines in manufacturing industries and more.
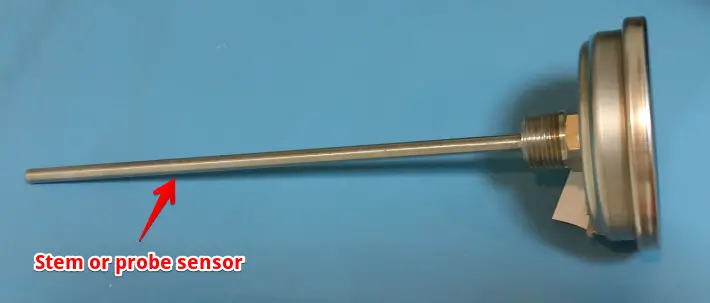
This is also called a metal stem thermometer or a bimetal thermometer. This type of thermometer utilizes a pair of bonded metal strip that is wound into a coil. Any change in temperature corresponds to a movement in the bimetallic metals that are connected to a pointer.
When temperature increases, the bimetallic strip will contract. The movement is carefully designed where it has an equivalent temperature, which is directly displayed on a calibrated scale.
This kind of temperature indicator is purely mechanical where a direct display of temperature is easily obtained without any accessories ( like batteries or wires). That is why it is very simple and cheap. Same simplicity as the glass thermometer.
If you are not concerned in a very accurate measurement of temperature, this is a good option. A simple dial thermometer has an accuracy of 1.5 % to 3 % of its Full-scale reading. It can measure from -60 to 600 degree Celsius.
Why do we need to calibrate a dial thermometer?
Dial Thermometers have bimetallic strips that expand and contract depending on the change of temperature. This expansion and contraction creates a wear and tear in the mechanical parts of the dial indicator as time passes.
Also, these bimetallic metals have a different coefficient of thermal expansions in which exposure to a higher (or lower) level of temperature longer can significantly affect its sensitivity, therefore, affect the response.
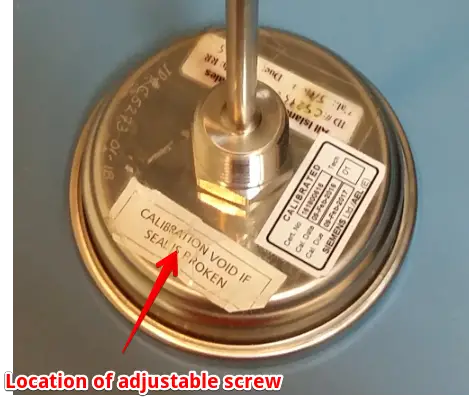
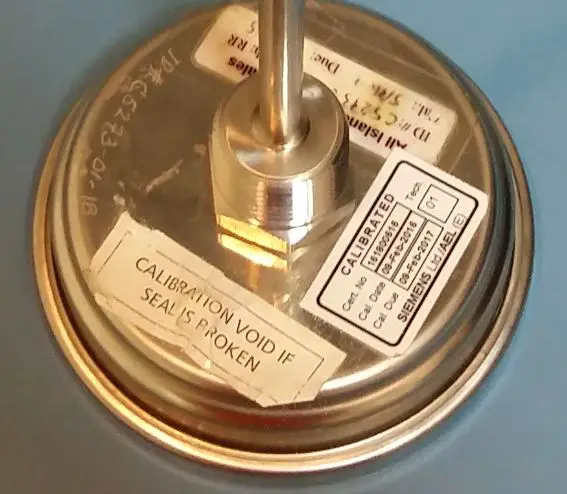
One good thing about calibration of dial thermometers is that most of it are adjustable. Some dial thermometers can be adjusted depending on the design. It has a screw in the back of the display where you can manually turn by a screwdriver.
How to Calibrate A Dial Thermometer
Calibration Method
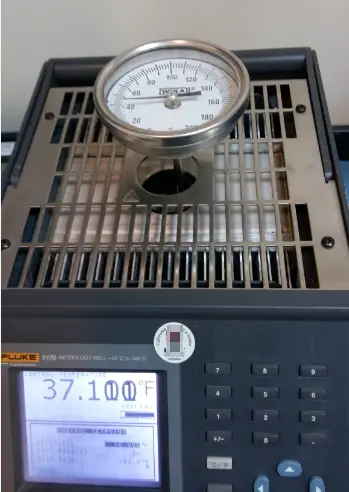
In this thermometer calibration procedure, we will be using a metrology well as our temperature calibration standards. An actual temperature will be generated by the Metrology well.
The metal stem or probe of the dial thermometer is inserted on the insert hole of the Metrology well. The display of the Well will be compared to the display of the Dial thermometer.
Calibration using the Metrology well, which also known as dry bath temperature calibrator, is one of the most accurate method for calibrating a bimetallic thermometers. This is because of its high accuracy (more than 10:1 ratio) and stability which includes the verification of the whole range of test points of the thermometer.
Requirements:
-
-
- Warm-up time ( Unit Under Calibration): At least 1 hour for proper stabilization
- Temperature: 23 +/- 5 deg C
-
- Humidity: 50 +/- 30%
-
- Perform 3 trials for each point or range
-
- Measurement Data Sheet (MDS)
-
Reference Standard and Equipment:
-
-
- Thermo-hygrometer– for temperature and humidity monitoring
-
- Cleaning materials
Calibration Procedure:
-
-
- Observe proper care and safety, Metrology Well generate a high temperature which can cause burn and damage.
- Check the dial thermometer for any visual defects that can affect its accuracy. Discontinue calibration if any defect is noted.
- Clean the dial thermometer with a soft cloth.

Dial thermometer Calibration Setup - Prepare the measurement data sheet (MDS) and record all necessary details or information (Brand, Model, serial #, etc).
- Determine the range of the thermometer, equally divide the range based on the scale, choose at least 3 test point or as per the requirement of the user.
- Power on the Metrology Well and set to the desired temperature, starting from low to high temperature, once the temperature of the Metrology well has stabilized, carefully insert the probe into the holes of the well. There are different sizes of holes so choose the one that fits properly to ensure maximum heat absorption and accuracy.
- Wait for the display to stabilize ( approximately 15 min), tap the (face) glass of the dial thermometer once then get the reading. Record readings on the MDS.
- Wait for another 2 minutes, then get another reading. Repeat this for 3 times.
- Continue steps 7 and 8 until all set points are finished.
- Check readings if within the accuracy defined by the manufacturer, for example, accuracy = +/-1.5 % of Full Scale.
- If the readings are already within limits update the corresponding record, do labeling and sealing and issue to the owner, otherwise, do necessary repair or adjustment.
- End of Verification
-
- To achieve better accuracy, remember to follow the required stabilization time, ensure a proper immersion of stem or probes and tap the face during taking a reading to ensure it is not obstructed.
Conclusion
I have discussed in this post about a dial thermometer, a little overview of how it works, why we need to calibrate and the calibration procedure. Understanding how a metrology well works will help you to calibrate easily a majority of thermometers for temperature in-house calibration, not just a dial thermometer. I recommend visiting my other post regarding Metrology Well.
Thank you for visiting my site, please comment and subscribe
4 Responses
shrabosky
Is that a bi-metallic or metalic
edsponce
Hi Sir,
Thank you for asking. If you are referring to its sensor, yes it is a bi-metallic.
Phuc
Hi Sir,
We’d like to know about CMC and its meaning?Could you please explain us about this?
Thank you and best regards,
Phuc
edsponce
Hi Phuc,
CMC means “Calibration Measurement Capability”, this can be seen on the accreditation certificate with the Scope of Accreditation of an accredited calibration laboratory. This should be available to be seen by customers.
CMC will show the capability of every laboratory to provide the most accurate results. The smallest the CMC, the more accurate the reference standard to be used in calibrating a specific instrument.
CMC is calculated on the same process of calculating measurement uncertainty.
When looking for a lab to calibrate your instruments, this should be one of the main checkpoints to consider.
Thanks for visiting my site.
Edwin