As a Calibration Technician or Engineer, one of our responsibility is to ensure the proper functioning of most measuring instruments installed in our processes.
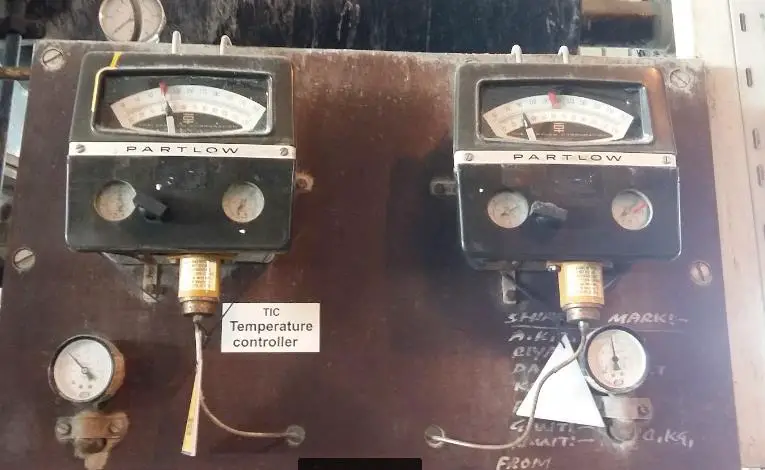
In this post, I will share to you on how I calibrated an old industrial temperature indicating switch, the PARTLOW brand. It is used to monitor the temperature of a tank in a gas industry using a capillary tube as the sensing element or a capillary temperature sensor.
Since this is a very old model, we have spent some time locating on how to adjust its temperature in order to display an accurate reading. I will share to you in order to help just in case you encounter this kind of temperature switch.
What is a temperature switch?
First of all, I will explain little background about the principle of a temperature switch. A temperature switch is one type of switch that uses a temperature sensor to trigger an “on” and “off” status depending on a setting. When a certain set point is reached, it will trigger a switch to stop or turn on a process.
Temperature switch are designed as “normally open or NO”, where once the switch is triggered, it will close. The other one is the opposite which is “normally closed or NC” where it will change to OpeN status once the switch is triggered. And depending on its purpose, it will either start or stop a process.
Some commonly used temperature sensors are Thermocouples, RTDs and Capillary type tubes. This model of Partlow temperature indicating switch is using a capillary tube.
How to Test a Temperature Indicating Switch (Old Partlow model)?
In this model of temperature switch, you can test its functionality by manually turning the knob to a required set point. This is a manually adjustable temperature switch. While turning the knob, the red pointer will move to a required set point. It is also an indicator and at the same time a controller because it can display a temperature reading while controlling it to a desired temperature range.
To test, supply a temperature until the black pointer will align to the red pointer. Once they are aligned, a valve will open and release a pressure, and at the same time, temperature will also decrease.
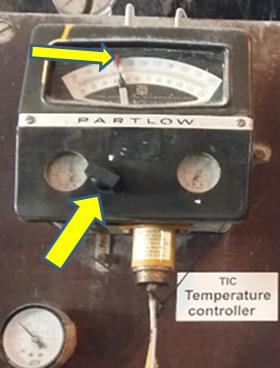
In this process, the temperature indicator is now acting as a switch. It is a temperature switch because once a certain limit temperature is reached, it will trigger a switch to open a valve, thus preventing the tank to overheat and over pressured.
If you need to adjust this temp switch, read more until the bottom.
How to Calibrate a Partlow Temperature switch using a Metrology Well
What is a Metrology well? Please visit my other post here.
Calibration Method
Now I will show you how I calibrate this Model of Partlow temperature switch. The method is simple, we will just compare the output temperature which is generated by the metrology well, our reference standard, to the display of the temperature indicating switch.
Calibration Procedure:
- Observe proper care and safety, Metrology Well generate a high temperature which can cause burn and damage.
- Check the temperature switch and its probes for any visual defects that can affect its accuracy. Discontinue calibration if any defect is noted.
- Clean the probes to make sure no foreign matters are sticking that can affect the heat absorption.
- Prepare the measurement data sheet (MDS) and record all necessary details or information (Brand, Model, serial #, etc).
- Determine the range or test point to be calibrated. This type of temperature switch has an indicator or display, so a number of test points can be determined.
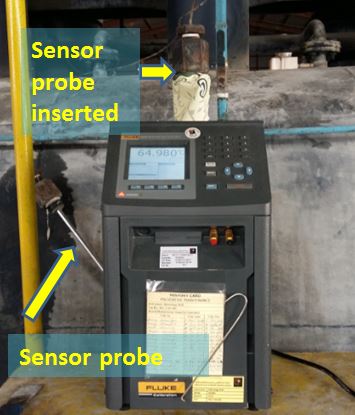
- Turn on the Well and set to desired temperature, starting from low to high temperature, once the temperature of the Metrology well has stabilized, carefully insert the probe on the holes in the well. There are different sizes of holes so choose the one that fits properly to ensure maximum heat absorption and accuracy.
- Wait for the display to stabilize ( approximately 15 min), then get the reading. Record readings on the Measurement Data Sheet (MDS).
- Wait for another 2 minutes then get another readings. Repeat this for 3 times.
- Continue steps 7 and 8 until all ranges are finished.
10, For Switch action:
a. Set the red pointer to desired temperature by turning the knob.
b. Then set the metrology well to the same temperature where the red pointer is set. The switch should be triggered once the black pointer and the red pointer are aligned.
11. Check readings if within the accuracy defined by the manufacturer, for example , accuracy = +/- 2 or reading. If the readings are already within limits update the corresponding record, do labeling and sealing and issue to owner, otherwise, do necessary repair or adjustment.
12. End of Verification
How to Adjust This Type of Partlow Temperature Switch?
In case the readings are out of tolerance, you can adjust the temp switch by following below procedure.
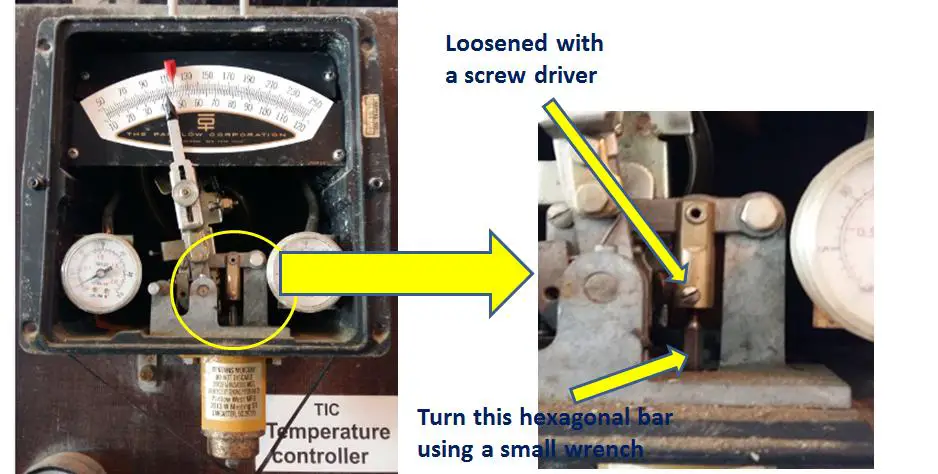
- Open the protective cover of the temperature switch by removing the 2 screws in front to reveal its mechanical parts.
- Loosened the small screw inside to unlock the hexagonal bar ( see picture above).
- Once the screw is loosened, carefully turn the black hexagonal metal with a small wrench on the direction depending if you add or subtract a certain reading. Clockwise to increase and counter-clockwise to decrease.
- After adjustment, tighten back the screw to lock the settings in place.

I have presented how to calibrate and adjust a Partlow Temperature Indicating Switch using a Metrology Well. Even though this is specific to Parlow Temperature Switch, you can still apply the principle to other temperature switches that are using a probe as the sensing element. such as thermocouple and RTD. The only difference is the action of the switch where most of the time you need an additional tool or standard which is either a multimeter or a process calibrator such as Fluke 754.
Looking for a temperature switch? check this out on AMAZON temperature switch
Thank you for visiting my site, please share, comment and subscribe.
Edsponce
Leave a Reply