There are many types of switches which are used in different processes and one of them is the pressure switch. A switch is used to cut or supply a power in a circuit. As the name implies, it is a switch that is triggered by a change in pressure level either increasing or decreasing pressure.
There are also many types of pressure switches but the main purpose is to trigger on or off a certain process once a specified pressure limit is reached. The pressure switch has 2 states, these are Normally Open (NO) or Normally Close (NC) and is based on the design or settings of the unit, these settings are interchangeable depending on its application.
A change in input pressure results to a change in output state and therefore I can also say that a pressure switch is also a pressure sensor.
You can read more about pressure switches in this link….WIKIPEDIA
In this post, I will present the following:
- How to set up and calibrate a Baumer or Bourdon Haenni Pressure switch
- Reference standards that can be used to calibrate a pressure switch
- How to adjust just in case an error is detected
The pressure switch that I will present here is an analog type pressure switch where only a mechanical movement or positioning of the switch is heard or observed through the use of a digital multimeter or a process calibrator Fluke 754.
How to test a pressure switch?
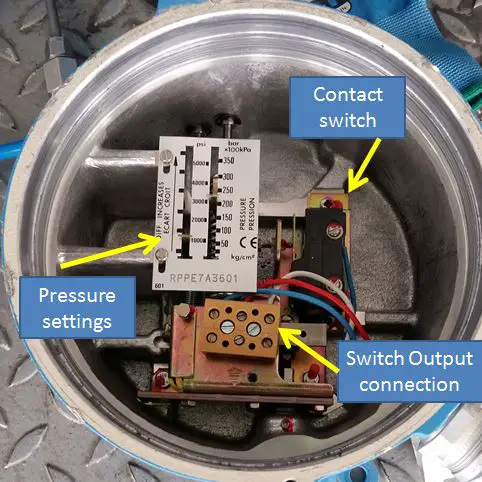
A pressure switch can be tested if functioning properly by supplying pressure until the switch is triggered once the set pressure is reached. The pressure switch has a scale to see the settings of the required pressure. Once the switch is triggered, it will start or stop a process.
During calibration, a known pressure source from a calibrator is used in order to determine the exact value of pressure when the switch is triggered. Just compare the set pressure value and the pressure reading from the calibrator.
The analog or mechanical type of pressure switch can be tested or calibrated even it is removed from its power source. We will be using a multimeter on its OHM meter function or to the most advanced type is the Open and Short functions where it emits a sound when the circuit is Shorted and stop when it is Opened.
Pressure Switch Calibration Procedure
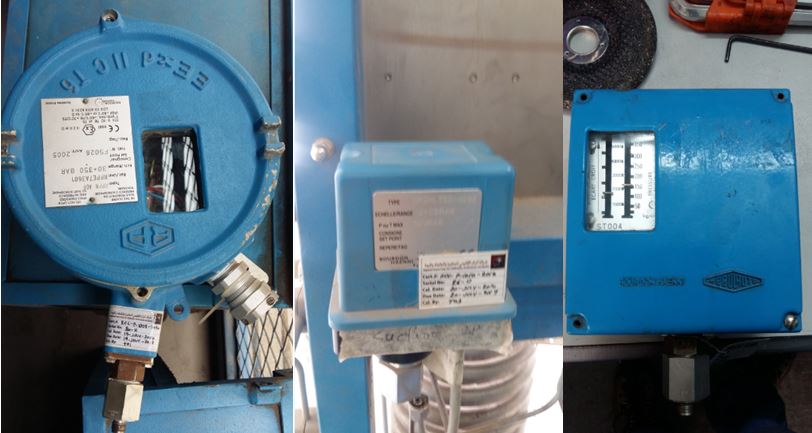
In this procedure, we will use the Baumer or Bourdon Haenni brand of pressure switches which are used to monitor pressure on a compressor system in a gas industry. This procedure is also applicable to a differential pressure switch type. Moreover, this method can also be used to most pressure switches as long as proper fluid and fittings used are compatible including the digital pressure switches.
Objective:
To define the calibration procedures for Pressure Switch using Electronic Deadweight Tester (EDWT), pressure module with a pneumatic hand pump and a process calibrator.
Calibration Method:
The pressure generated in EDWT or pressure module with the hand pump is directly compared to the set value of the Unit Under Calibration (UUC) which is the pressure switch. The pressure switch triggering mechanism ( OPEN/CLOSE) is monitored or detected through the use of the process calibrator or simply a multimeter (ON and OFF triggering using the tone emitted).
Requirements:
- Warm-up time ( Unit Under Calibration): At least 1 hour for proper stabilization
- Temperature: 23 +/- 5 deg C
- Humidity: 50 +/- 30%
- Perform 3 trials for each point or range
- Measurement Data Sheet (MDS)– for the recording of results.
Reference Standards
The reference standards and equipment needed are:
- Fluke 754 process calibrator or a Digital Multimeter
- Electronic Deadweight Tester (EDWT)– for high-pressure source
- Fluke Pressure module with a pneumatic hand pump – for low-pressure source
- Thermohygrometer– for temperature and humidity monitoring
- Set of fittings
- Cleaning materials
Calibration set up
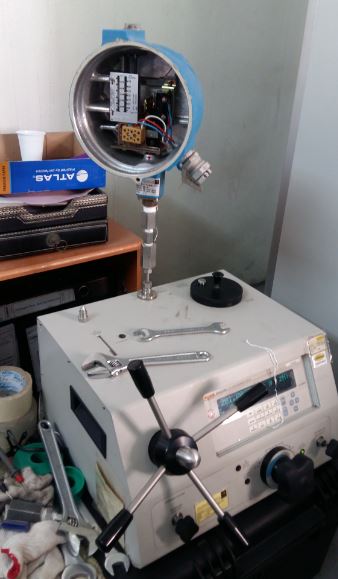
For high-pressure ranges, we will use an Electronic Deadweight Tester ( EDWT) and still a multimeter or FLuke 754 for open-close monitoring of the switches.
Calibration Procedure:
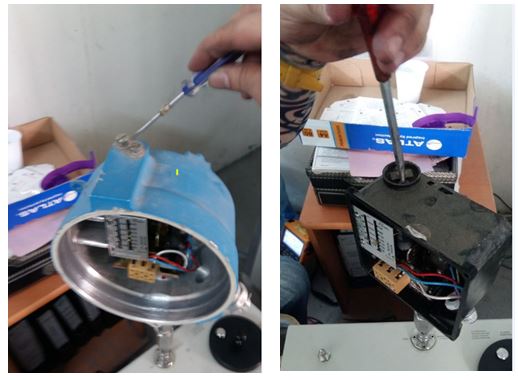
- Check the pressure switch for any visual defects that can affect its accuracy. Discontinue calibration if any defect is noted.
- Observe proper stabilization time of at least 1 hour.
- Prepare the measurement data sheet (MDS) and record all necessary details or information (Brand, Model, serial #, etc).
- Determine the test point to be calibrated.
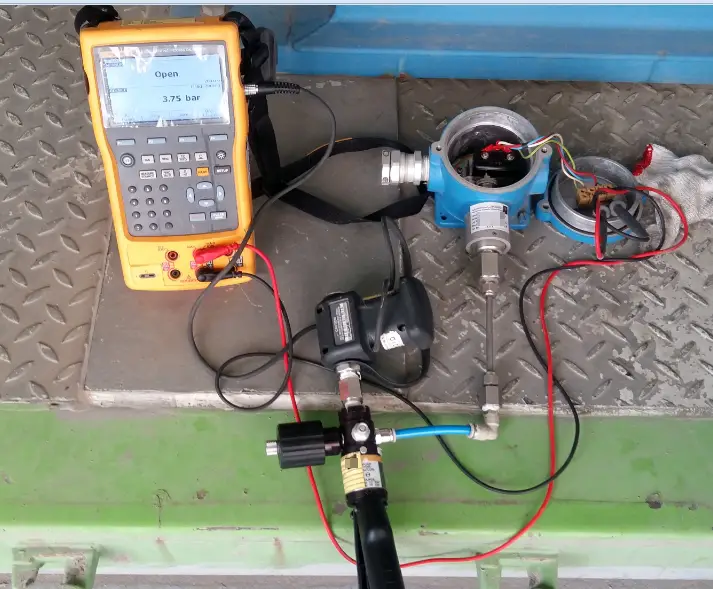
- Connect the pressure switch to the pressure calibrator as shown in the set up above.
- Connect the Fluke 754 or a digital multimeter as shown below. Set the meter to its Open/Short function.
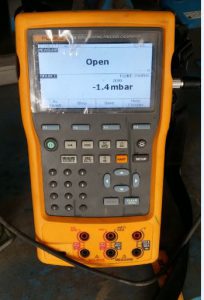
Dual Functions of a Fluke 754. Pressure indicator and OPEN and CLOSE indicator that emits a sound during a CLOSE status of the switch 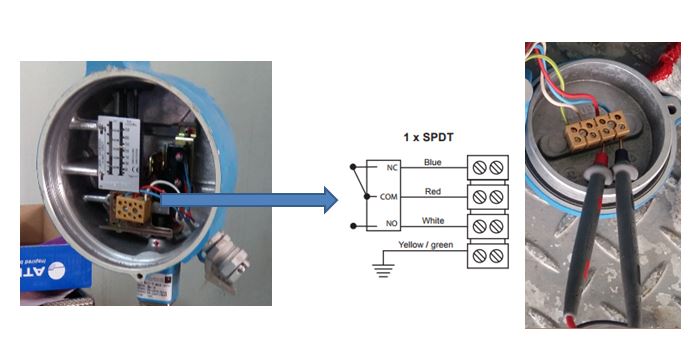
Connections for the multimeter or Fluke 754 lead wires. Observe the NC and NO connections. - SET action: Apply pressure from the deadweight tester or hand pump until the switch is triggered. You know that the switch is triggered when a continuous tone from the multimeter or process calibrator is heard. This is the case for a NO (normally open) setting of the pressure switch.

(For Normally Close (NC) switch, an emitted tone will stop once the switch is triggered)
- Wait for the display on the pressure calibrator to stabilize, then get the reading. Record readings on the Measurement Data Sheet (MDS).
- RESET action: After recording the value of increasing pressure, slowly decrease the pressure then observe if the emitted tone will stop. Record the indicated pressure value.
- Repeat this for 3 times.
- Check readings if within the accuracy defined by the manufacturer, for example , accuracy = +/- 1% of Full Scale. If the readings are already within limits update the corresponding record, do labeling and sealing and issue to owner, otherwise, do necessary repair or adjustment.
- End of Verification
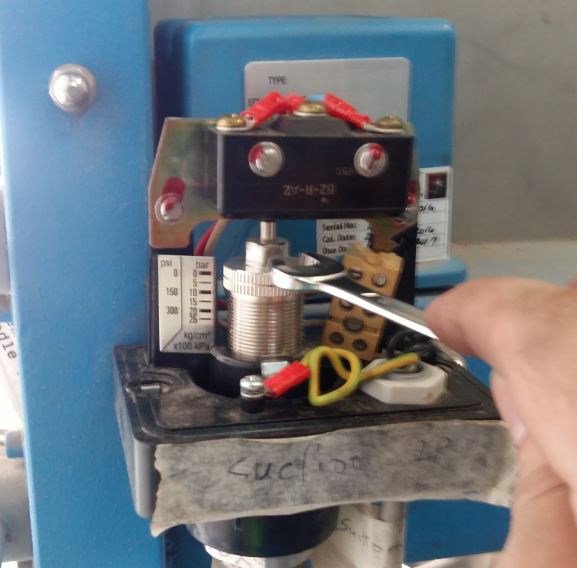
Pressure switch adjustment techniques
Adjustment technique when using these type of pressure switches ( Baumer / Bourdon Haenni with model RP2El or RPPNAA3601-0201).
Conclusion
I have discussed above what a pressure switch is, its basic function and presented the calibration procedures. Also, just in case you encounter an out of tolerance reading or needed some adjustments, a set up on how to adjust are included.
There are so many kinds of pressure switches but the basic principles are the same.
Thank you for visiting my site, please leave a comment, share and subscribe.
edwin
7 Responses
صنعت تک
The content was very good, please visit our site
Sanat Tak Industrial Automation is a specialized set of training, introduction and sale of pressure measuring equipment including pressure sensors, pressure transmitters, pressure switches and pressure gauges that help its customers to easily identify their suitable sensor or transmitter and if Need to buy. You can always call 02144032578 for advice or guidance.
irenx
thank you
edsponce
you are welcome
ADAKSEPEHR
TAHNKS FOR BEST BLOG
edsponce
You are welcome. Thanks also for visiting my site.
Okechukwu Chidozie
Is very good procedure but please can I have they video As demonstrate
edsponce
Hi Okechukwu Chidozie,
Maybe in the future, I will try.
Thanks for reading.
Edwin