How to extend the current measurement range of your handheld digital multimeter up to 10X or more?
Most regular handheld multimeters have a current range that you can measure up to 10A. A problem occurs when there are situations where we need to measure a high current range, (usually in the range 20A to 1000A) and the only measuring instrument we have is a handheld multimeter.
One solution to this problem is to purchase another high rated ammeter or a clamp meter that can measure up to 1000A, but as we can see, this is very costly.
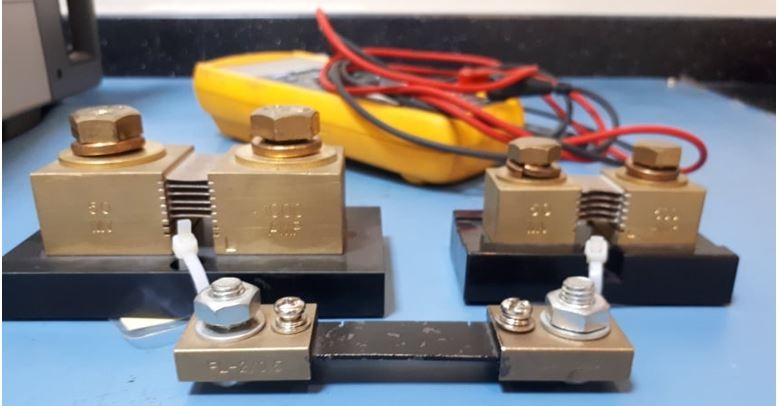
An alternative solution, which is very affordable with higher accuracy compare to clamp meter, is just to integrate what we call a current amplifier, also known as a current sensor or a current shunt.
By integrating this kind of sensor or device to our multimeter, we can now measure a very large amount of current.
In this post, I will share with you the following topics about the current shunt.
- What is a current shunt?
- Current shunt calibration setup
- How to use a current shunt in calibration
- How to verify the accuracy of a current shunt?
- 2 Important things to consider when using a current shunt for calibration
What is a current shunt?
A current shunt is the same as a resistor, thus, also called a current shunt resistor, but it has different material (called manganin) that can handle a large amount of power. It has a very low resistance value that makes it a good conductor for a current to pass through.
If you are familiar with the use of a current shunt resistor, then it is easy for you to understand its principles. It has the qualities of resistors but with different ratings and applications.
The current shunt is used to measure the current in a given circuit (AC or DC). But the current is measured indirectly by utilizing the value of voltage and resistance. It is operating in the principle of Ohms Law (V=IR).

The current shunt is also a sensor, it is used to detect the presence of a voltage which in turn used to calculate the equivalent current using Ohms Law.
Another term for the current shunt sensor is a current amplifier. Since we can measure a high range current just by measuring the voltage using a multimeter, we have extended its measurement range.

The Current Shunt in Electrical Calibration
Now that we know what a current shunt is, I will now explain its importance in calibration especially under the electrical parameter.
The main purpose of a current shunt in calibration is to measure a high current range. If you are looking for a cheaper with higher accuracy standard (above 4:1), compared to a clamp meter, then this is a good choice.
Common accuracy specifications of current shunts are ±0.1%, ±0.25% or ±0.5%. Compared to Clampmeter which is having an accuracy of 1% to 3%.
A current shunt will become part of our reference standard, and therefore must be calibrated before use. This is used with a calibrated digital multimeter.
But keep in mind that its accuracy is also dependent on the accuracy of the multimeter and therefore, we should consider using a highly accurate multimeter.

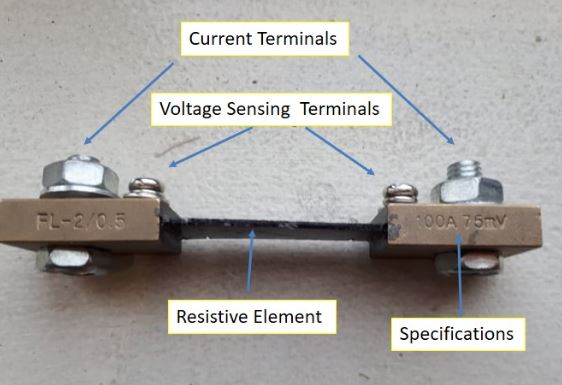
The rated value of a current shunt is shown above. It is printed in its body. How to use the rated value of a current shunt?
This means that the maximum current that can be measured by this shunt is 100A with a voltage of 75mV.
When a 100A current will pass in this current shunt (current sensor), we should expect to read a voltage value of 75 mV.
And therefore, since current and voltage is given, through Ohms Law, we can calculate the resistance value of the current shunt.
V=IR, R =V/I, Therefore:

R = 0.00075 Ω or 0.75 mΩ
This resistance value is fixed regardless of the current that is present in the shunt (with a little difference usually in the lower range). A current value with corresponding voltage (mV) value.
Or, since the current shunt is calibrated, check its calibration certificate for the exact value of the current shunt (the resistance value) for more accurate measurements at a given range of current.
Again, once resistance is known, by using Ohms Law, the formula I = V/R, we can calculate the current at any given voltage.
Current Shunt Calibration Setup
The calibration setup using a current shunt is very simple.
- We will just connect the current shunt in series with the load or within the circuit.
- Connect the multimeter probes in parallel with the shunt
- Set the meter to mV function
- Measure the voltage across the shunt.
- Calculate the current value using Ohms Law equations.
That’s how simple it is. It has the same principle when measuring a resistor in a circuit. But be careful, because we are dealing with an exposed or open electrical line.
How to Use the Current Shunt for High-Range Current Calibration
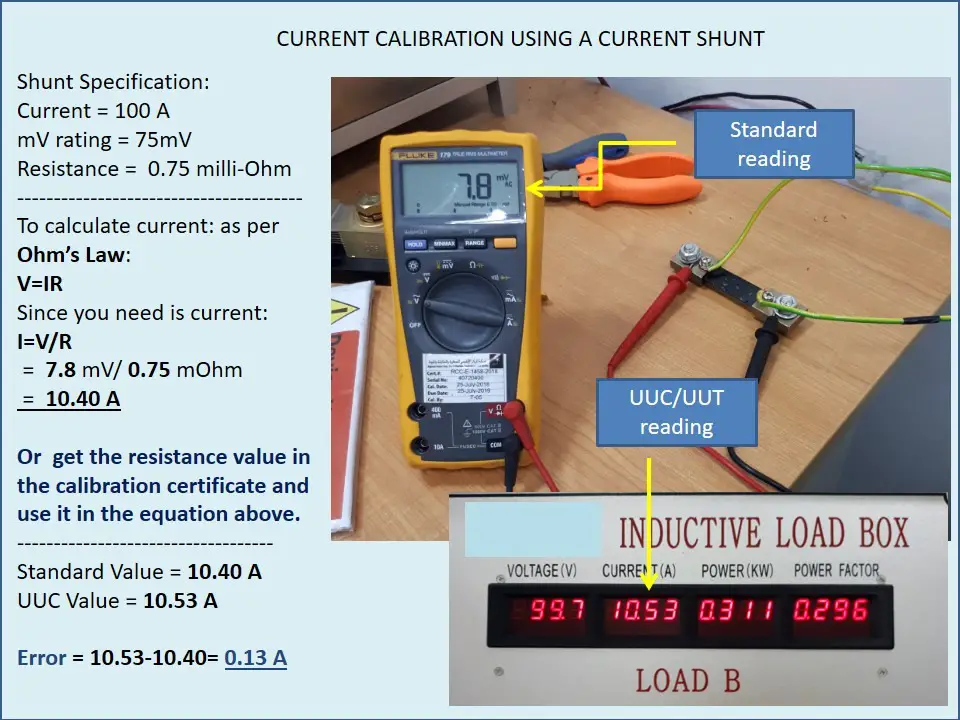
In this example. We will be calibrating an Inductive Load Box. We will focus the calibration on its current output. This is where we will use the current shunt.

A little advice about the photo above: Notice that the multimeter probes are connected in the wrong terminal, it should be in the voltage sensing terminal.
Also, the shunt I used is a dc shunt while the signal is an ac. If you are trying to achieve higher accuracy results, then this setup could contribute to an error that could be a problem. I have read a good article about this written by Dennis Destefan, check in this Link
Now, as per the photo above, the multimeter is only capable to measure up to 10 A and therefore, we will use a current shunt to measure above 10A.
We will calibrate the current parameter of the inductive load box. In order to do this, we will connect the current shunt in series with the circuit, the line going to the load.
Then, at the same time, we will connect multimeter probes in parallel with the current shunt to measure the voltage across the shunt.
We will calibrate the current output of the Inductive load box which is set to an output value of 10.53 A (see the photo above)
Then using Ohms Law, we can determine the actual value of the current based on the acquired voltage reading from the multimeter. Then we can now compare and determine the error.

How to Verify the Accuracy of a Current Shunt?
The current shunt verification is almost the same as a resistor. The only difference is that we need a higher current source in order to achieve the maximum range or the working range of the current shunt.

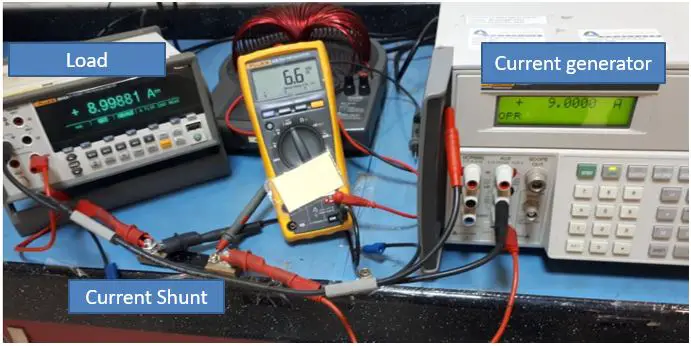
The current shunt can be verified by generating a known current. As per the photo above, I supplied a known current and measured the voltage.
Base on the photo, a 9A current is generated, and again, through Ohms Law, we will use the voltage reading to calculate the current. (current shunt specs: 100A/75mV)
I = V/R; I = 0.0066V/0.00075 = 8.8 A
We will use the 0.5% accuracy as the basis for a tolerance limit as an example (you may include the error from the multimeter and .current generator for a wider and more acceptable tolerance)
Tolerance limit = 0.005*100 =0.5 A
Tolerance Interval = 9 +/- 0.5 = 8.5 to 9.5
Therefore, the verification result is PASSED
3 Important Things to Consider When Using the Current Shunt
- If you want to achieve better accuracy, connect the shunt in its proper connecting terminals (see parts of a dc shunt in the above photo) that are tightly mounted.
- Use only 66% or ⅔ of the rated output to prevent heating which can damage the shunt.
- If in any case, you need to use above the maximum limit (above 66%), see to it that temperature does not reach above 80 deg C. Usually within 2 minutes of continues current flow.
Read more in this link >> shunts
Conclusion
If you are already familiar with a resistor, then using a current shunt is already easy for you. By using a current shunt, you need to familiarize yourself with Ohms Law. This where the principle of calculating the value of the current shunt is based.
By integrating this device or standard in your electrical measurement, you can extend the current measurement range of your multimeter without purchasing additional costly ammeters.
In this post I have shared with you below topic:
1, what is a current shunt.
2. The Current Shunt for Electrical Calibration
3. Calibration setup using a current shunt
4. Example of Calibration Using a Current Shunt
5. How to verify a current shunt.
6. Safety things to consider when using a current shunt.
I have presented here how to use a current shunt to measure high-range current, please make sure that you observe the safety limit in order to avoid damage or accident.
If you are looking to buy for a current shunt, you can check it here.
Thank you for reading, please leave a comment, subscribe and share if you learn from it.
You can also connect with me on my Facebook page.
Best Regards,
Edwin
22 Responses
Ariel
Hello Edwin,
Thanks to this article on how to extend a high current measurement using a multimeter.
Best Regards,
Ariel
edsponce
Hi Ariel,
You are welcome. Thank you for reading my post.
Thanks and regards,
Edwin
Aung Kyaw
Thank you very much for shared and we can learn from your post.
edsponce
Hi Aung,
You are welcome.
Thank you also for reading my post.
Best Regards,
Edwin
Security Cameras Auckland
Important use of a current shunt in electrical calibration is driving the internet crazy. to the ones not knowing WHY.It is a must read and is worthy coming back to it again and again. . I love this blog and really happy to come across this exceptionally well written content. If you are looking same kind of valuable information, then can also visit redline-electrical.co.nz.
edsponce
Thanks for the comment and for reding my posts.
Best regards,
Edwin
Erwen Bilo
Thanks Sir Ed for a well written Blog, But as for ISO 17025 accredited lab, I don’t think if you can use this Set-up, if you do it would more complicated to calculate the uncertainty of measurement.
edsponce
Hi Sir Erwen,
You are welcome and thank you for reading.
I do not think that it will complicate the measurement uncertainty calculation. We just need to include its measurement uncertainty from its calibration certificate in the existing budget together with the multimeter. Other sources can be added based on your assessment of the setup.
Best regards,
Edwin
West Auckland Electrician
This article provides us information regarding important use of a current shunt in electrical calibration. The best available content here and the article is much informative regarding work as well. I love this article, thanks for producing such great contents. I love your posts always. You must also check out Bencableelectrical.co.nz it has some great insights too.
edsponce
Thank you for the comment.
Best Regards,
Edwin
Overhead powerline covers
I am really happy and surprised too to read such a lovely article on this topic.. Thank you very much for taking your time out for doing this research on this topic and sharing it with us!! Good luck for your future articles too, would love reading them… I have seen similar information at one place, you can also see on Mitchellelectrical.nz.
edsponce
Thank you. Best luck also to your site.
Edwin.
Electrician Waimauku
Thank you for making us read a well written article on the importance of using a current shunt in electrical calibration.These are must read for all. This article is a good one to look at. You will get best review over here and would suggest others too. Great blog indeed, will visit again future to read more!! I must say this, if you get time can visit Livewireelectricalauckland.co.nz for ideas on this topic.
edsponce
You are welcome. Best of luck to your site.
Thanks for visiting my site.
Edwin
Electricians West Auckland
Great analysis, I love how you really went in-depth with everything it really projects what one needs to know about important use of a current shunt in electrical- calibration. You have done an excellent job with this content I must say.
edsponce
Thank you.
test and tag Auckland
This is such a nice blog stating about the importance of using current shunt in electrical calibration. It provides us true and insightful information regarding the topic. Things to be considered include many options listed in this link. It is very useful article and would suggest others too. I am sure many people will come to read this in future.
Prerna
Be it the shunt calibration, multimeter calibration or calibration for any electrical parameter; the uncertainty measurement must be taken into account accurately. The ISO 17025 accredited electrical lab will add more reliability to your outcomes.
mohamad
Need to know the exact way to measure resistance in current shunt.What instruments are required?
edsponce
Hi Mohamad,
You need a high precision multimeter and a current generator that can generate current within the range of the shunt, we use Fluke 5522A for a low range current as seen in the photo above.
Once a known current is generated, you need to measure the voltage using the Multimeter. Once current and voltage are known, you can now calculate the resistance using Ohms Law, R=V/I.
I hope this helps,
Edwin
Allen
Thanks for creating a great article about shunts. I work as an electrician in New Zealand and this is by far the best article I have found out about shunts. Keep up the good work!
edsponce
Hi Allen,
You are welcome. Thanks for reading, appreciate the comments.
Best regards,
Edwin