I believe most of us are familiar with ovens. Once heard, we think of it as equipment used for baking or roasting. This is what most of us know but for those exposed in manufacturing areas, some usage of ovens are for faster drying, sterilization, and in reliability testing.
As an example, in semiconductor industries, Oven is used to test the strength of solder joint in a chip on a given temperature. In a food industry, some laboratory appratus used for testing products inside the lab are being dried and sterilized using the oven.
As we see, above usage of ovens are critical where an accurate temperature should be maintained. And this accuracy can only be determined through calibration.
In this post, I will share with you how to calibrate an electric oven using a digital thermometer and a thermocouple wire. I will present here a 3 point calibration set up in an electric oven with an analog temperature controller.
Although you will see here a simple and small electric oven, it is applicable to most single layered industrial ovens which are used in the manufacturing field which is the digital oven, the more advanced type.
Why do we need to calibrate ovens?
The best answer is to ensure the accuracy of the temperature inside the oven enclosures. Most electric ovens are mechanically operated where each part experiences stress specifically the thermostat part, where the very sensor is attached.
The thermostat is operated by a dial knob that is designed to be triggered to switch on and off once it sensed the desired temperature settings. When this sensing is not accurate, then the desired temperature will not be produced which will affect the quality of your product (or bread if baking).
As usage is in maximum, the sensor losses its accuracy or efficiency, and therefore, a calibration should be performed in order to detect such in-efficiency or in-accuracy.
Temperature calibration is also performed after a repair is done in order to verify its accuracy.
Moreover, calibration is performed to determine the exact position and location of items to be placed inside the oven where the temperature is at a minimum or maximum in order to create proper adjustments or positioning of products.
Electric Oven Calibration procedure
The main reason why we calibrate electric oven is to determine how accurate or inaccurate the temperature that it produces at a specified set point or set value.
Other reasons why we perform calibrations includes:
- To determine the stability of temperatures.
- To determine inhomogenieties or uniformity of readings.
- To determine the most accurate or appropriate locations inside the chamber.
- To determine the accuracy of a certain test points as per user settings.
Oven temperature calibration is simple but it takes a lot of time if you are performing to calibrate more than one test points because we need to stabilize before we can take the reading.
And this stability is not the same for every oven. Some ovens takes an hour to reach the test point before stabilization.
Calibration Method
The basic procedure to calibrate electric oven is to compare the generated temperature of the oven through the set value in the dial knob to the reading of the reference standard which is a digital thermometer with a thermocouple wire as the sensors.
Requirements
- Warm-up time ( Unit Under Calibration): At least 1 hour for proper stabilization
- Temperature: 23 +/- 5 deg C
- Humidity: 50 +/- 30%
- Perform 3 trials for each point or range
- Measurement Data Sheet (MDS)- to record results
- Click this link to learn more about Measurement Data Sheet (MDS)
Reference Standards to be used
- Fluke 1524 reference thermometer/Fluke 754 process calibrator
2. Thermocouple wires ( capability to withstand a temperature of at least 300 deg Celsius)
3. Thermohygrometer– for temperature and humidity monitoring
4. Cleaning materials
Oven Calibration Set Up
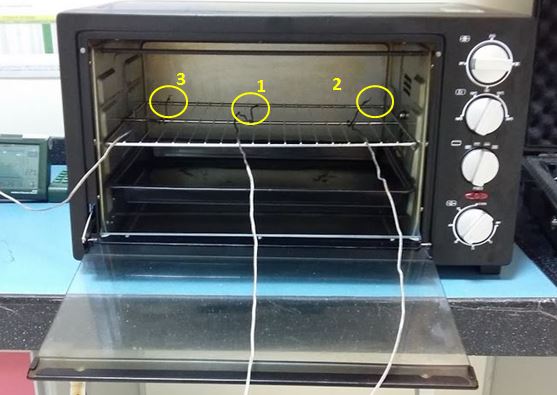
Open the oven and insert the thermocouple wires inside. In this setup, I distribute the wires in 3 locations, 1 in the center, 1 in the middle right and 1 in the middle left side (See figure below). The middle thermocouple will be the reference sensor.
The more thermocouple wires, the better, in this way, we can determine a good uniformity reading.
The best number of thermocouples that we can use in this size of the oven is 5 pcs, which are evenly positioned in the 4 middle areas of each sides of the oven and 1 at the middle.
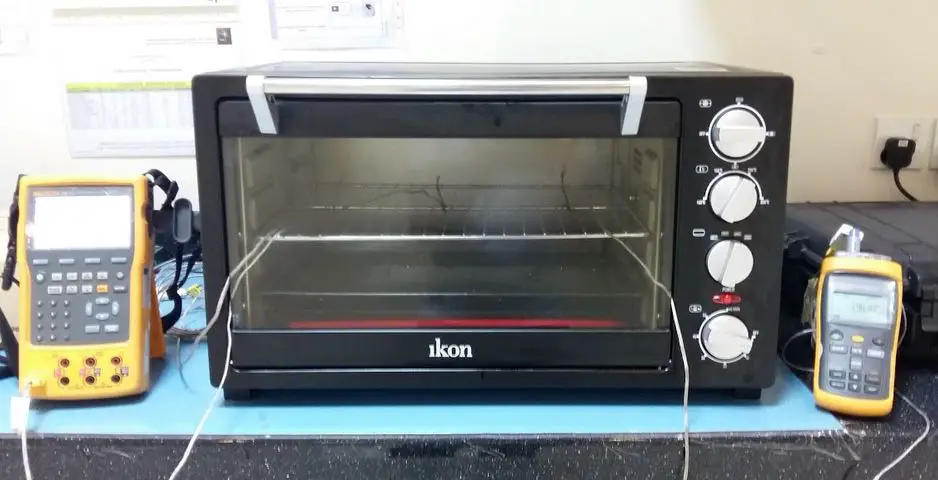
The oven below is for household use, and for the simplicity of my presentation, I used only 3 pcs of thermocouples.
If you have a temperature recorder with 5 or more channels, then this is the best reference standard to be used. You can just leave it while it records the readings automatically.
Calibration procedure
- Observe proper care and safety, ovens generate a high temperature which can cause burn and damage.
- Check the electric ovens for any visual defects that can affect its accuracy. Check the fan, the heating element, and the thermostat dial functionality. Discontinue calibration if any defect is noted.
- Prepare the measurement data sheet (MDS) and record all necessary details or information (Brand, Model, serial #, etc).
- Determine the range of the electric oven, equally divide the range based on the scale, choose at least 3 test point.
- Follow the set up above.
- Turn on the electric oven and set the temperature to set point 1, starting from low to high temperature.
- Wait for the readings on the display to stabilize (approximately 15 min).
- Record readings on the MDS. Fill up Trial 1 for thermocouple 1, trial 2 for thermocouple 2 and trial 3 for thermocouple 3.
Sample Oven Measurement Data Record (MDS) - Turn to the next set point and Continue steps 7 and 8 until all ranges are finished.
- For stability, select the mid range and determine the highest and lowest reading within a 30 min. time interval
- Check readings if within the accuracy defined by the manufacturer or as per user requirements, for example, accuracy = +/-2 Deg C. If the readings are already within limits update the corresponding record, do labeling and sealing, otherwise, do necessary repair or adjustment.

11. End of Verification
Through the calibration process, we can determine the error and perform corrections. Also, by using a timer, we can determine how long it will take to reach the set temperature and become stable.
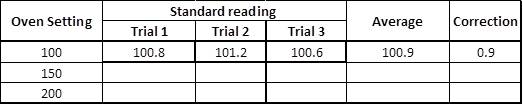
To get the correction, just subtract the average standard reading and the oven knob setting. Use the correction for every use of the oven setting to compensate for the error. This is applicable if the oven is not adjustable.
Based on the calibration result (table above), there is a correction of 0.9 deg Celius, it means that for every set point of 100, add a 0.9 as the correction factor. To learn more about interpreting a result in a calibration certificate, visit this post: how to interpret a calibration certificate.
I have presented here a simple procedure to calibrate an electric oven by using a Digital thermometer with thermocouple wires as the sensor. Make sure to use the right thermocouple wires to avoid burning of its coating.
You may check here K Type 800C Wire Lead Measuring Thermocouple Sensor.
Thank you for visiting, please comment, share and subscribe.
Edwin
6 Responses
Serjy
Good article.
edsponce
Hi Serjy,
Thank you for reading my post.
Best regards,
Edwin
PS Lim
Hi Edwin,
Could you advise me on the measurement uncertainties components to be include for this oven calibration.
edsponce
Hi PS,
Thank you for visiting my site.
Below are the components of measurement uncertainties that you can include in your oven calibration uncertainty budget.
1. repeatability – Type A
Type B
1. Resolution of the Standard
2. Resolution of the UUC
3. Stability
4. Uniformity
5. The drift of the standards used
6. Uncertainty value of the standard (thermometer and probes)
I hope this helps.
Edwin
Merry Deyta
Hi Sir,
Thanks for this post.
Is there a standard procedure for calibration of oven? If I used a laboratory-developed procedure, how can I validate my procedure? what statistical tool can I use?
edsponce
Hi Merry,
It’s my pleasure..
You can use the EURAMET cg 20 and DKD-R 5-7 as a guide for oven standard procedure. And for validating a laboratory developed method, you can check “Eurachem Guide , The Fitness for Purpose of Analytical Methods”. Euramet and Eurachem are free to download on their website.
I hope this helps,
Edwin