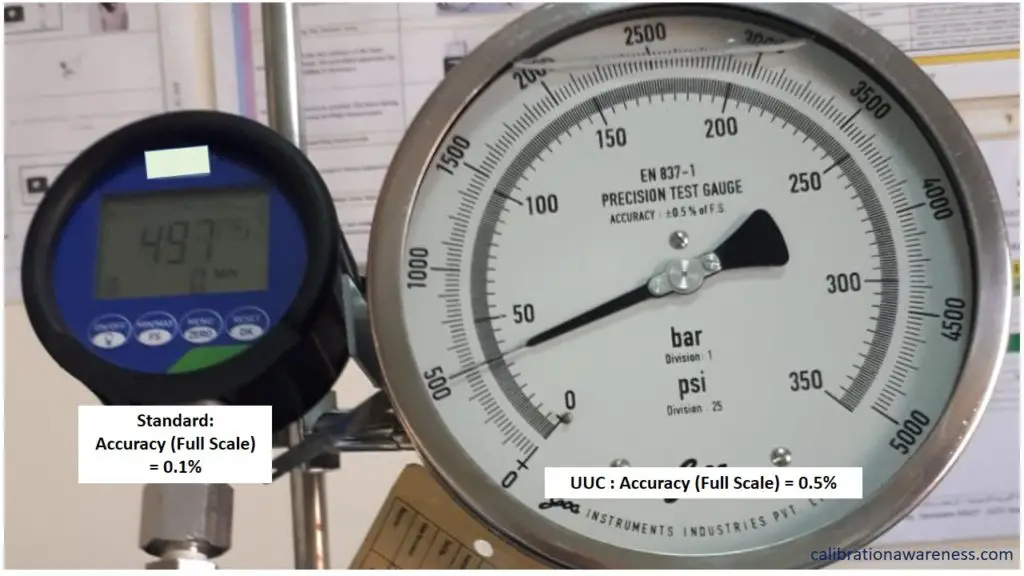
Are you familiar with the differences and relationships between Accuracy, Error, Tolerance, and Uncertainty in calibration Results?
There are so many terms that we always use or read during our measurement process. Knowledge in these terms is the key to proper understanding and execution of your measurement results which is also an important part of a calibration awareness training that you should consider.
I have recently received the below question in most of the comments in my posts, And therefore, it is worth a topic to discuss.
Q1. I am unable to understand the relation between Accuracy, Error, and uncertainty. Can you tell me with example?
Q2. What is the difference between Tolerance and Uncertainty?
One way to easily learn, and implement the results in a calibration certificate, and to properly understand most of the calibration procedure is to understand the measurement terms in it.
In my last article, I presented the difference between Calibration, Verification, and Validation in the measurement process. See this link if you have not read it yet >> Calibration-Verification-Validation
Now in this article, I will present the differences, relationships, and Interpretations of the following terms: Accuracy, Tolerance, Error, and Uncertainty.
Moreover, I will share with you below topics to answer the questions above:
- The Difference Between Accuracy and Error (Accuracy vs Error)
- The difference between Error and Uncertainty (Error vs Uncertainty)
- The Difference between Tolerance and Uncertainty (Tolerance vs Uncertainty)
- The relationships between Accuracy, Error, Tolerance, and Uncertainty in Calibration Results
As per JCGM 200 and 106: 2012, below are the actual definitions:
- Accuracy = closeness of agreement between a measured quantity value and a true quantity value of a measurand
- Error or measurement error = measured quantity value minus a reference quantity value
- Tolerance =difference between upper and lower tolerance limits
- Uncertainty or measurement uncertainty = non-negative parameter characterizing the dispersion of the quantity values being attributed to a measurand
First Let me present each term in a simple way that I understand (I hope for you too)
Accuracy
Accuracy is the closeness of UUC results to the STD (true) value. This ‘closeness’ is usually represented in percentage value (%) and can be shown in the same unit by converting it into an error value ( %error). The close the percentage value to ZERO (0%), the more accurate.
Accuracy is more on a qualitative description which means that it does not present an exact value.
Accuracy is equivalent to a percent error (%error). This is where the value of error will be used.
Accuracy can be calculated using the formula:
If you know the error from a specific range, you can calculate the accuracy.
Error
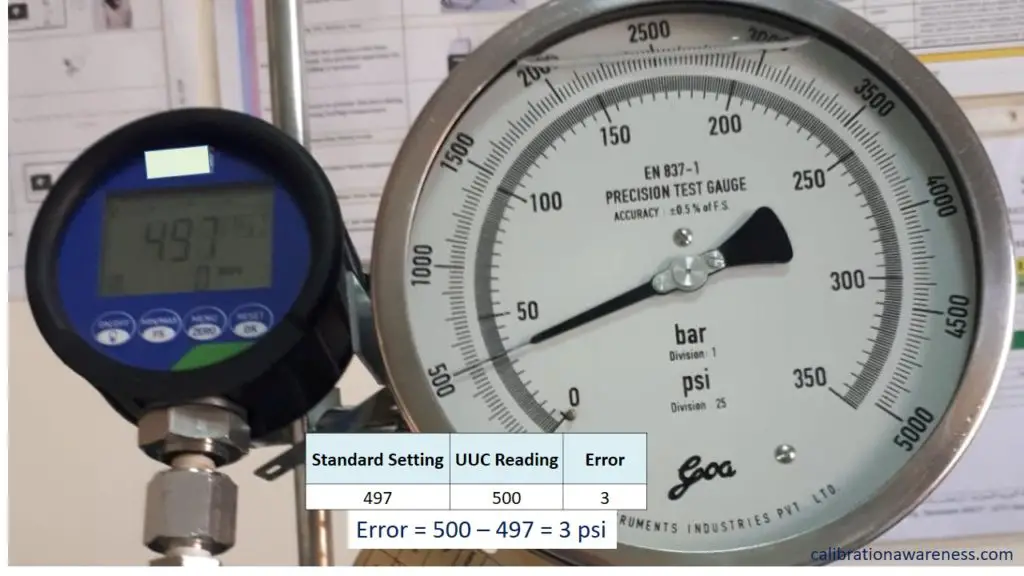
Error is simply the difference between the UUC and STD results after calibration. It has the same unit as the measured parameter.
See the below example from a calibration result based on the photo above.
Tolerance
It is the maximum error or deviation that is allowed or accepted in the design of the user for its manufactured product or components.
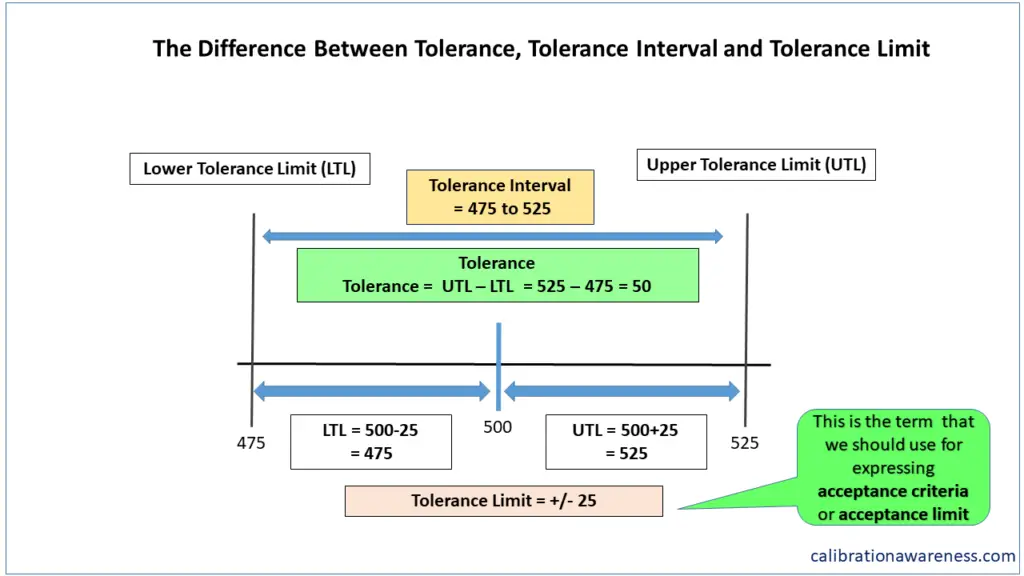
Tolerance is a range of values that is acceptable or permitted by the user from the result of the process or product measurement.
It is the permitted error that is:
- Calculated from the process design by the user
- Prescribed by regulatory bodies (based on Accuracy Class)
- Manufacturer specifications (based on Accuracy)
The formula is Upper limit – lower limit (UTL-LTL)
UTL or LTL is the value based on tolerance limits. Tolerance limits = Tolerance/2
Tolerance Limits are provided either by manufacturer or process requirements.
If we perform a measurement, the value of the tolerance limit will tell us if the measurement we have is acceptable or not.
If you know the calibration tolerance limits, it will help you answer the questions like:
1. How do you know that your measurement result is within the acceptable range?
2. Is the final product specification pass or fail?
3. Do we need to perform adjustments?
“The wider the tolerance Interval, the more product or measurement results will pass or be accepted.”
Uncertainty
I will only explain here what measurement uncertainty is, not how to calculate measurement uncertainty.
This will be in a different post because many processes are involved before we can come up with a single expanded uncertainty result. My point here is to show you the differences and relationships of uncertainty results with the other measurement terms.
Ok, let’s go…
Uncertainty or Measurement Uncertainty is defined as the quantification of doubt. There is always a doubt that exists, an error included in the final result that we do not know, therefore, there are no perfectly exact measurement results,
Why do we have uncertainty or doubt in our measurement?
Some of the main reasons why we have doubt or uncertainty in measurements are:
- Inadequate knowledge of the Effects of the environmental conditions on the measurement;
- Personal bias in reading analog instruments, an example is the resolution or smallest value that you can read.;
- inexact values of measurement standards and reference materials;
- approximations and assumptions incorporated in the measurement method and procedure;
- variations in repeated observations of the measurand under apparently identical conditions – Repeatability
You can read more under JCGM 100:2008 also known as the GUM
We do not know this error that is added to our measurement results, and therefore, we cannot remove or correct it.
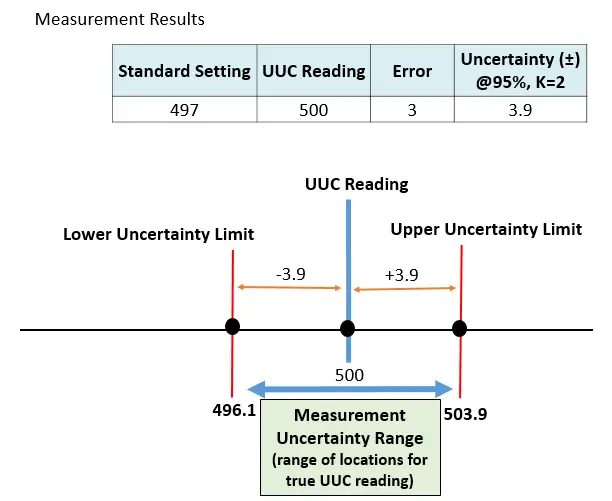
Because we cannot correct it, what we can do is to determine or estimate the range where the true value is located, this range of true value is the measurement uncertainty result.
See the below image with the calibration result as an example:
“The smaller the measurement uncertainty, the more accurate or exact our measurement results.”
Learn more about the “8 Ways on How to Use the Measurement Uncertainty” in a calibration result.
Differences Between Accuracy, Error, and Tolerance, their Relationships and Interpretations in Measurements
Accuracy Versus Error
Accuracy is for gauging how small/large the error is (a qualitative description), while the Error is the actual representation of accuracy in the same units as the reference quantity value. In other words, the error shows the quantity of accuracy in the unit of measurement used.
Accuracy and error have opposite relationships (indirectly proportional) but they are directly related to each other.
Accuracy is a qualitative form, meaning no exact value or measurement result is presented, only a presentation (usually in percentage form) of how good or bad or how far and near but no exact value, while error shows the absolute value or actual value.
In order to show the exact or absolute value, we need to use the error. The error shows the exact distance of the measurement result from the true value.
Sometimes, accuracy is presented in a quantitative form which is actually the error at a certain range. See below example based on the photo above:
Example: accuracy of 0.1% of Full scale is more accurate than a 0.5% of full scale reading.
@Full scale = 5000 psi
For 0.1% accuracy = 0. 1%*5000 = 0.001*5000 = 5 psi
For 0.5% accuracy = 0.5% *5000 = 0.005*5000 = 25 psi
From the results above, it is clear that 5 psi is a much smaller error compared to 25 psi, which means that 0.1% is more accurate than 0.5%
Accuracy Class and MPE: A Manufacturer Tolerance Value
At this point, accuracy can be used as a Tolerance based on manufacturer specifications. We call this type of accuracy as the Accuracy Class or Grade.
Then from the accuracy class, it is calculated to its equivalent error which is called the MPE (maximum permissible error) as required by standards like ASTM and ISO or manufacturer’s specifications. This is then used as the tolerance limits, and afterward, the tolerance value. See the below image presentation.
.
The Difference Between Error and Uncertainty and its Relationship in Measurement Results
Error vs Uncertainty
As we know now, Error is the difference between UUC – STD reading. The smaller the error, the more accurate the measurement results.
UUC -STD = error
Any error that we know can be corrected. From calibration certificate results, where a standard value is given, we can now determine the error. And since the error is determined, we can correct it by either adding or subtracting the correction factor which is the opposite of the error.
Correction = STD-UUC.
From the table above, we now know that the error is a +3, or more than 3, therefore, to achieve the most accurate result during use in measurement, we need to remove the excess 3, hence minus 3 (the correction value). Now, the final value of our measurement result is 497.
You can read more about the correction factor in my other post at this link >> Simple Ways to Apply Correction Factors In a Calibration Certificate-If the Exact Value You Need Is Not Given
In reality, the exact error is not known, therefore, what we can do is estimate it. This estimated error is the measurement uncertainty. A range of estimated errors.
Uncertainty is the ‘range of values’ where the true value or actual location of the measurement results (UUC) lie, while the Error is the ‘exact result’ of the difference between the UUC and STD which shows how accurate the measurement result is by showing the actual distance to the true (STD) value.
Uncertainty is a boundary within the measurement results to show the range of its actual location based on a given confidence level (95%, k=2)). See the photo below.
When the uncertainty results are included in the measurement results, we are 95% sure that the true value lies somewhere in the range of 496.1 to 503.9 psi.
The smaller the measurement uncertainty, the more accurate the result, because it shows that the range of estimated errors is very small.
The Difference Between Tolerance and Uncertainty
The Difference Between Tolerance, Error, and Uncertainty
Based on the image above, shows the difference between Tolerance and Uncertainty, such as:
- The Tolerance is the permissible value of errors that are limited by the upper and lower tolerance limits (see the description above);
- The Uncertainty shows the boundary or limits of an estimated error where the exact measurement result’s location.
Calibration tolerance limits are provided by the user, by regulatory bodies, or as per specifications while Uncertainty is calculated based on the combined errors related to the STD and UUC.
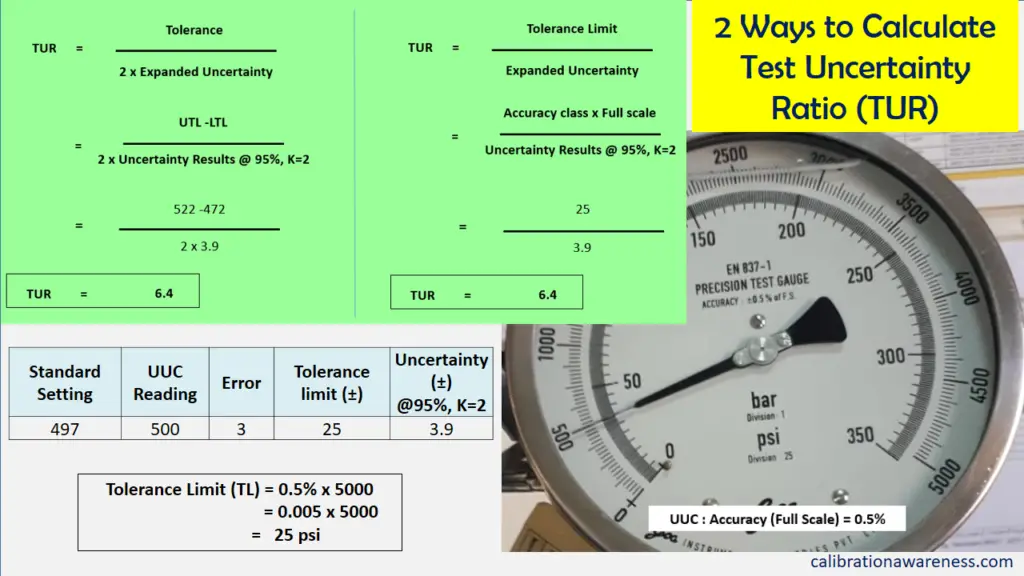
With a given Tolerance and Uncertainty, TUR (Test Uncertainty Ratio) can be calculated. A ratio of 4:1 is recommended.
The formula for TUR is equal to Tolerance / (2 x expanded uncertainty) or Tolerance Limit / Expanded Uncertainty. See the below formula and the example. The TUR for this is equal to 6.4:1
Tolerance and Uncertainty As a Basis for Decision Rule as per ISO 17025:2017
Uncertainty is used or included when determining compliance with specifications as per the requirement of ISO 17025:2017. One way to tell if a product has passed or failed based on a given tolerance, is a decision rule.
What is a Decision Rule?
As per ISO 17025:2017, clause 3.7, it is a rule that describes how measurement uncertainty is accounted for when stating conformity with a specified requirement.
One way to account for measurement uncertainty is to include it in the measurement results. We will use it as if it is a tolerance limit within the measured value. See the calculation in the photo below:
Below are the decision rules (as an example based on the image below):
- If the results of our measurements are within the tolerance indicated including the uncertainty results, then it is a ‘pass’.
- If the results of our measurements are outside the tolerance including the uncertainty results, then it is considered ‘fail’ or ‘out of tolerance’.
- If one of the uncertainty limits is outside the tolerance while the other limits are inside the tolerance limit, then it is not a pass or a fail, we call it ‘Indeterminate’. The decision now is based on the user.
The requirement is that, during the assessment of the statement of conformity, we should consider the uncertainty results and apply the above decision rule. See the below presentation to explain more:
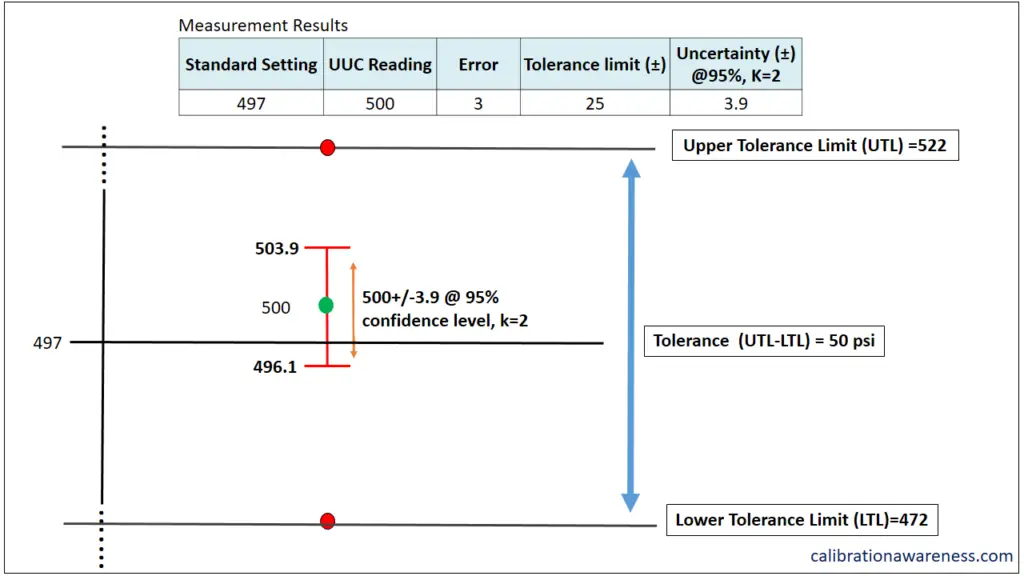
Based on the above results/presentation, it is “passed” because the result (UUC reading) including the uncertainty results is inside the tolerance limits.
For a detailed explanation regarding the ‘decision rule’ and ‘reporting statement of conformity’, I have created a separate post. Check out this link>> 5 Steps to Implement ISO 17025 Decision Rules
The Relationships Between Accuracy, Error, Tolerance, and Uncertainty – The Interpretation from a Calibration Result
Accuracy shows the degree of closeness of a measurement result to the true or reference value.
The degree of closeness from the reference value is presented in the actual value (not a percentage (%) of) through the calculated Error (UUC-STD).
The error shows how the measurement results have deviated from the true value.
While accuracy is calculated based on error and true value, Uncertainty is calculated based on the combined errors or inaccuracy of reference standards (STD) and the Unit Under Calibration (UUC).
Uncertainty shows the range where the measurement results (UUC) actually located. An estimated location of true UUC value which is limited by the confidence interval (usually @ 95%, k=2).
In order for the result to be acceptable, uncertainty results should stay within the tolerance limit.
Not in all cases uncertainty is larger than the error as presented here. But in all cases to have a sure ‘Pass’ remarks, when included in measurement results, it should stay within the tolerance limit.
Tolerance shows the permissible error of measurement results and it is the difference between the UTL and LTL (UTL-LTL)
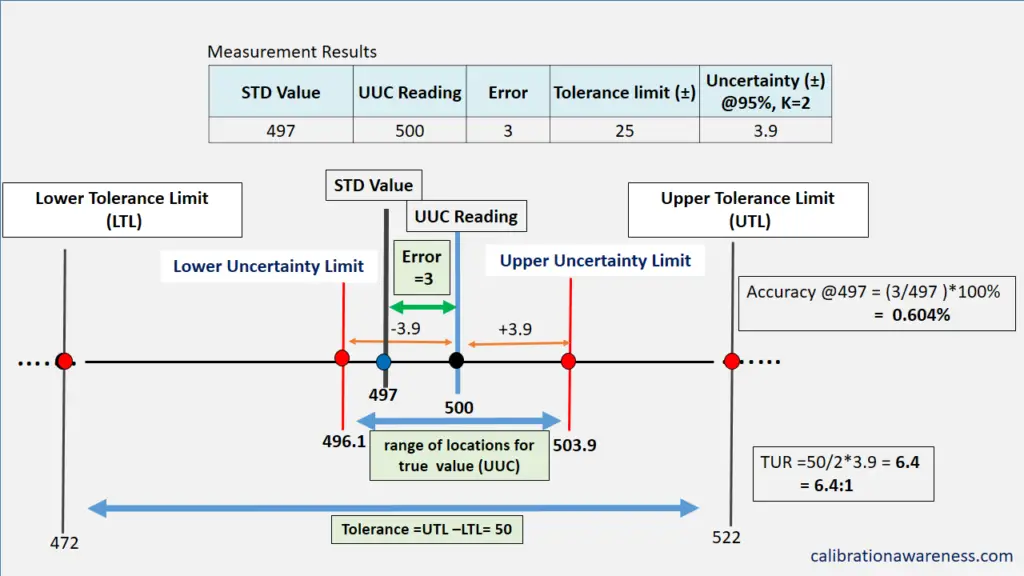
To sum it all, see the below image.
How to apply all of these in a calibration certificate? Check out my ebook at this link >> DEMYSTIFYING THE ISO/IEC 17025 CALIBRATION CERTIFICATE
Conclusion
I hope I have presented you with simple definitions and explanations regarding the differences, relationships, and interpretations of accuracy, error, tolerance, and uncertainty.
These are the most used terms when it comes to reporting calibration results, understanding and creating a calibration procedure, or just simply understanding a calibration process.
These will help us understand more about the calibration process and therefore we can have a proper and correct way of interpretations thus leading to correct measurement implementation.
In this post, I have presented the following:
- The Difference Between Accuracy and Error ( Accuracy vs Error)
- The difference between Error and Uncertainty (Error vs Uncertainty)
- The Difference between Tolerance and Uncertainty (Tolerance vs Uncertainty)
- The relationships between Accuracy, Error, Tolerance, and Uncertainty from a Calibration Results
When it comes to decision-making regarding the results of our measurements, these are the terms that we need to understand.
For the relationships between Accuracy, Precision, and Tolerance, visit my other post HERE
Please comment and share to LinkedIn
Connect with me on my Facebook page.
Best Regards,
Edwin
88 Responses
ARTURO
Good night
Thank you very much Edwin very well explained
A query when a pattern comes out not compliant can I continue to use to calibrate other instruments
edsponce
Hi Arturo,
You are welcome. I appreciate your comment.
Non-compliant means it is a fail or out of tolerance, therefore it needs adjustment and recalibration before use.
I hope I understand your question.
Thanks for reading my post.
Edwin
SHANKAR SHIVARATRI
Hi,
Thank you very much Mr.Edwin very well explained with examples.
Shankar
edsponce
Hi Shankar,
You are welcome. Thanks for reading.
Best regards,
Edwin
M. Saleh AL-Mufti
Sir,
Really,it’s very great job & helpful too with high explanation, many thanks to your efforts.
edsponce
Hi Saleh,
You are welcome. Your comment is highly appreciated.
Best regards,
Edwin
Naveed Ahmed
Thanks sir very good brief all queries in my mind now clear thanks again
edsponce
Hi Naveed,
You are welcome. I am glad that you liked it.
Best Regards,
Edwin
Vinod
Ultimate guide sir, you clear all my doubts.
Finally i want to know that as per example you have taken the tolerance is very high. if it is applied for temperature calibration and accuracy is 0.5 % of reading and range of equipment is 0 to 200 deg. cel. then we can say that tolerance is 199 to 201 deg. cel.@ 200 deg. cel.
After calibration we have found the error of 0.6 deg. cel. and expanded uncertainty is 1.3 deg. cel. then what is means for that equipment’s acceptability? Have we correlate the uncertainty with tolerance or error with tolerance for adding both (uncertainty and error). Your valuable response is awaited.
edsponce
Hi Vinod,
Thanks for the comment.
Please see the below image if it answers your concern.
The decision rule that applies for the above result is Indeterminate, meaning, it is up to the user on how he will decide into it.
Some ways to fix this are:
1. Perform adjustment if possible or use the correction factor.
2. Look for a calibration service provider with a good CMC
3. Use a reference standard with much higher accuracy
4. Implement guardbanding
I hope this answers your questions.
Edwin
Vinod
A lot of thanks, i understood it that from a calibration certificate, an equipment is acceptable if UUC Reading +/- expanded uncertainty < tolerance for that equipment. Is it right?
edsponce
Hi Vinod,
Yes, You are correct. There is no doubt that it is acceptable if the results including the uncertainty are within or < than tolerance limits. Best regards, Edwin
Y.B.Rao
Dear Mr Edwin,
With respect to the above example, what if the Uncertainty was 0.9 instead of 1.3.Would the conclusion be still the same. My points is that the error of 0.6 can be compensated. So its +/-1 Tol limit vs +/-0.9 uncertainty.
Where is the flaw in my logic.
Would be happy to know.
Thanks
Rao
edsponce
Hi Rao,
I believe you are referring on the example and image under Mr. Vinod comments.
There is no flaw in your logic, you have a good point. It is just a matter of a lab perspective and a user perspective.
As a lab that provides the results, the conclusion will still be the same, because error will not be compensated where uncertainty still stays outside the limit. It will be reported only as it is and the decision is still “indeterminate”.
But as a user and since the decision is “Indeterminate”, you have the authority to perform an adjustment by compensating or correcting the error, then come up with the final decision as “Pass” since the 0.9 uncertainty will now stay inside the tolerance limit of +/-1.
I hope this helps,
Edwin
P Gooljar
Sir,
I work as Analytical Chemist in a Government Food Testing Laboratory and we are in the process of accreditation to17025:2017. Your notes and explanation are very helpful.especially when in doubt.
As we are not a calibration laboratory, is it possible to calibrate or verify glasswares (Volumetric flask) and electronic pipettors in our laboratory? For Volumetric flask we have the batch certificates when purchased and for pipettors we have certificate but not sure whether it is a calibration certificate or traceability certificate.Also whether it will be a non conformance during auditing process 17025:2017. Please comment and if verification or calibration needed, how it can be carried out.
edsponce
Hi P Gooljar,
Thank you for your time in reading my post. I appreciate that you learn from it.
As per your concern, Yes it is possible, you only need a good reference standard, acceptable calibration method and evidence of training on this particular activity. These are some of the main requirements that will be checked if you are applying for accreditation as per ISO 17025:2017 Standards.
If the calibration of your glasswares and pipettors are not yet expired and performed by an accredited laboratory, then I do not see any problem. You just need to perform a review in these certificates to ensure that the results are all within your tolerances or specifications.
If you want to perform calibration or verification, you can use or follow the calibration procedure or method as per ISO 4787 (or other related standards). I suggest you buy this standard document and follow the specified requirements and procedures. One method of calibration that is presented in ISO 4787 is the use of a digital balance as the reference standard, it is the determination of volume through mass displayed in the balance.
I hope this helps,
Edwin
David Potter
Excellent job building the explanation from basic to the full integration of all the terms. Very nicely done!
edsponce
Hi David,
Thank you for the feedback. I appreciate it.
Thanks and regards,
Edwin
Amiel
Hi Sir Edwin,
I am a little bit confused with the term ‘measurand’. Is the measurand the standard or the unit under test? thank you!
edsponce
Hi Amiel,
The measurand is the quantity measured in a unit under test (UUT). For example, the Fluid pressure (in psi) in a pressure gauge. The ‘pressure’ is the measured quantity in the pressure gauge that we need to measure and therefore known as measurand.
Best regard,
Edwin
manuelmruiz@yahoo.com
Make a quick google search of what measurand means. It will tell you that the measurand is the QUANTITY subject to measurement. It is neither the standard nor the unit under test. Take this analogy as an example: temperature is the measurand while the thermometer is the measuring instrument. Do not make the mistake of calling the instrument as the measurand.
edsponce
Hi Manuel,
Thank you for the advise and clarifications. I will edit my terms to align with the exact meaning.
Cheers!
Best regards,
Edwin
Amiel
Thank you very much Sir Edwin. I have learned a lot from you and will share these learnings to my colleagues. Again, thank you very much po
edsponce
Sir Amiel,
You are welcome. Thank you for sharing.
Best regards,
Edwin
Amine Khadija
Thank you very much Mr Edwin For your efforts ..
edsponce
Hi Amine,
You are welcome. I am glad you liked it.
Best regards,
Edwin
Jesse Tsai
Thank you for sharing, well explained.
edsponce
You are welcome Jesse, Thanks for reading my post.
Edwin
Meliza
Sir ,
Can you tell more how to interpret this calibration data I have, it says my balance has Limit of performance of +/- 0.02g and Uncertainty of Weighing of +/- 0.0093g. Therefore how should I interpret an actual measurement from my instrument?
thank you
edsponce
Hi Meliza,
The limit of performance is the measure of balance capability at a specified range or user range, in short, this is the maximum error that you can expect the balance can give at any time.
This means that for example, you have a user range of 10g to 30g. At this user range, the expected error will be the reading plus and minus 0.02g.
What you can do is to compare this error with balance specifications (accuracy class) or your process tolerance to see if it is acceptable or not. If the results are outside your tolerance then you need to recalibrate or change the balance.
To explain further, below are some examples in using the results, we will use 25g as the specific range:
We will assume a tolerance limit for the balance of +/- 0.1g
1. For example in using the performance limit to 25g range:
>> at 25 grams nominal range, the expected UUC reading 24.98 to 25.02 (25+/-0.02). It is within the 25+/-0.1g (24.9 to 25.1) tolerance limit. Therefore it is a passed. See below chart for 25.02g reading.
2. For example in using the measurement uncertainty:
>> at 25.02 grams UUC reading, we are 95% confident that the true value or true reading of the UUC falls within the range of 25.0107 to 25.0293 (25.02+/-0.0093)- The measurement uncertainty range shows the possible locations of the true value of the UUC result. See the chart below, the smaller the uncertainty means the more accurate the results.
3. This is another implementation, this is applicable if you require it from the lab as it applies to your procedure. Using the measurement uncertainty to be included in your decision rule for a pass or fail results. See below example with the chart.
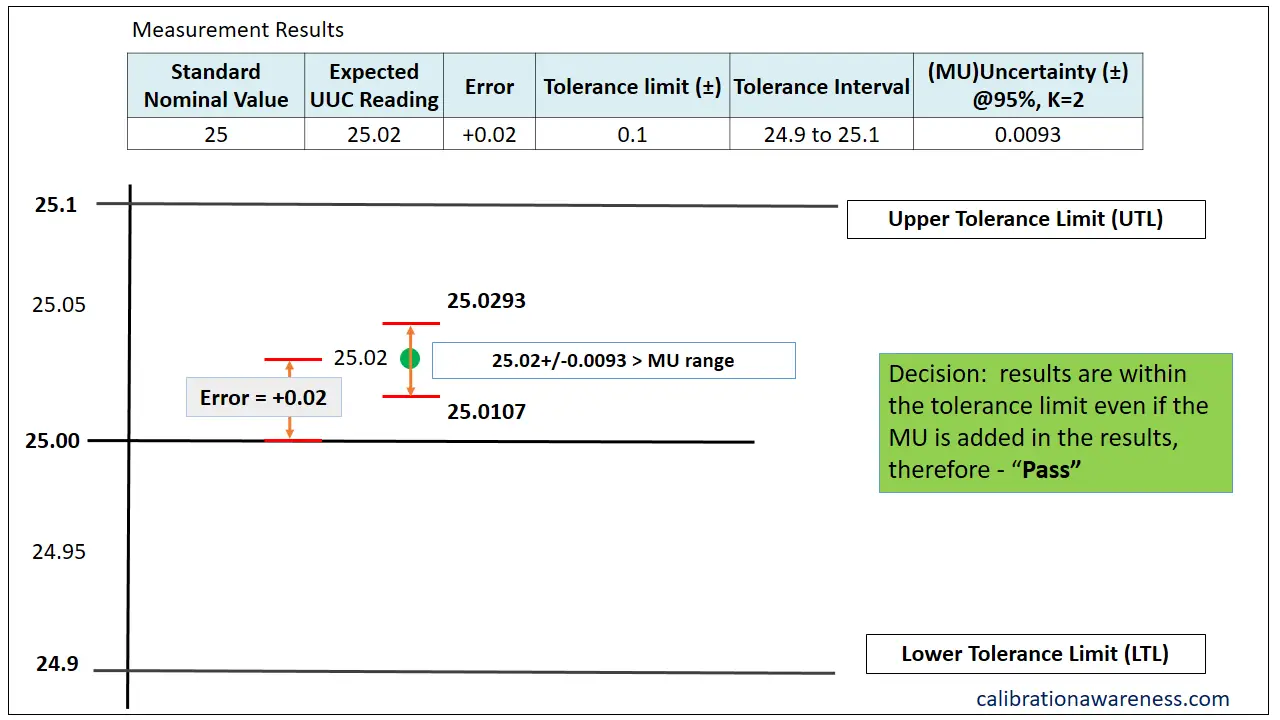
If you do not use this decision rule where you include the uncertainty results in the UUC results to determine a pass or fail status, then just stick to the number 1 above. The same principle with the chart, just remove the uncertainty range or results.
I hope this helps,
Edwin
divya
Dear edwin,
Pls comment on least count and resolution
edsponce
Hi Divya,
Do you have a specific questions or concerns about resolution?
Edwin
divya
Dear Edwin,
I am confused with least count and resolution…both are same or not?
Also when we call for calibration for a particular equipment what all things we should mention in our call for calibration and look into for calibration from external agency.
Divya
edsponce
Hi Divya,
For simplicity, yes they are the same.
Least count is the smallest measurable value of an instrument.
Resolution is the smallest change that an instrument can display, which is the least count.
So basically, they are the same at most usage. Whatever the least count is, the display will show it to you as the resolution.
Resolution is best explained in the digital display. During the measurement activity and when the display is changing, the smallest change you can see or observe is the resolution.
During measurement, it is easy to understand if you call it resolution, it means the smallest change you can observe in the instrument display.
In your next concern. I believe you are referring to what requirements or criteria to look for in a calibration lab you want to use.
These are what I can recommend.
1. You should look for an accredited lab under ISO 17025:2017. Check their accreditation certificate and their scope of accreditation and see to it that your instrument parameter is listed there. This will ensure good traceability, and procedure used are assessed by auditors from the accreditation bodies.
2. Then discuss with them your requirements like tolerance and uncertainty. They should agree with your requirements if they can do it. If not, they should inform you clearly.
3. Make sure that the certificate they will issue is an ISO 17025 calibration certificate compliant.
I hope this helps,
Edwin
Sagar Mohite
hi sir , can u tell me how to find uncertinity.
edsponce
Hi Sagar,
Measurement uncertianty can be found on the calibration certificate from an accredited laboratory. You can use this directly. I have an example in my other post in this link >> decision rule.
If you want to learn how to calculate measurement uncertianty, i have read a good book. Checxk this out : A Beginner’s Guideto Uncertainty of Measurement by Stephanie Bell.
I hope this helps,
Edwin
sagar mohite
Thank you very much
edsponce
Hi Sagar,
You are welcome. Thanks for visiting my site.
Edwin
Kanhaiya
Sir,
A lot of Thanks for understanding of so many concepts.
I have a question when in our calibration certificate tolerance is not given and only least count is mentioned.
In that case how tolerance is calculated ? Please clear my doubt.
Regards,
Kanhaiya
edsponce
Hi Kanhaiya,
You are welcome.
Tolerance is usually based on your process. In any case, you need to check the manufacturer specifications and look for the accuracy part. it is already calculated by the manufacturer.
If you approve it, you can use the measurement uncertainty results in the calibration certificate. If you see that it is very small or strict, you can multiply it by 2.
Depending on the instrument, other tolerance limit, which is know as mpe (maximum permissible error) is also recommended by an recognize organization, like ASTM, OIML or ISO.
Can you show me what type of instrument you are referring to?
Thanks and regards,
Edwin
era
hi want to ask about how to apply decision rule to our testing parameter for sewerage sample?
for example for ammonia test, our uncertainty is +- 4. Our testing result is 6.How to get tolerance? is it from our regulator std? If let say my regulator acceptable result is 10.
So how to apply decision rule..Please advise.TQ
edsponce
Hi Era,
To define a conformance to specification, you need the following:
1. The measured value
2. The reference standard value – the nominal or target value you want
3. The tolerance limit of the sample or UUT
4. Measurement uncertainty (MU).
The tolerance limit you need is the tolerance limit of the sample – the ammonia in your case.
Once you have this, the next is determine the decision rule, for example: pass if measured value +/- MU is within the tolerance limit, fail if measured value +/- MU is outside the tolerance limit.
I have presented this in full detail in this link>> decision rule
I hope this helps,
Edwin
Ulik
Hi,
I want to ask You in which way I should use CF. For instance: UUC = 100 Error +10 and UUC 1000 Error -200, how to establish error for instance for UUC = 400, UUC=800 ? Can You help me in this matter ? Maybe You have any links about it to share ?
Best Regards,
Ulik
edsponce
Hi Ulik,
Errors are only an estimate for a given range, therefore, there are 3 methods that I can share with you that I always use.
First is to use averaging method. This is to add 2 errors between 2 ranges. This is appropriate to use when 2 measurement range is close to each other.
Example:
@100 , error is 2
@200 = ?
@ 400, error is 3
If you want to get the error at 200, just add 2 and 3 and get the average, which is equal to 2.5
Second, You can choose the one that is nearer to the value of your test point. Same example as above, 2 is nearer to 100, so use the correction factor (CF) of 100 for 200 range.
The Third is by using the Linear Interpolation, this requires a formula. I’ve seen a lot of examples in Google (just type linear interpolation). This is determining the value in between of ranges where error and correction factor is increasing linearly with range.
I hope this helps,
Edwin
Mukesh Budaniya
Hi SIr, My instrument GRIMM 11-A showing Tolerance ranges +- 3 % > = 500Particle /Litre
How can I convert it into % uncertainty?
edsponce
Hi Mukesh,
The tolerance limit cannot be converted to uncertainty. Uncertainty or measurement uncertainty has a special process or procedure of calculation.
The +/- 3% is already the accuracy or the % error. You need to check the calibration report for the measurement uncertainty results then we can calculate it from there.
Best regards,
Edwin
Rohum
Hi Edwin,
Thank you very much for the great posts. I am trying to select some tools. I would appreciate it if you could take a moment to help me with that.
There is a mechanism which requires the screws to be tightened to 5 cNm. The design tolerance is ± 10% (4.5 – 5.5 cNm). If we want to select a torque screwdriver for tightening the screws and a torque transducer for calibrating the torque screwdriver, how accurate should the torque screwdriver and the transducer be?
What I found online is that the transducer should be at least 4 time more accurate than the screwdriver. But I could not find any rules/standard for selecting the torque screwdriver based on the design tolerance.
Many thanks,
Rohum
edsponce
Hi Rohum,
The “4 times more accurate” requirement is already the rule that you need to follow since this is the recommended accuracy ratio. You can check ISO 6789 for this.
The next move now is how to determine that your transducer is 4 times more accurate than the torque screwdriver.
These are my recommendations (this is the simplest):
1. We will follow the recommended 4:1 accuracy ratio.
2. Since you already know your requirements which 5± 10%, perform a little calculation.
3. Divide 10% by 4 = 2.5%.
4. 2.5% means that the accuracy meets the 4:1 accuracy ratio for a torque screwdriver. Look for a torque screwdriver with this range. You can use directly a torque screwdriver with the 10% accuracy rating but 4 times more accurate is better because you have more allowances for any unexpected errors.
5. Now, next to consider is the Transducer. The same principle applies.
6. Divide the 2.5% by 4, which is equal to 0.625%.
7. With this rating, look for a transducer that is equal to or less than 0.625% specifications in order to meet the 4:1 accuracy ratio.
There are other methods in which you will use the TUR, where you will use the tolerance limit of the torque screwdriver, and the measurement uncertainty of the transducer, but this method requires that your instrument is calibrated with a measurement uncertainty result. Once you have the measurement uncertainty, divide the tolerance limit with the expanded measurement uncertainty. The result should be more than 4. Check out my example about TUR above.
I hope this helps,
Edwin
Rohum
Thank you very much Edwin, for taking the time to answer my question. Very helpful.
edsponce
Hi Rohum,
You are welcome. Happy to help.
Edwin
Abhishek
Hi Edwin,
Nice information that you have put up, thank you for that.
I have a doubt regarding MPE. So, if in a calibration certificate both Tolerance and variance is mentioned, then do we add tolerance and variance to arrive at the MPE?
On the other hand, some certificates reflect uncertainty and error, in such case do we add uncertainty and error to arrive at the MPE?
Thank you for your reply.
Regards
Abhishek
edsponce
Hi Abhishek,
I am not sure regarding the variance because this is not usually reported in a calibration certificate. MPE or tolerance limit is the one reported if requested by the user. This is mostly based on manufacturer specifications or provided by the user.
As the user, you can recalculate MPE where you may include measurement uncertainty with it if this is what you see fit for your process.
About error and uncertainty, what we add is the measurement uncertainty and the measured value and then we compare it to the tolerance. This interpretation falls under ‘decision rule’ in which I have explained it in detail in this link>>decision rule
Measurement uncertainty can be added to come up with an MPE but not an error. The error should be corrected or compensated. When you know the error, you just need to correct it before using the affected instrument. You can correct the error by performing adjustments or using the correction factor.
I hope this helps, thank you for reading my post.
Edwin
Syaiful
Hi Edwin,
Thanks for the post. I would like to clarify something. Now i have a PT100 Class B sensor. I am trying to calculate my uncertainty of measurement but the only information I have is the tolerance. May i know how do I use the tolerance as my uncertainty for the PT100. For eg, uncertainty is 0.55C @ -50C and 0.3C @ 0C. May i know what is the uncertainty @ -40C? Hope to hear from you soon.
Syaiful
edsponce
Hi Syaiful,
Look for the accuracy of the Class B and use that as the contributor for your uncertainty.
But if you want to get a value in between a result for your uncertainty, there are 3 things you can do:
1. You can use linear interpolation.
2. You can use the average of the results.( (0.55+0.3)/2)
3. Or just use the value nearer to your test point. In your case choose 0.55 for -50, which is nearer to -40.
I hope this helps.
Edwin
Syaiful
Hi Edwin,
Thanks for the post. I would like to clarify something. Now i have a PT100 Class B sensor. I am trying to calculate my uncertainty of measurement but the only information I have is the tolerance by IEC 751-95 Standard. May i know how do I use the tolerance as my accuracy for the PT100. For eg, tolerance is 0.55C @ -50C and 0.3C @ 0C. May i know what is the accuracy @ -40C? Or is there a specific accuracy for the pt100 which I can use for the uncertainty measurement? Hope to hear from you soon.
Syaiful
edsponce
Hi Syaiful,
To calculate accuracy, you need the standard value and the UUC value. Use the formula that I have presented above. Accuracy = (UUC Reading-Standard reading)/Standard readingx100%
Accuracy can be based on full scale (or span) reading or as per test point. For example: @-50C test point with tolerance limit of 0.55, accuracy =0.55/50*100% = 1.1%; Accuracy based on fullscale of 200C with a tolerance limit of 0.55, accuracy= 0.55/200*100% =0.275%
For Specific accuracy, check the manufacturer specifications on its manual or other standards like ASTM.
I hope this helps, thanks for reading my post.
Edwin
Jayson L
Hi Sir Edwin,
Thanks for your post.
I have some questions, hopefully you can guide me.
I do have Pressure Calibrator (Master/reference standard) with manufacturer accuracy of 0.02% of reading. How do i interpret this if my pressure calibrator is suitable against our field instrument with a calibration range 1.000 to 3.000 bar, calibration tolerance 0.20 bar.
The full scale value of field pressure transmitter is from -1.000 to 10 bar.
thank you,
Jayson
edsponce
Hi Jayson,
You are welcome.
One of the main requirements for pressure calibrators is to have at least a 4:1 accuracy ratio. I will be using the TUR (Test Uncertainty Ratio) for this,
This is how I will do it.
We do not need the specification ‘0.02% of reading’, what we need is the measurement uncertainty reported in the calibration certificate of the Pressure calibrator.
Once you have that uncertainty value, you can now use the formula for TUR which is TUR=tolerance limit/measurement uncertainty (0.20/uncertainty). You should have a value of >4 for the calibrator to be suitable (see my example above).
You can use the manufacturer accuracy of ‘0.02% of reading’ to calculate TUR with the same principle but the measurement uncertainty is more advisable since more error contributors are considered.
I hope this helps,
Edwin
Rob
Good Morning,
Thank you for this post. Your article was very helpful.
edsponce
Hi Rob,
You are welcome.
Thanks for reading my posts.
Edwin
Sabib
Hello dear,
I face a problem to calibrate the differential pressure, capacity (0-60) pascal, how I calculate tolerance & acceptance criteria of (0-60) pascal device
edsponce
Hi Sabib,
If you are performing a calibration, or verifying a calibration result, the basis for Tolerance limit or acceptance criteria is usually the manufacturer specifications if you do not have your own acceptance criteria from your process.
I have created a separate post about this, check out in this link >> 3 WAYS TO DETERMINE THE TOLERANCE OF INSTRUMENTS WITH A CALIBRATION CERTIFICATE – If the Tolerance is Not Given
I hope this helps,
Edwin
sridhar
Hi Edwin,
It is not clear as to how 3.9 is arrived at given K=2 & 95% confidence.
Sridhar
edsponce
Hi Sridhar,
3.9 is just an example of a measurement uncertainty result. Measurement uncertainty calculation is a long process that needs a separate subject for you to understand. But for simplicity, this is from a TYPE A -repeatability and TYPE B (resolution of std and UUT, uncertainty of calibrator, hysteresis, stability) contributor. All these contributors were combined and multiplied by K=2 to achieve the final results of 3.9
Thanks for reading.
Edwin
wajdi
thank you Mr.Edwin
long live your hand and this time it was more clarification clear for error & Accuracy and and on so
edsponce
Hi Wajdi,
You are welcome. Happy to know.
Thanks for the feedback.
Best regards,
Edwin
Divya
Dear Edwin
We have balance with the following
Range. 0 to 15 kg
Leat count. 0.5 gm
One of our working range is 0 to 3 kg
In the specifications for test,the requirement is mentioned as balance readable and accurate to 0.5 gm.
When we did the calibration ,the error observed in at 15 kg is 11g…and at 1kg is 1 g and it is increasing. The uncertainity in calibration certificate is 0.723.
How will be check if we require any adjustments
edsponce
Hi Divya,
Thanks for visiting my site.
You have a big error in your balance. But before you perform adjustment, you should determine first your tolerance limit. If the error is greater than your set tolerance limit, then it best to perform the adjustment.
As per the specifications, the accuracy is 0.5 grams, if you use this as your tolerance limit, then it is very clear that the balance is already out of specs, therefore, needs an adjustment. You also need recalibration since you have a linearity problem because of the increasing error that is too much when compared to its accuracy.
To make your results realistic, you can include the measurement uncertainty in the final reading every time you make the verification but this will make it worst, your error will become more larger.
If you want to try other methods to determine the tolerance limit, you may visit the other post that I believe will help you. Check out this link >> balance tolerance limit
I hope this helps,
Edwin
Sue
Hi.
I am end user.
For example, i want to calibrate thermometer at 100 degreeC. Tolerance allow is +-2degreeC (98 to 102degree). Is it correct if I mentioned the accuracy is +-2 degreeC? Is the usage of unit degreeC correct?
edsponce
Hi Sue,
+/-2 ºC is the provided tolerance. It is not the same with accuracy. Tolerance is the acceptable deviations as per process design or instrument design while accuracy is a qualitative value to determine how far or close the measured value to the true value, usually in percentage (%) unit.
Basing it on the example you gave, 100 ºC is the true value, then determine a measured value, say 101 ºC.
Using the formula I have provided above, Accuracy =(Error/True Value)x100%, [(101-100)/100]x100% =0.01 or 1%.
Therefore, the accuracy = 0.01 = 1%.. the smaller the value, the more accurate the measurement result.
It is more correct to use the term ‘degree Celsius’ or the unit ‘ºC’.
Thanks for reading my post.
Edwin
Juan Ruiz
Great Post thanks for your contribution. One question:
I have a Calibrated Vernier Caliper with the following results:
Nomimal Thickness of Calibration block: 5.90551 in
UCC reading: 5.9060 in
STD reading: 5.9055 in
Calibration Results:
Error: 0.0005 in
Uncertainity: 0.0014 in
Equipment Range: 0-12 in
Resolution: 0.001 in
Accuracy: 0.001 in (Manufacturer Data)
As you explained
LTL: 5.8935 in
UTL: 5.9175 in
STD reading: 5.9060
UCC reading: 5.9055
Lower Uncertainty Limit: 5.9041 in
Upper Uncertainty Limit: 5.9069 in
the UCC reading is on the measurement range.
My question is if this is enought to use the caliper to take mesures with +/- 0.0005 in tolerance
because if i take the error plus the uncertainty the value goes into: 0.0019 in and i cannot use the caliper.
Thanks in advance
edsponce
Hi Juan,
NO, you cannot use the caliper with a resolution and accuracy of 0.001 to measure a device with a =/-0.0005 tolerance. The tolerance limit is too small, the caliper cannot display that value.
Check your tolerance limit or Replace the caliper with a more higher accuracy one and look for a lab with a much smaller uncertainty.
Thanks for reading,
Edwin
M.Hassen
Thank you sir!
If we took 10 different points from the range (UUC) and we get Pass in nine points and Fail in one point, which one we must choose as a final conclusion? Passed or Failed?
edsponce
Hi Hassneer,
You should decide based on every single range you identified. It passed from 1 to 9 but failed at number 10. This means that you can still use the UUC in the range of 1 to 9. Unless you are referring to 10 repeated readings wherein you need to get the ‘average reading’ before you decide.
Thanks for reading my posts.
Edwin
Sourav
Hi
I have external micrometre of 25 mm and LC .01 mm
The tolerance as per standard is +/- 5 micron for 25 mm range. The uncertainty of micrometre is +/-9.9 micron. How to interpret result as per decision rule. Please reply.
edsponce
Hi Sourav,
there is a problem with your results, it will fail once you add the uncertainty results because the uncertainty is larger than the tolerance. If you are using the decision rule, you need to add (or subtract) the measurement uncertainty in the UUT reading, then check if it is within the tolerance limit. Check out my other post in the link below where I explained this with an example.
Decision Rule
Thanks for visiting my site.
Edwin
Macleans
Hi
Thank you for the valuable article.
I would like to find out if you should apply the correction factor on measurements if on the calibration report an instrument has correction factor lower than the uncertainty of measurement.
edsponce
Hello Mcleans,
Correction factor is used if you want to attain the most accurate results by compensating the error. Therefore, regardless of the value of measurement uncertainty, you should apply it.
Measurement uncertainty is not the basis if you apply correction or not. Measurement uncertainty varies for every procedure and calibration provider.
The basis when to apply a correction factor is in the accuracy requirement you need. Using a correction factor is a form of adjustment, some instruments do not need adjustment or correction if for example you have a policy that when an error is within 25% of the tolerance limit or if it is still within the allowable limit.
I hope this helps,
Thanks for reading my posts.
Edwin
Sinush
Hi, what if we don’t have range, instead of 150 – 200, we set only 170, then how to calculate the tolerance?
edsponce
Hi Sinush,
You can use “linear Interpolation” to determine the exact value you want. Check out my other post on how to use this method in this link, see item #4 >> linear interpolation
I hope this helps,
Edwin
Anne
Good day. I have read your post. I want to know if the thermohygrometer we’re using is “PASS or FAIL” based in calibration certificate. These are the details:
Applied Value (STD): 23 degrees C
Indicated Value (UUT): 24.9
Correction: -1.90 or max error of +1.9 degrees C
Measurement Uncertainty:
Temperature: +1.0 degrees C, coverage factor (k)=1.96
And also, if the temperature reading of the unit is 28.9, we should record 30.8 or 27.0? How would I know the accuracy? I tried to compute the accuracy by the following:
Accuracy = 30.8 – 28.9 / 28.9
= 0.065 degrees Celsius or 6.57%????
Are my computation and interpretation are correct?
I am confused now. Appreciate your reply and thank you in advance
Thank you.
Anne
edsponce
Hi Anne,
Good day!
When it comes to correction, it is just the opposite of error, which is STD-UUT = 23-24.9=-1.9 degree C. -1.9 is the correction factor at 23 deg C test point of the UUC.
In order to determine if it is a “Pass or a Fail”, we need the tolerance limit of the UUT. Unfortunately, we cannot use the accuracy as per the calculation you just shared. The manufacturer used different data in calculating the accuracy of their instrument, therefore it is not the same with the calculations you just made or what I presented in this post.
The tolerance limit can be calculated based on the accuracy of the UUT that is given by the manufacturer that can be seen on the UUT specification or from a published guide or international standard such as ASTM or ISO. What I can recommend is to check the manufacturer manual for the tolerance limit or if there is accuracy specifications provided. If you want, you can share the make and model so that I can help you check the accuracy of your UUT.
Once you have the accuracy, then you can now determine or verify if your UUT has passed or failed the calibration. To use the measurement uncertainty to determine a Pass or Fail, you can check my other post on decision rule in this link >> decision rule.
I hope this helps,
Edwin.
Anne
Hi Edwin,
Thank you for your reply. These are the details of our UUT:
Model: HEM 117; Part#NT-311; Manufacturer: Pro’sKit
Upon checking the manual, these are the specifications given:
SPECIFICATION:
Temperature Range:
Indoor:-10℃~+50℃ ± 1℃ (+14℉ ~ +122℉ ±1.8℉)
Outdoor: -50℃~+70℃ ± 1℃ (-58℉ ~ +158℉±1.8℉) (for NT-312 only, applicable for outdoor temperature sensor.)
Temperature resolution: 0.1℃
Humidity Range: indoor 20% ~ 90% RH ±5%(When the humidity < 20%RH, display 10%RH directly.) Humidity resolution: 1%
Power-supply: 1.5V (AAA size) x 1
Thank you very much.
Regards,
Anne
edsponce
Hi Anne,
Based on the specifications that you gave, the tolerance limit for the temperature is ± 1℃ and ±5% for the humidity.
The UUT reading should be within these limits. Since you have 1.9℃ error, it is already a “failed”. This is where you need to use the correction to compensate the large error.
I hope this helps
Best regards,
Edwin
hemal
For a newly purchased Vernier Caliper its shows that accuracy= +/- 0.04 than can it be considered its error?
edsponce
Hi Hemal,
Accuracy cannot be considered as error, based on the presentation above, they have different formula. The accuracy you shared is the tolerance limit.
If you want to determine its error, you need to have it calibrated or check its calibration certificate.
I hope this helps,
Edwin
hemal
Thank You Sir.
I have one more doubt which is as mentioned below
if I am using a dial gauge(Range=1.0mm , Least Count=0.001mm) for a dimension D=24.0 + 0.035 mm than up to what error can my instrument be accepted. How to decide the acceptance criteria for my instrument.
edsponce
Hi Hermal,
Regarding acceptance criteria of instrument, you should always check the manufacturer specifications. They usually published the international standard used. You may check JIS B 7533 and/or BS EN ISO 14978 or other similar standards for a dial indicators.
I hope this helps,
Edwin